Introduction
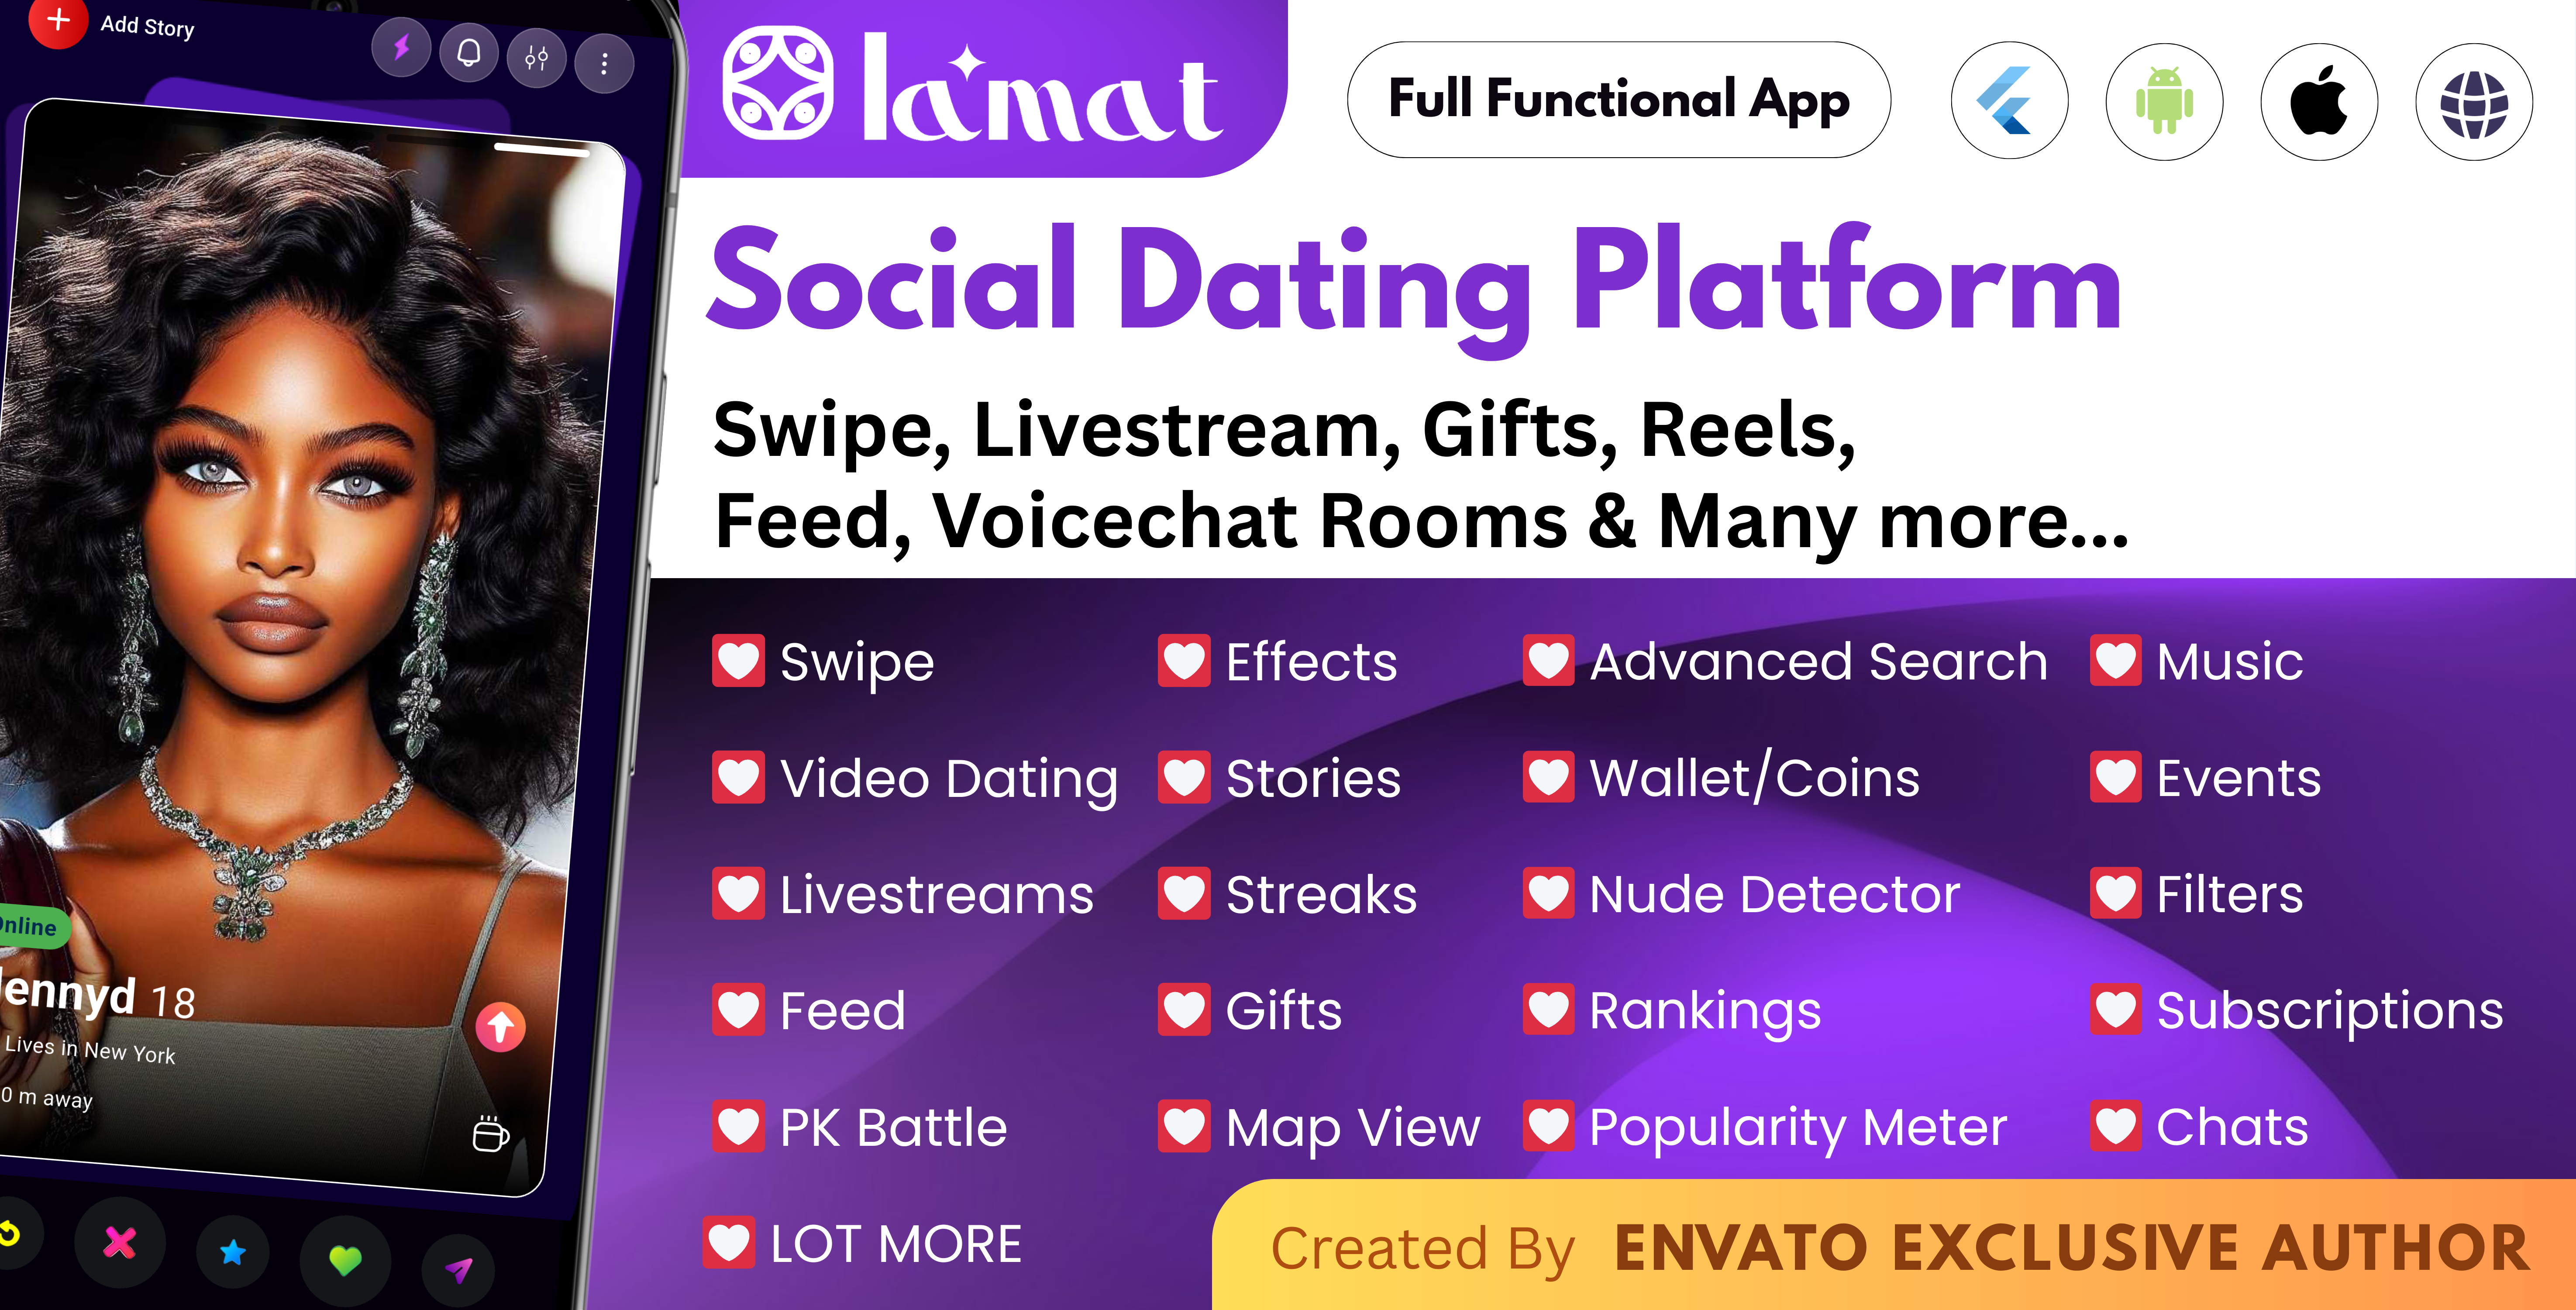
Lamat is a modern dating application built with Flutter (cross-platform Android, iOS, Web) and a Laravel 11 PHP backend. It includes a powerful REST API backend with 150+ endpoints, an admin dashboard, real-time messaging, voice and video calls, and a complete monetization system. Designed to launch all in one social dating solution.
Screenshots
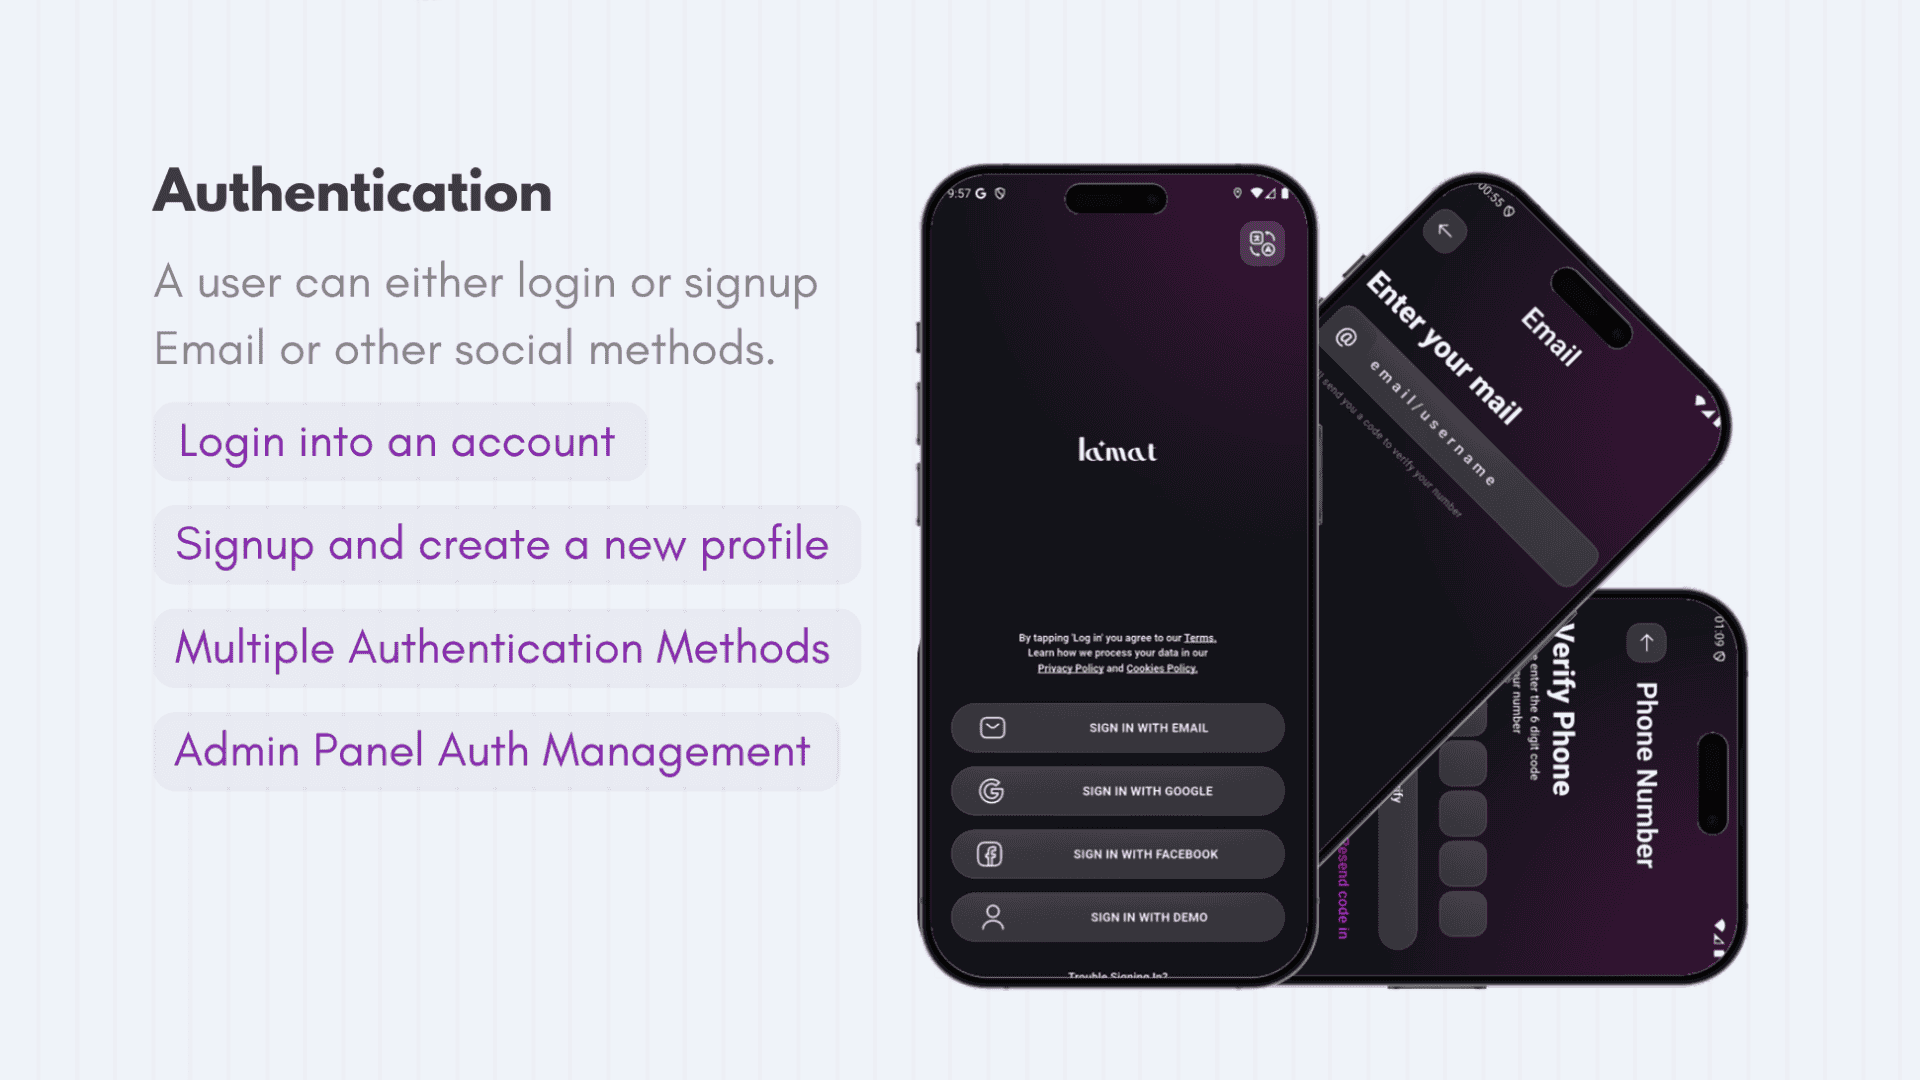
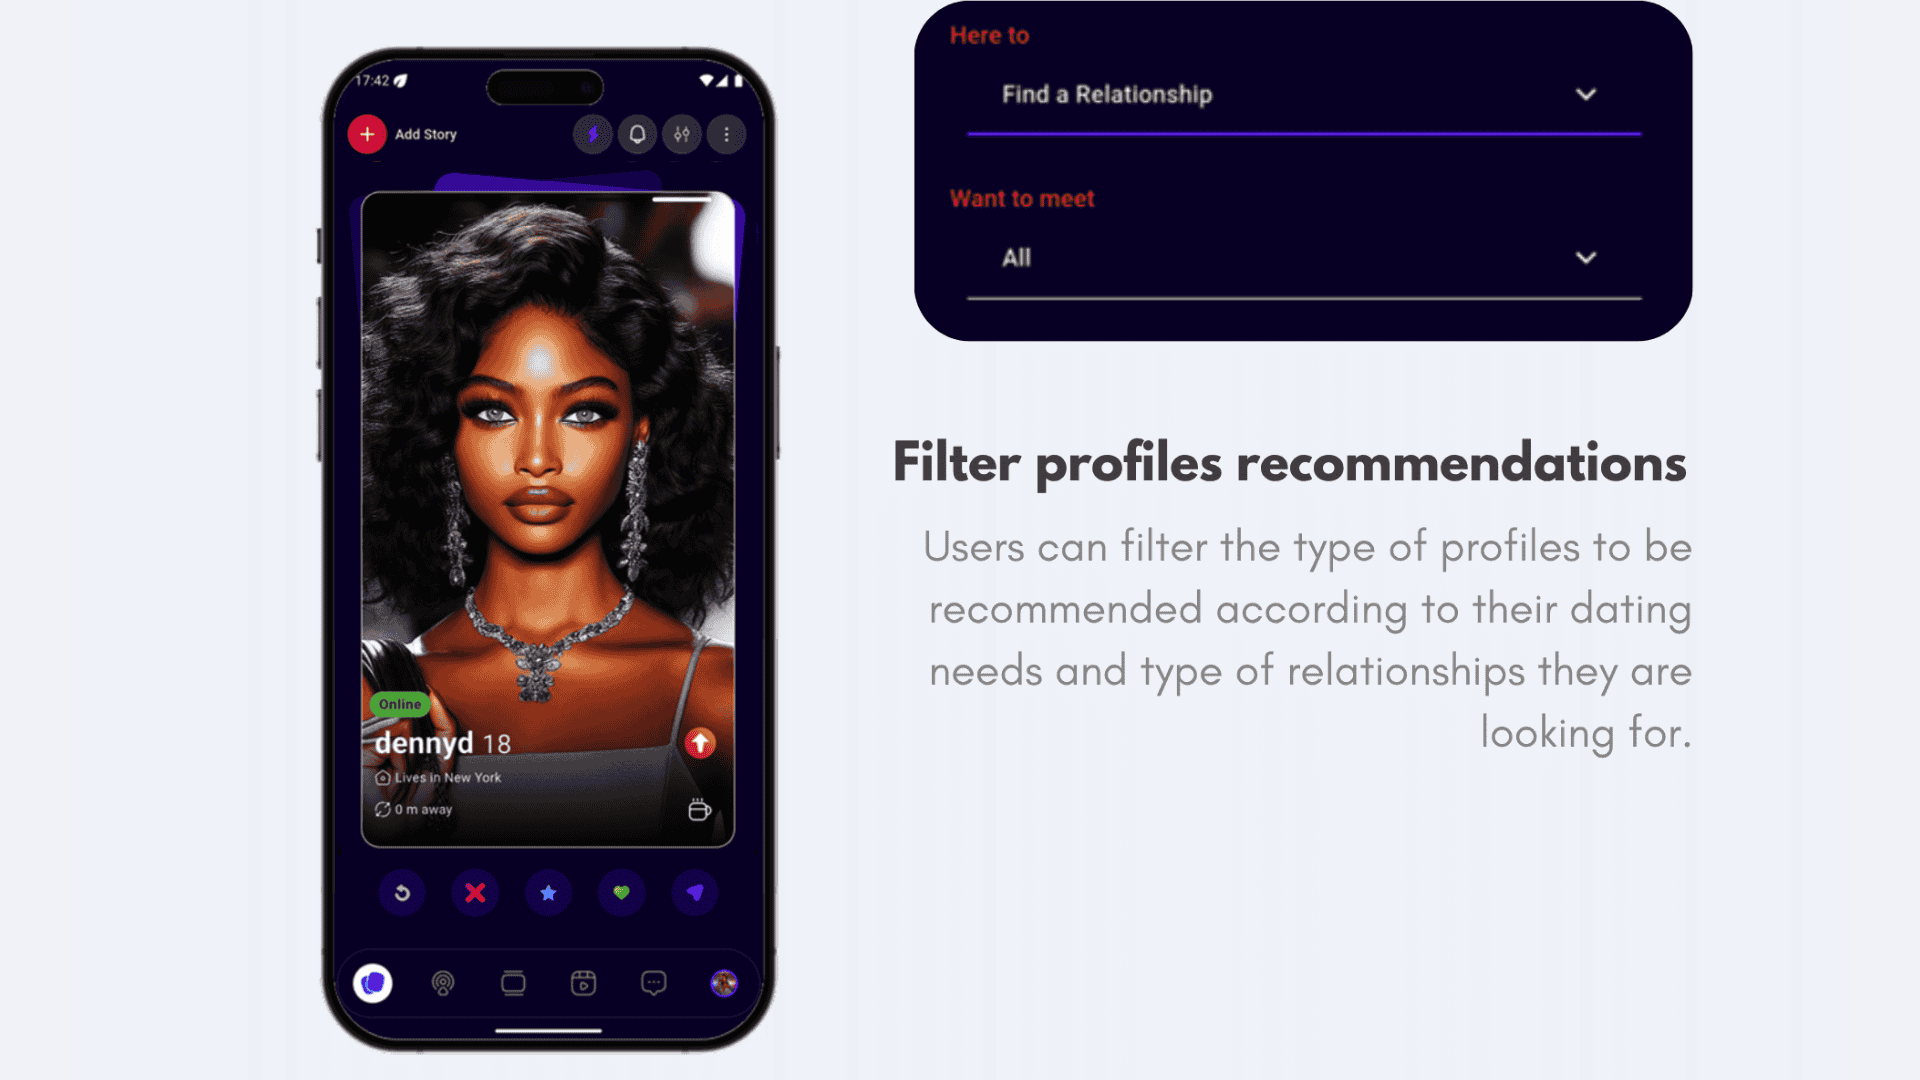
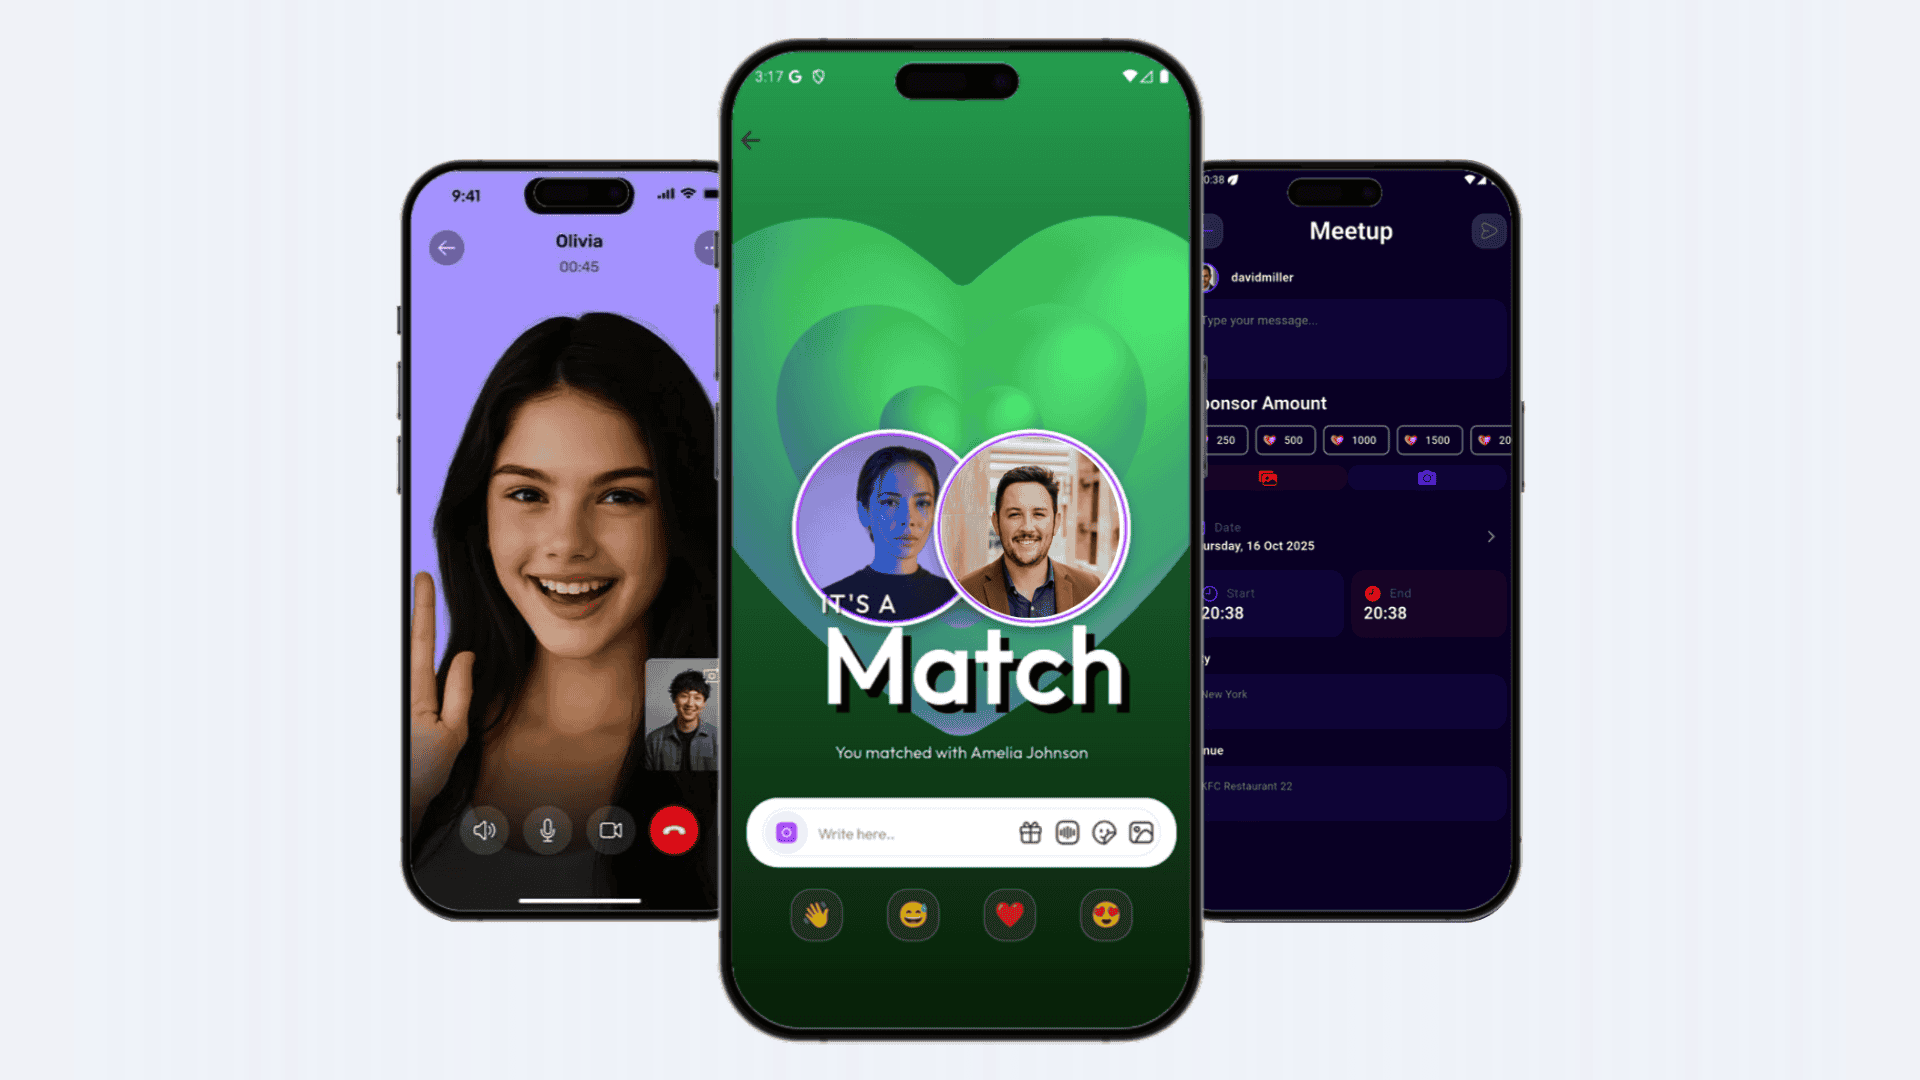
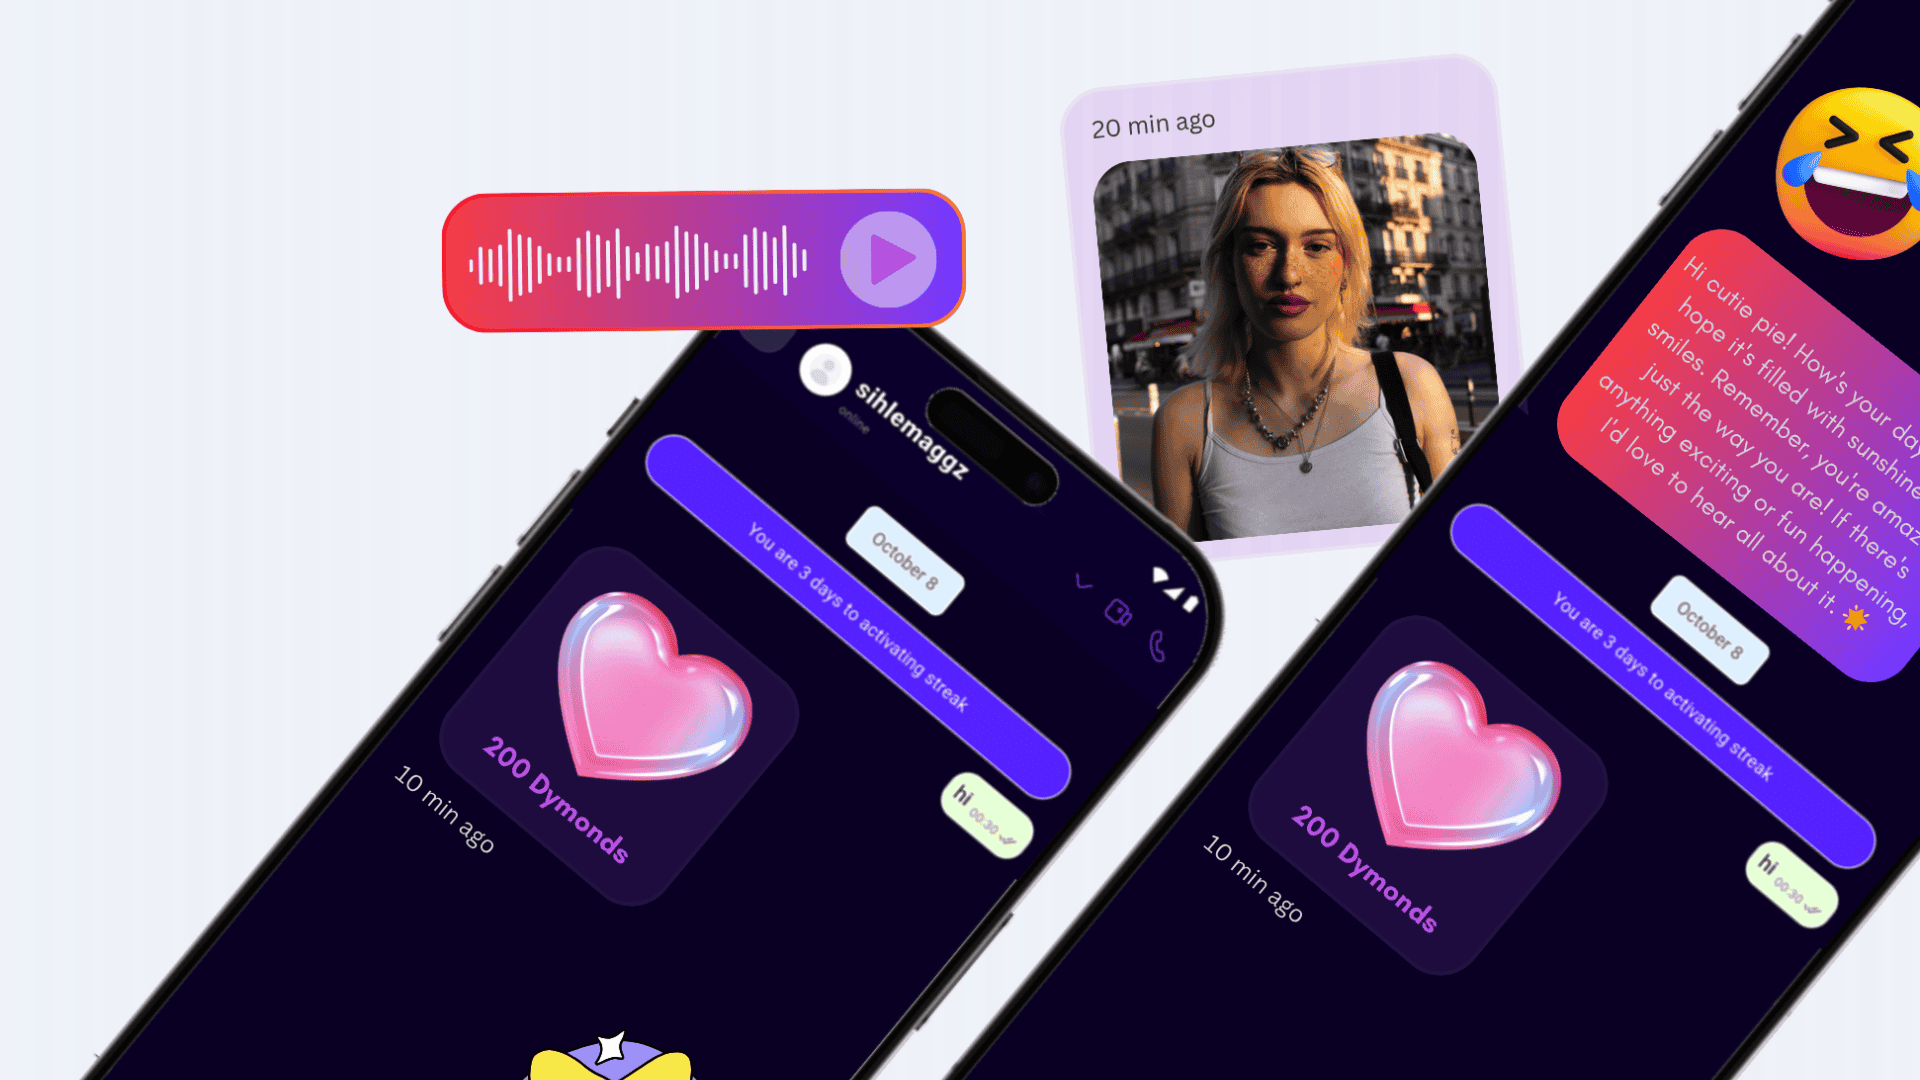
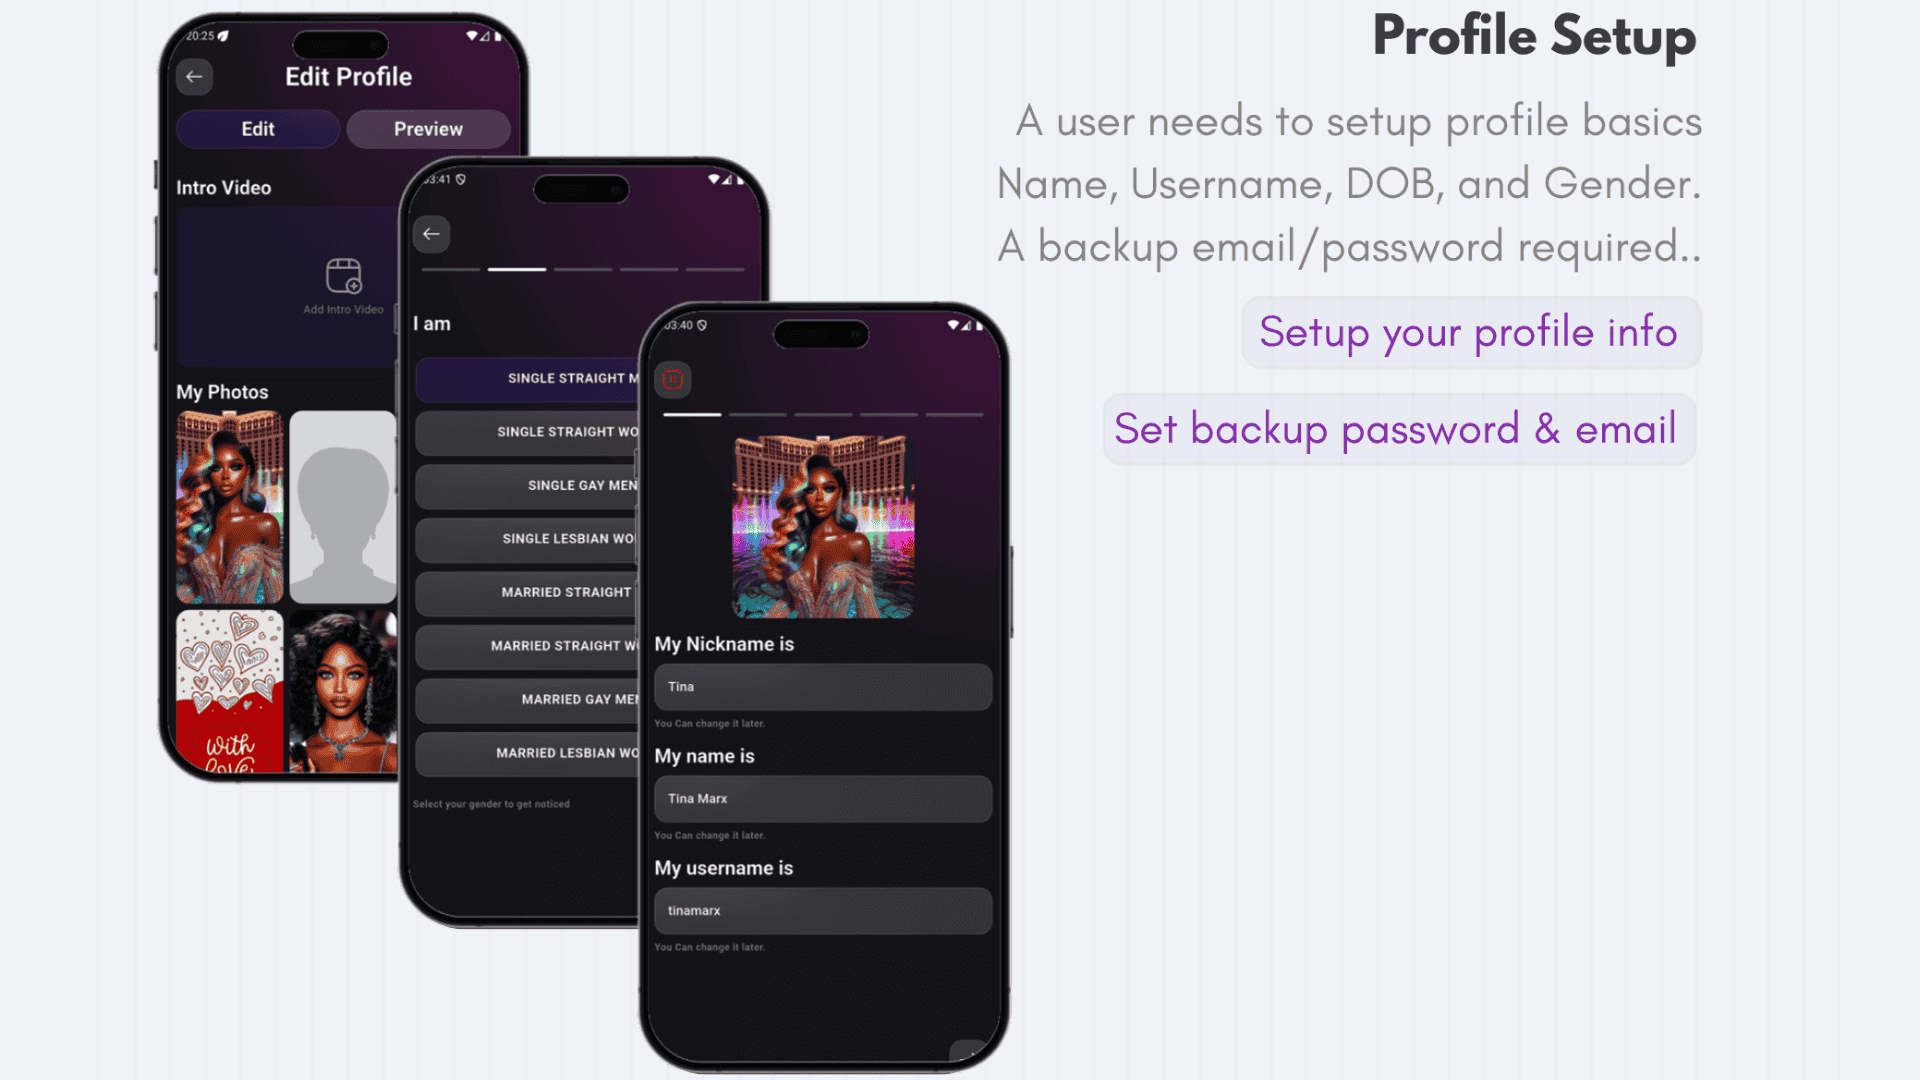
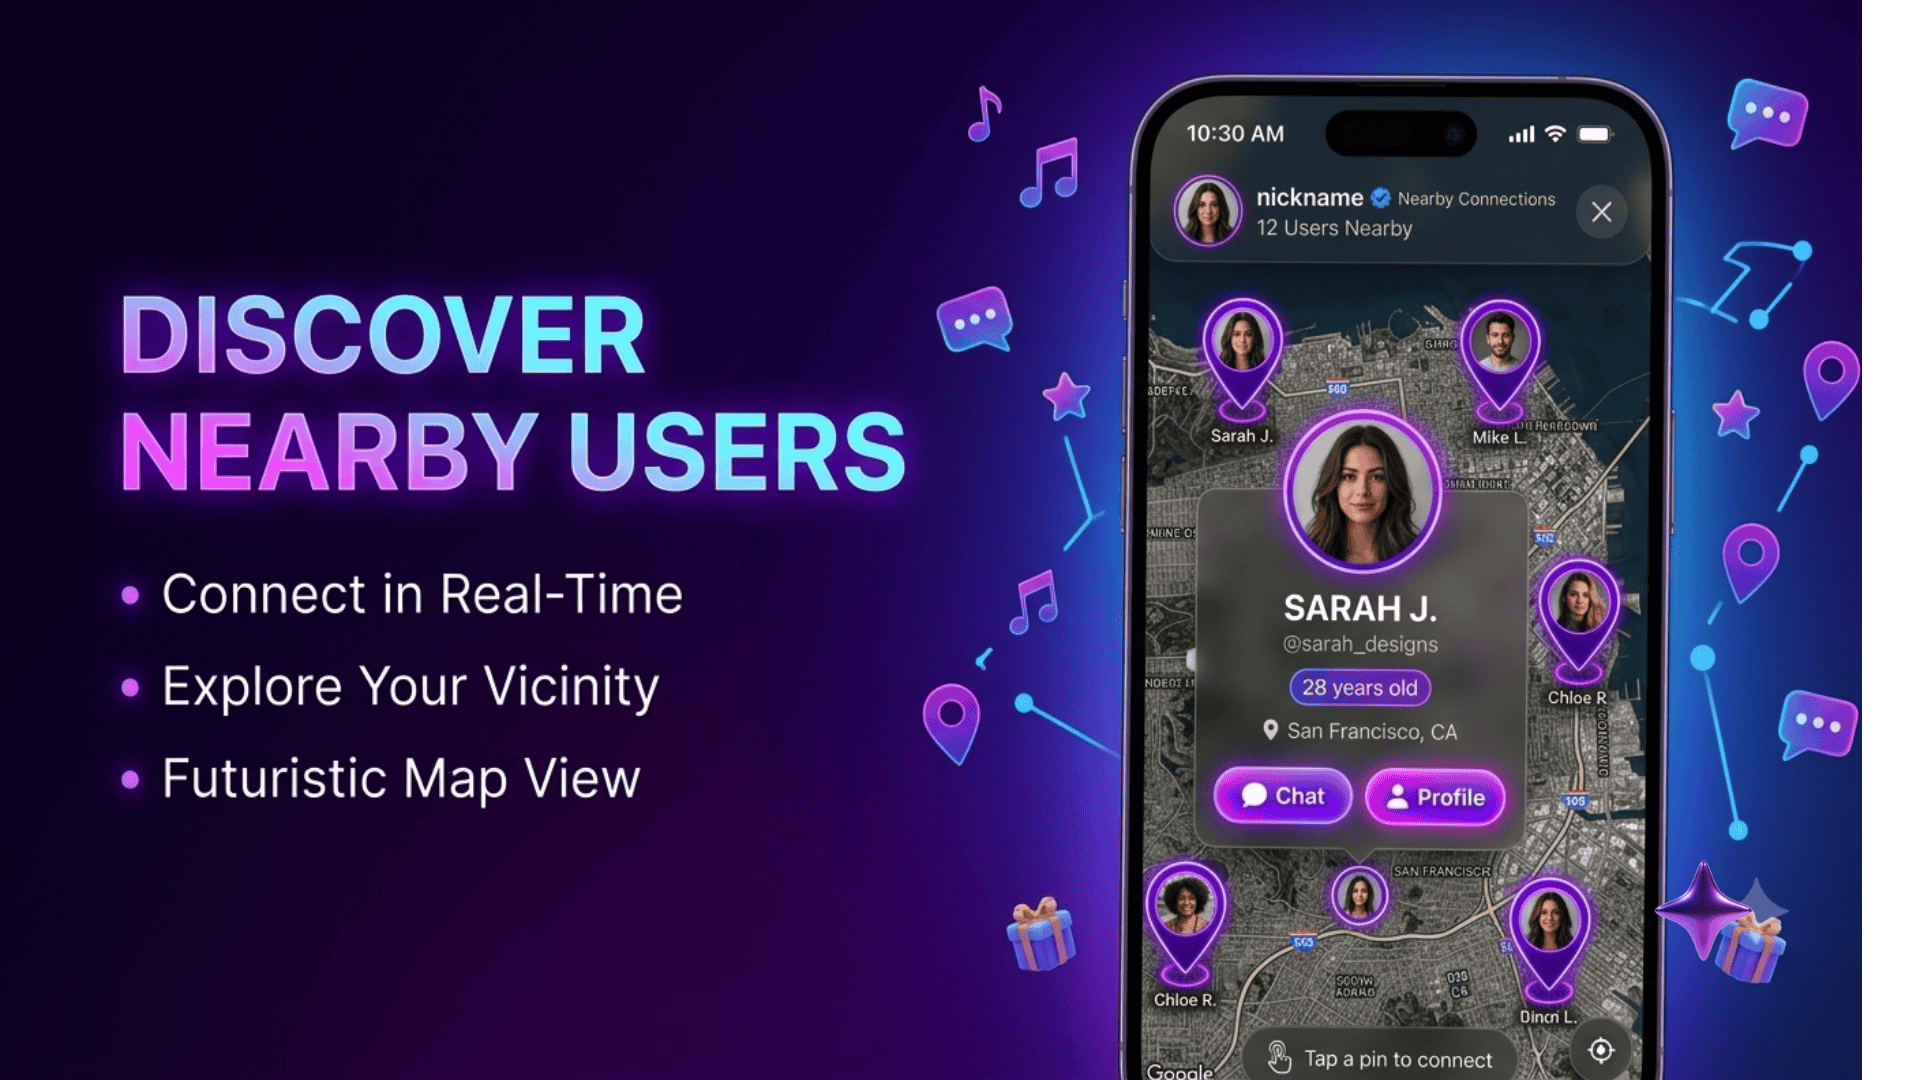
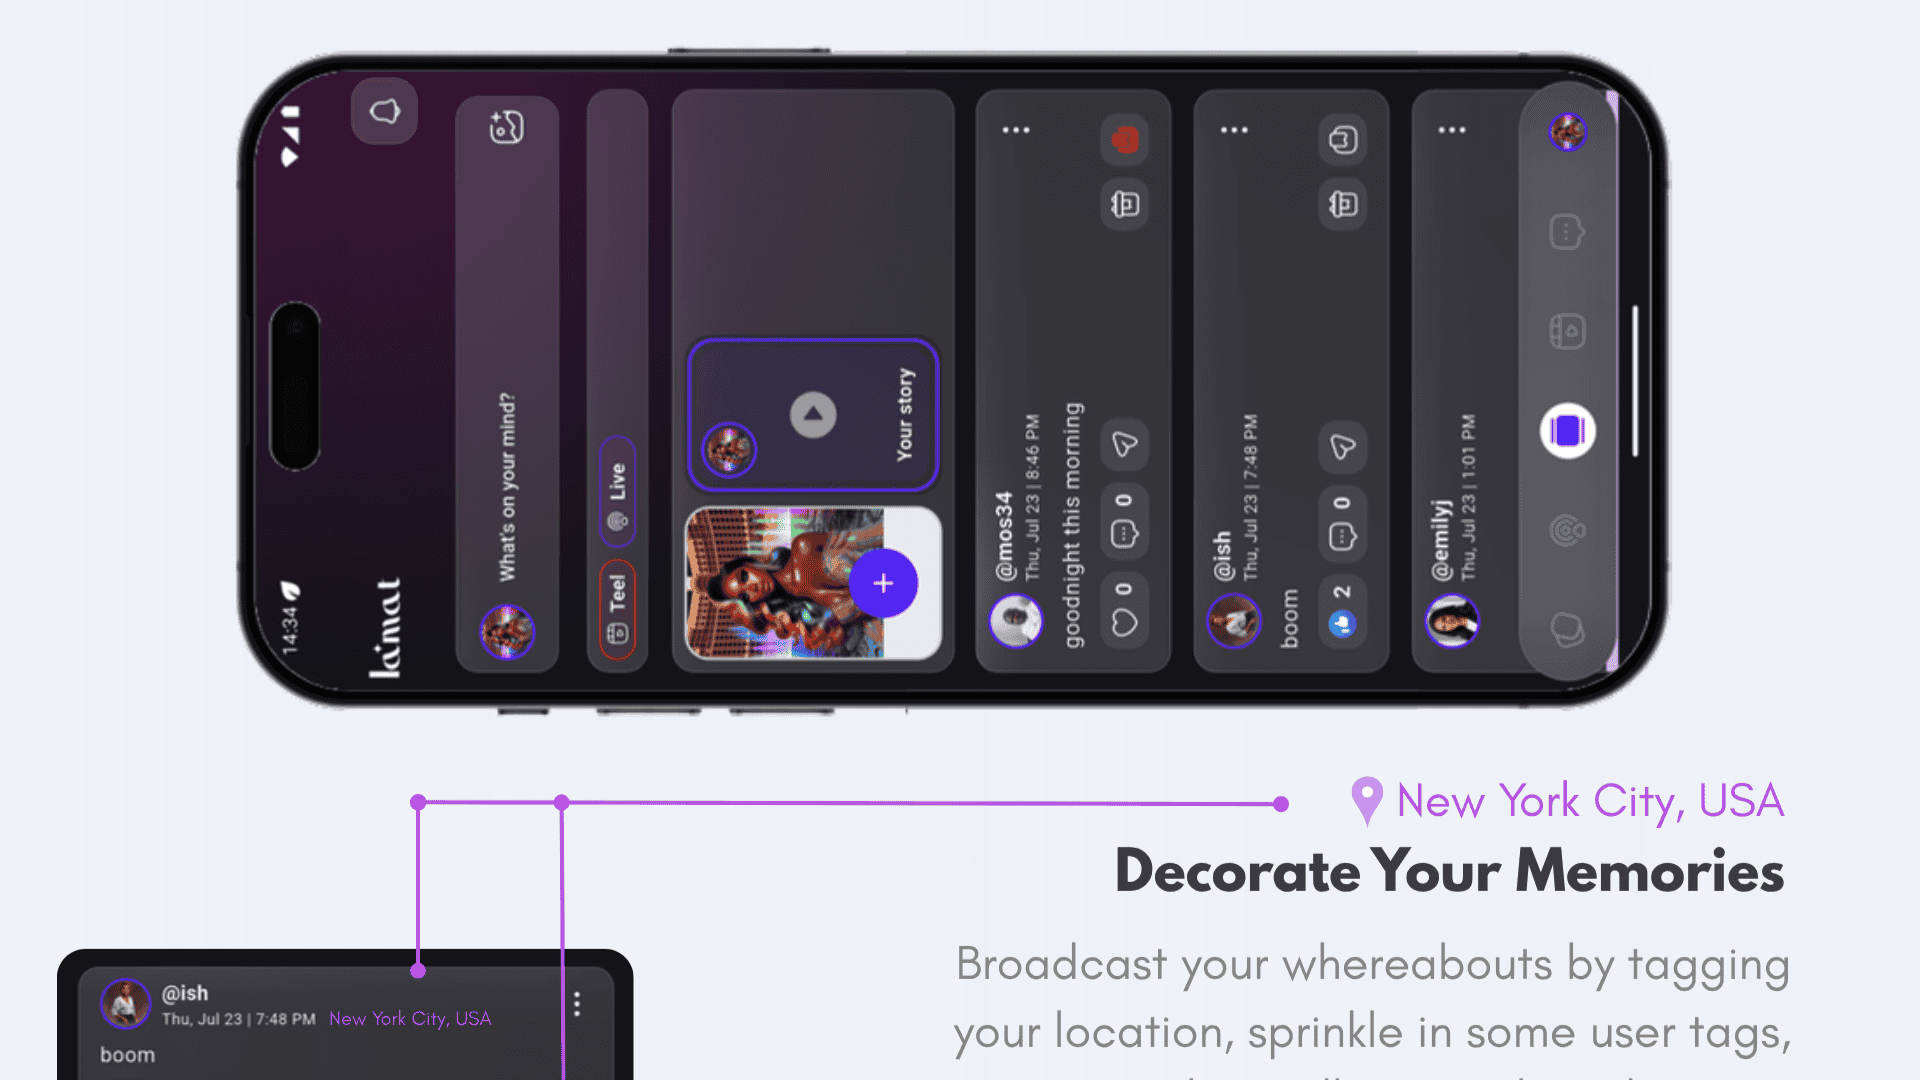
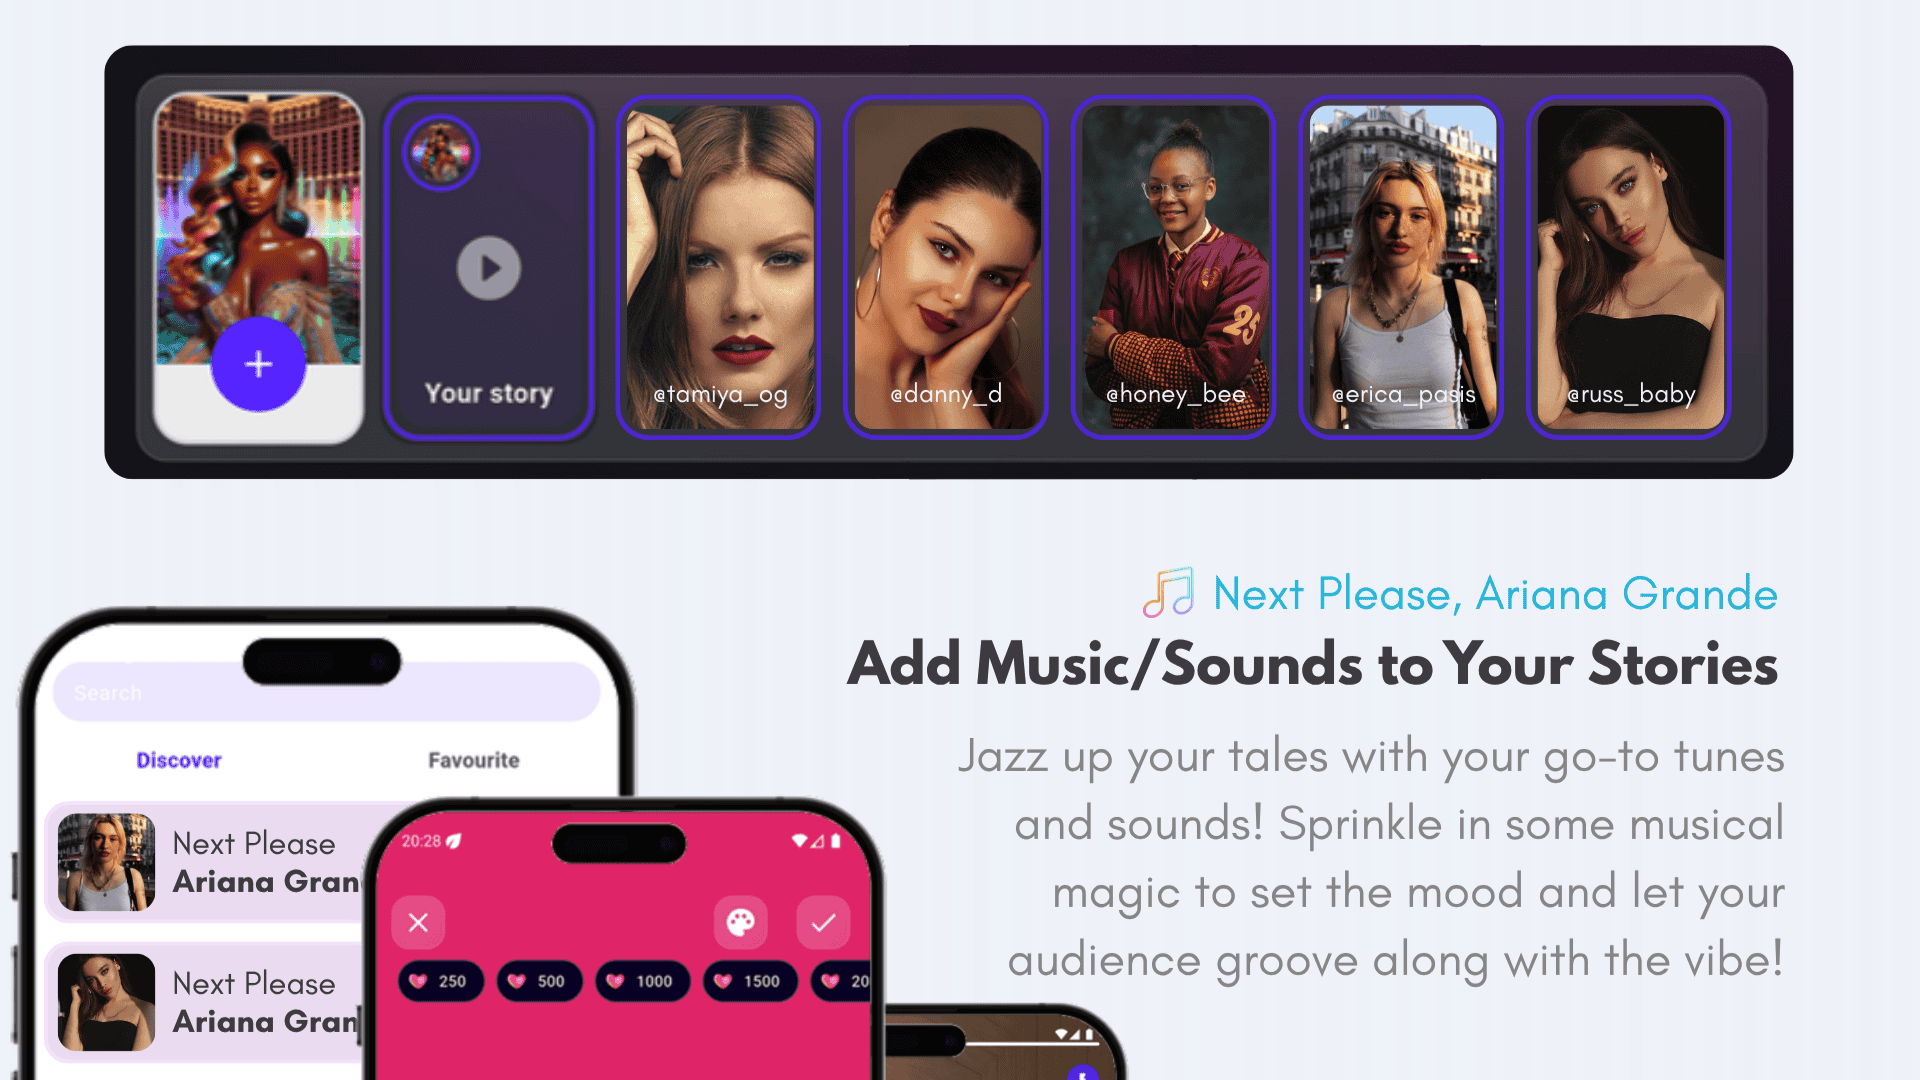
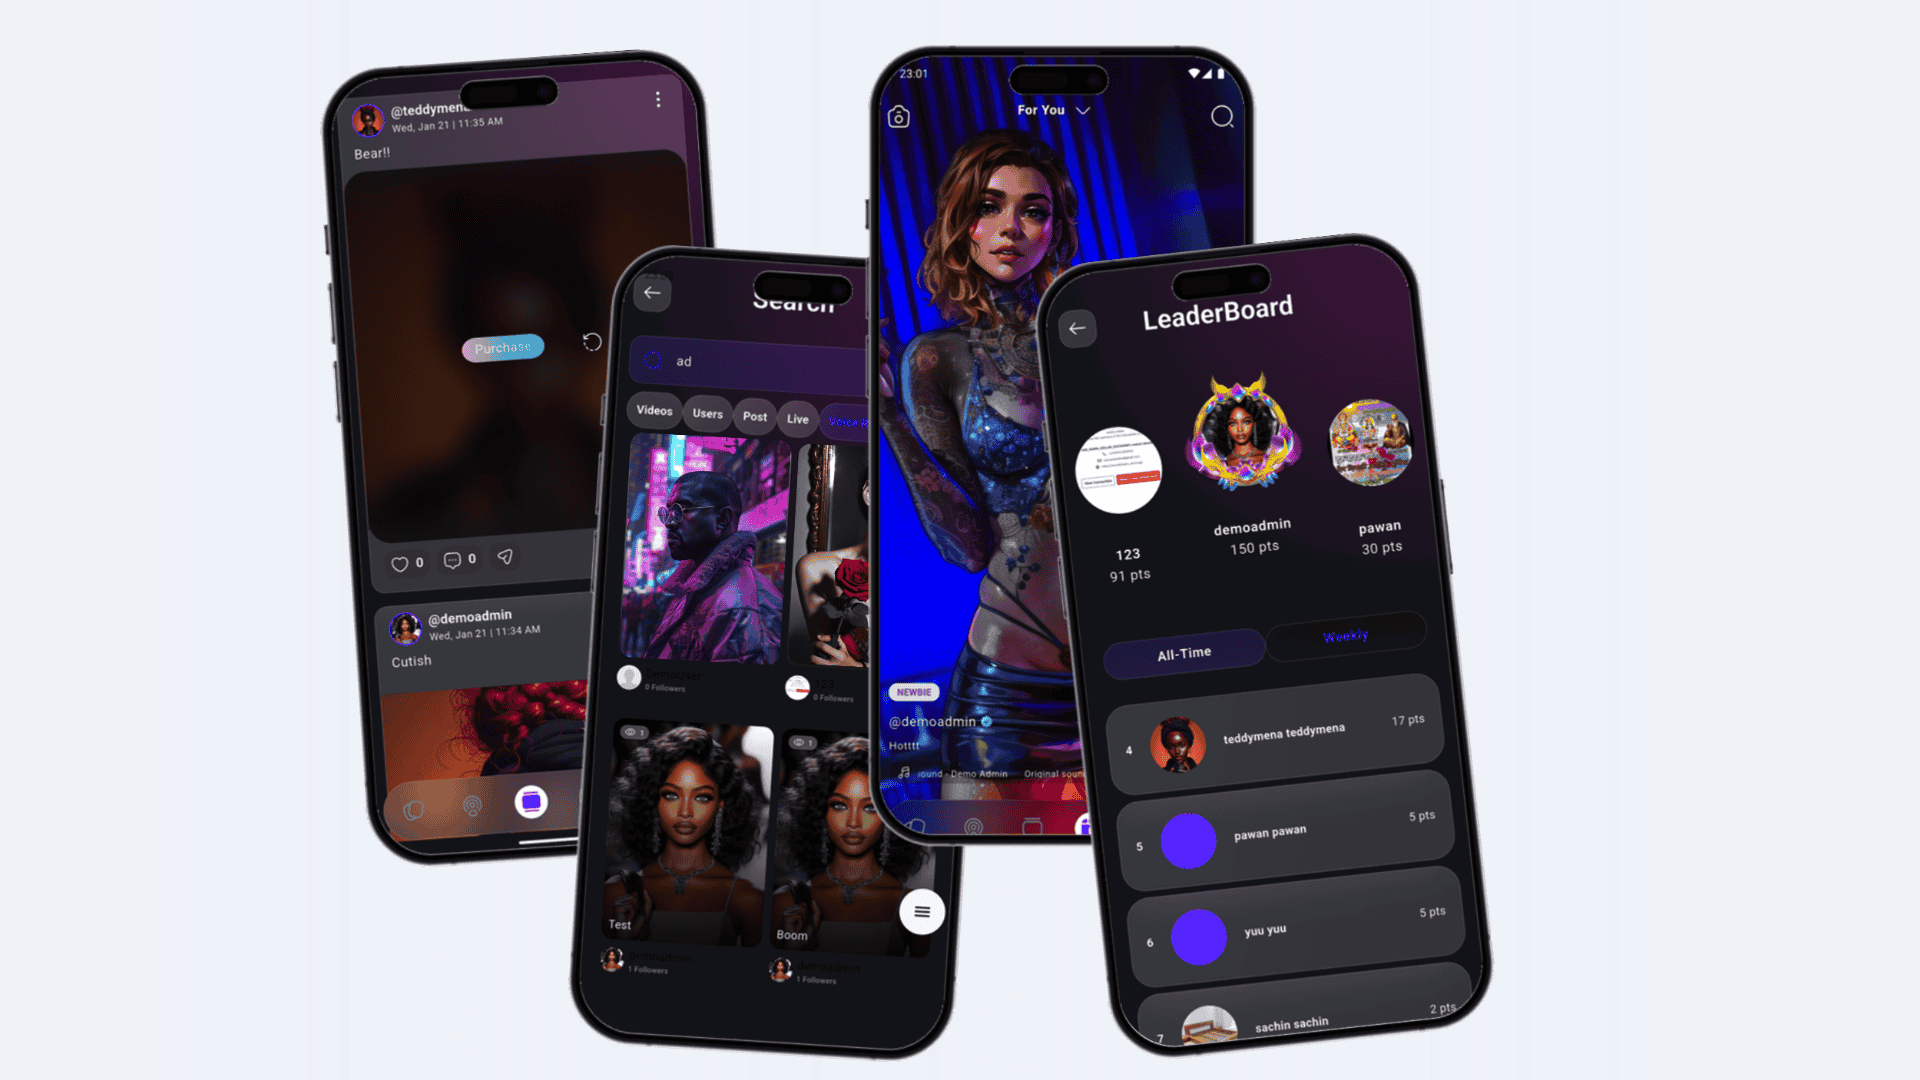
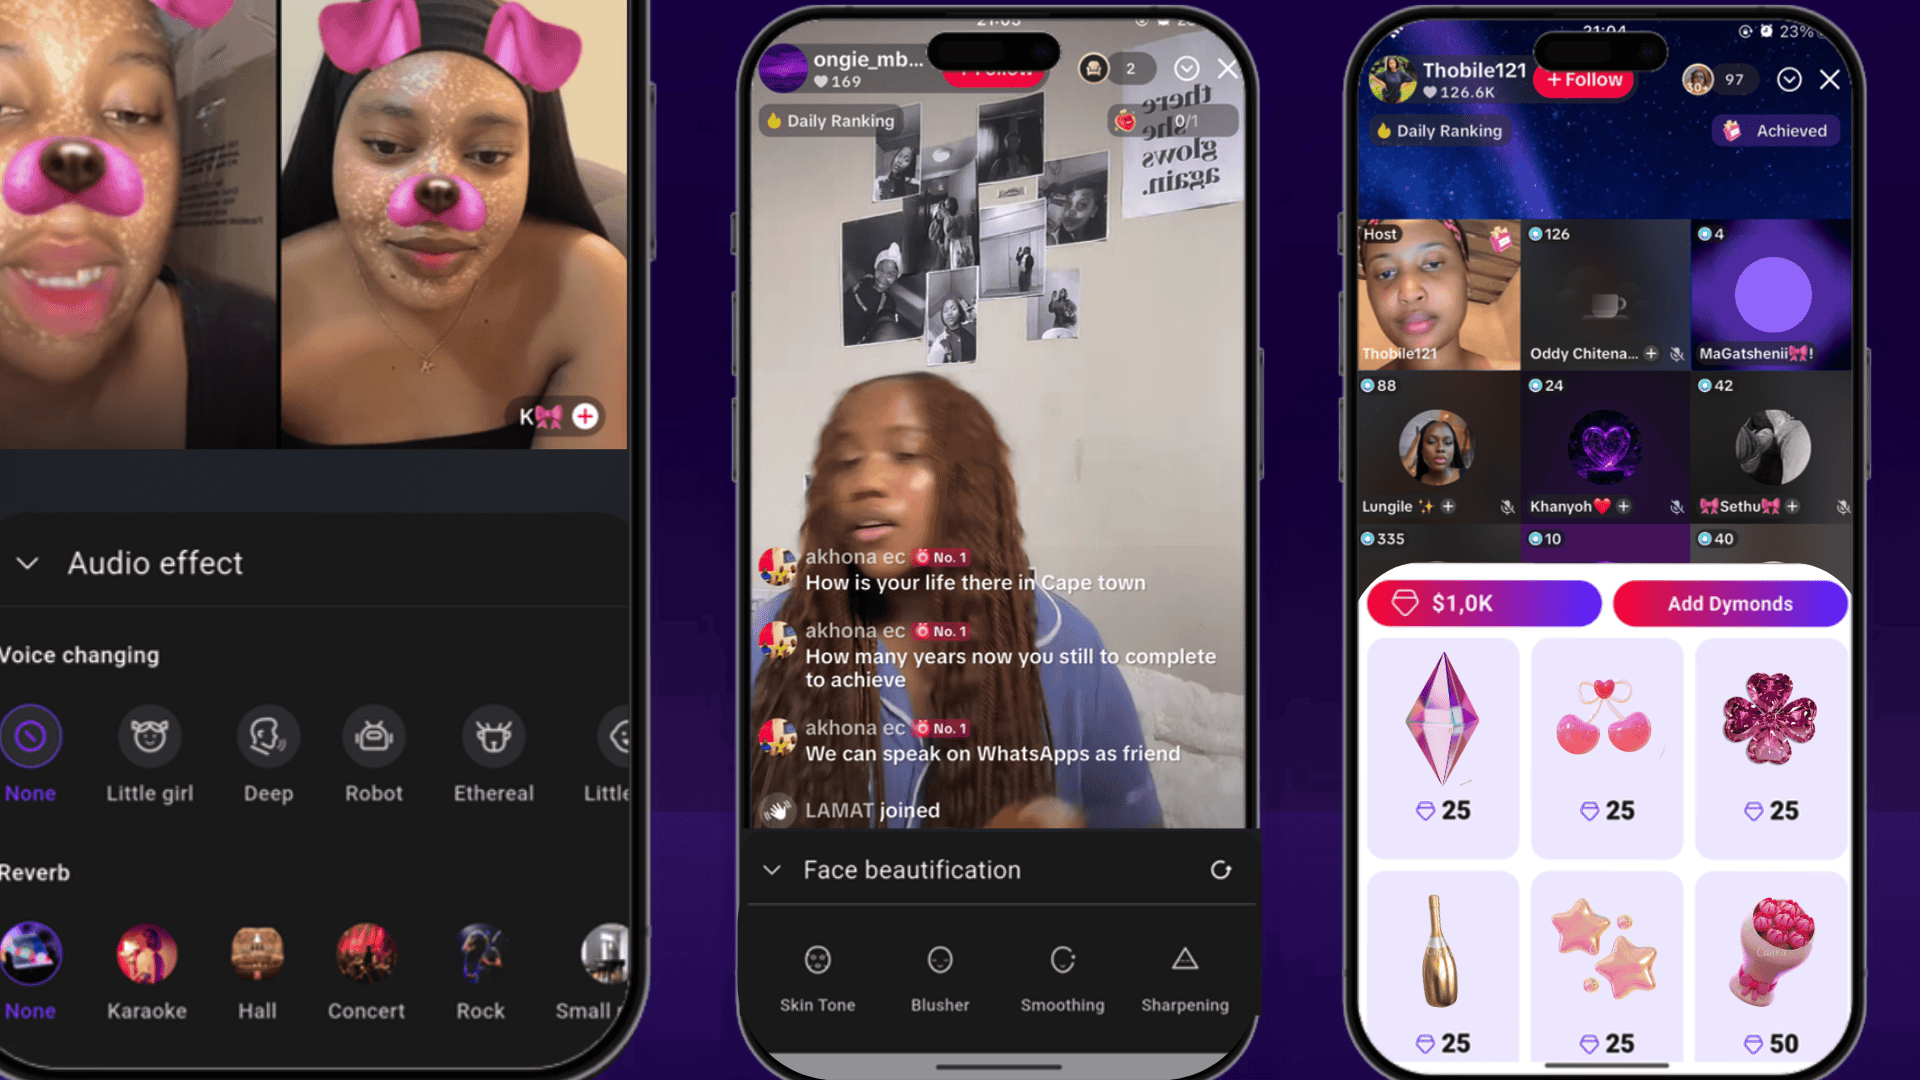
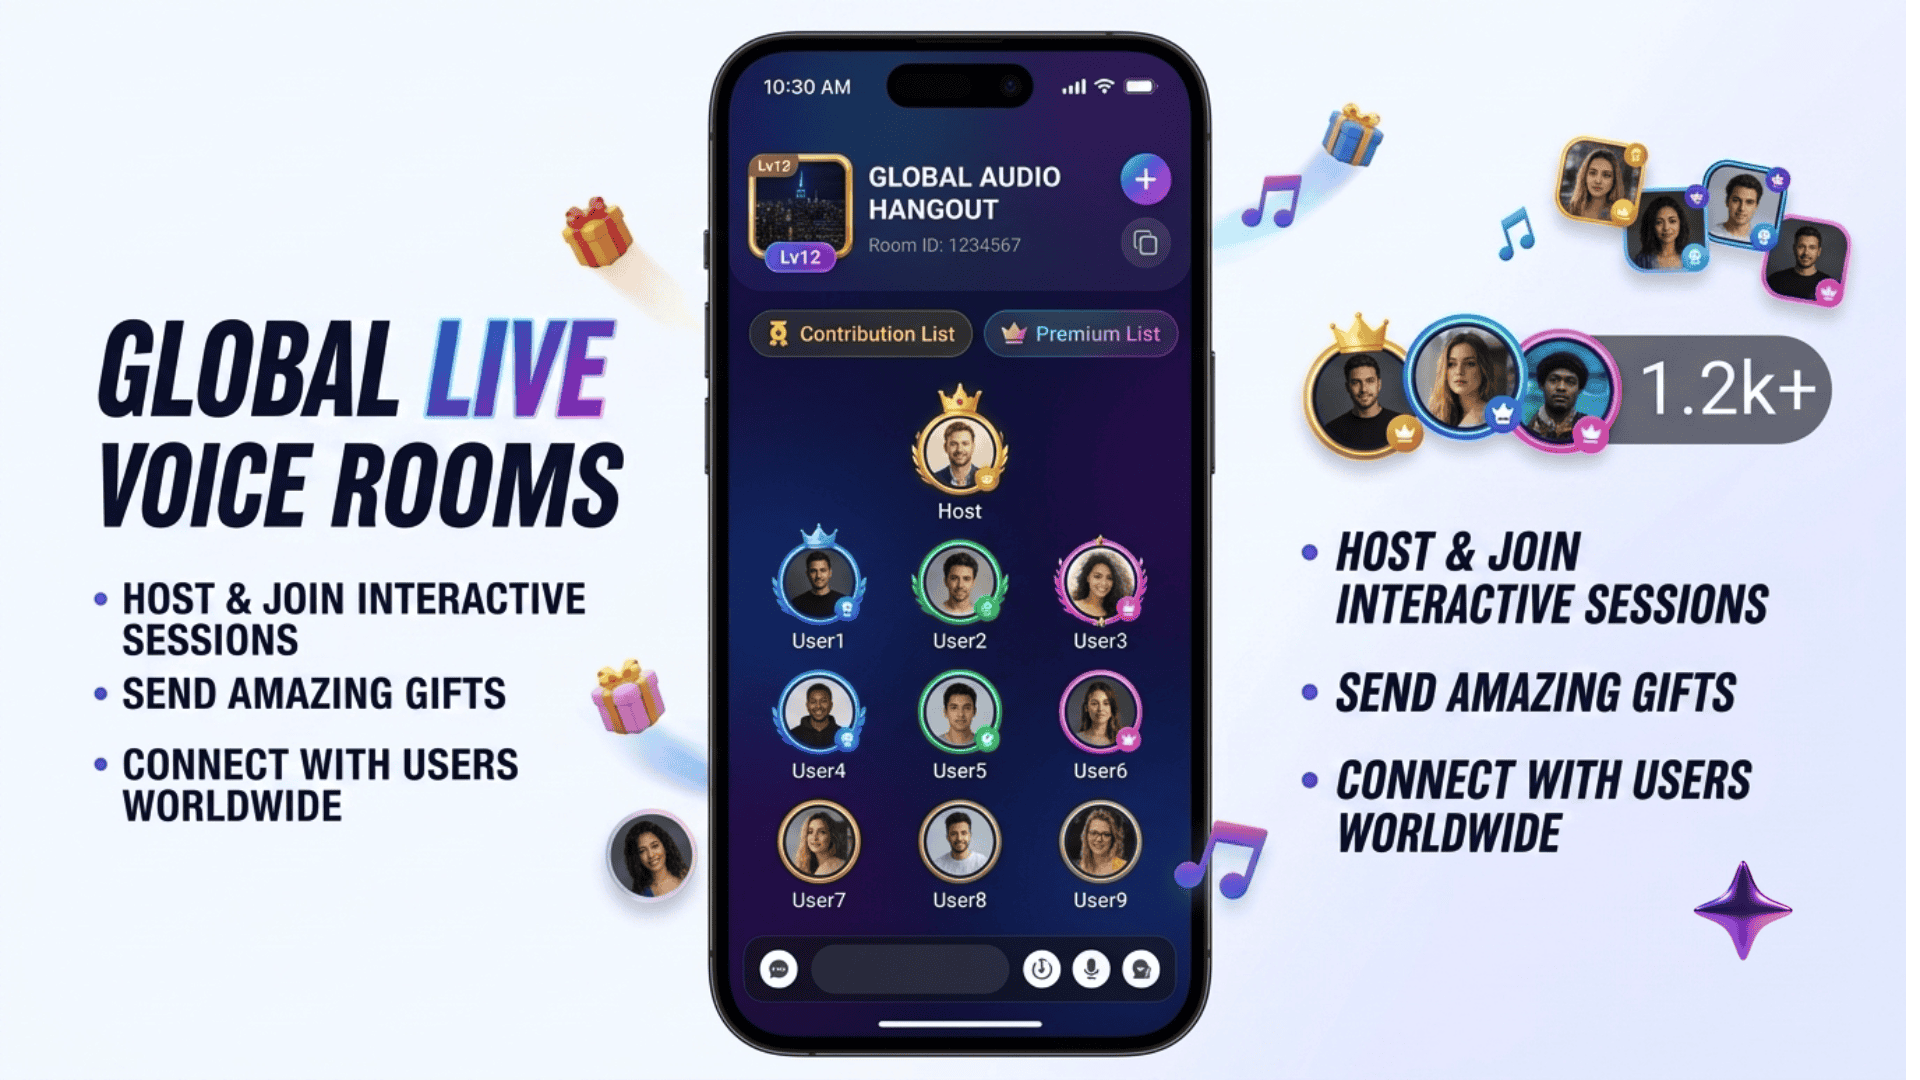
A visual tour of the main screens in the Lamat app — from authentication and discovery to chat, social features, and live experiences. Click any screenshot to view it fullscreen.
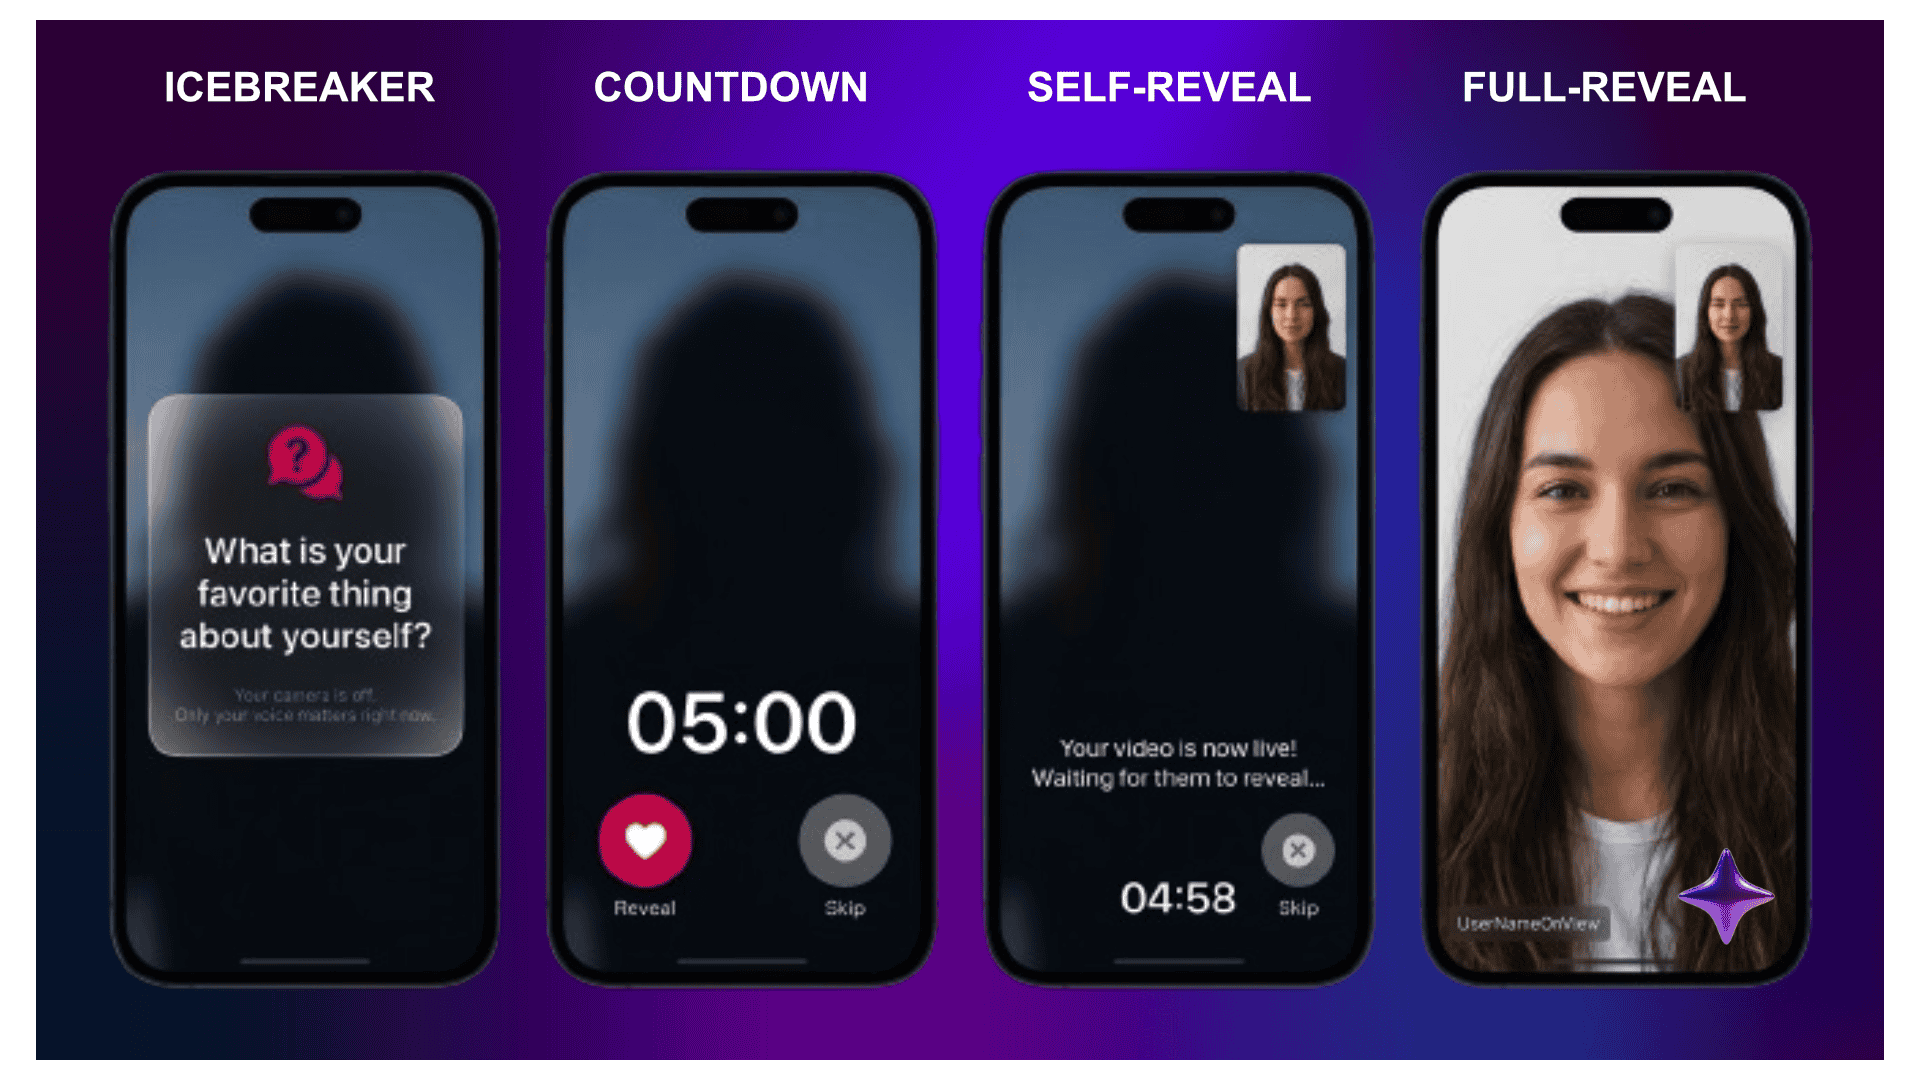
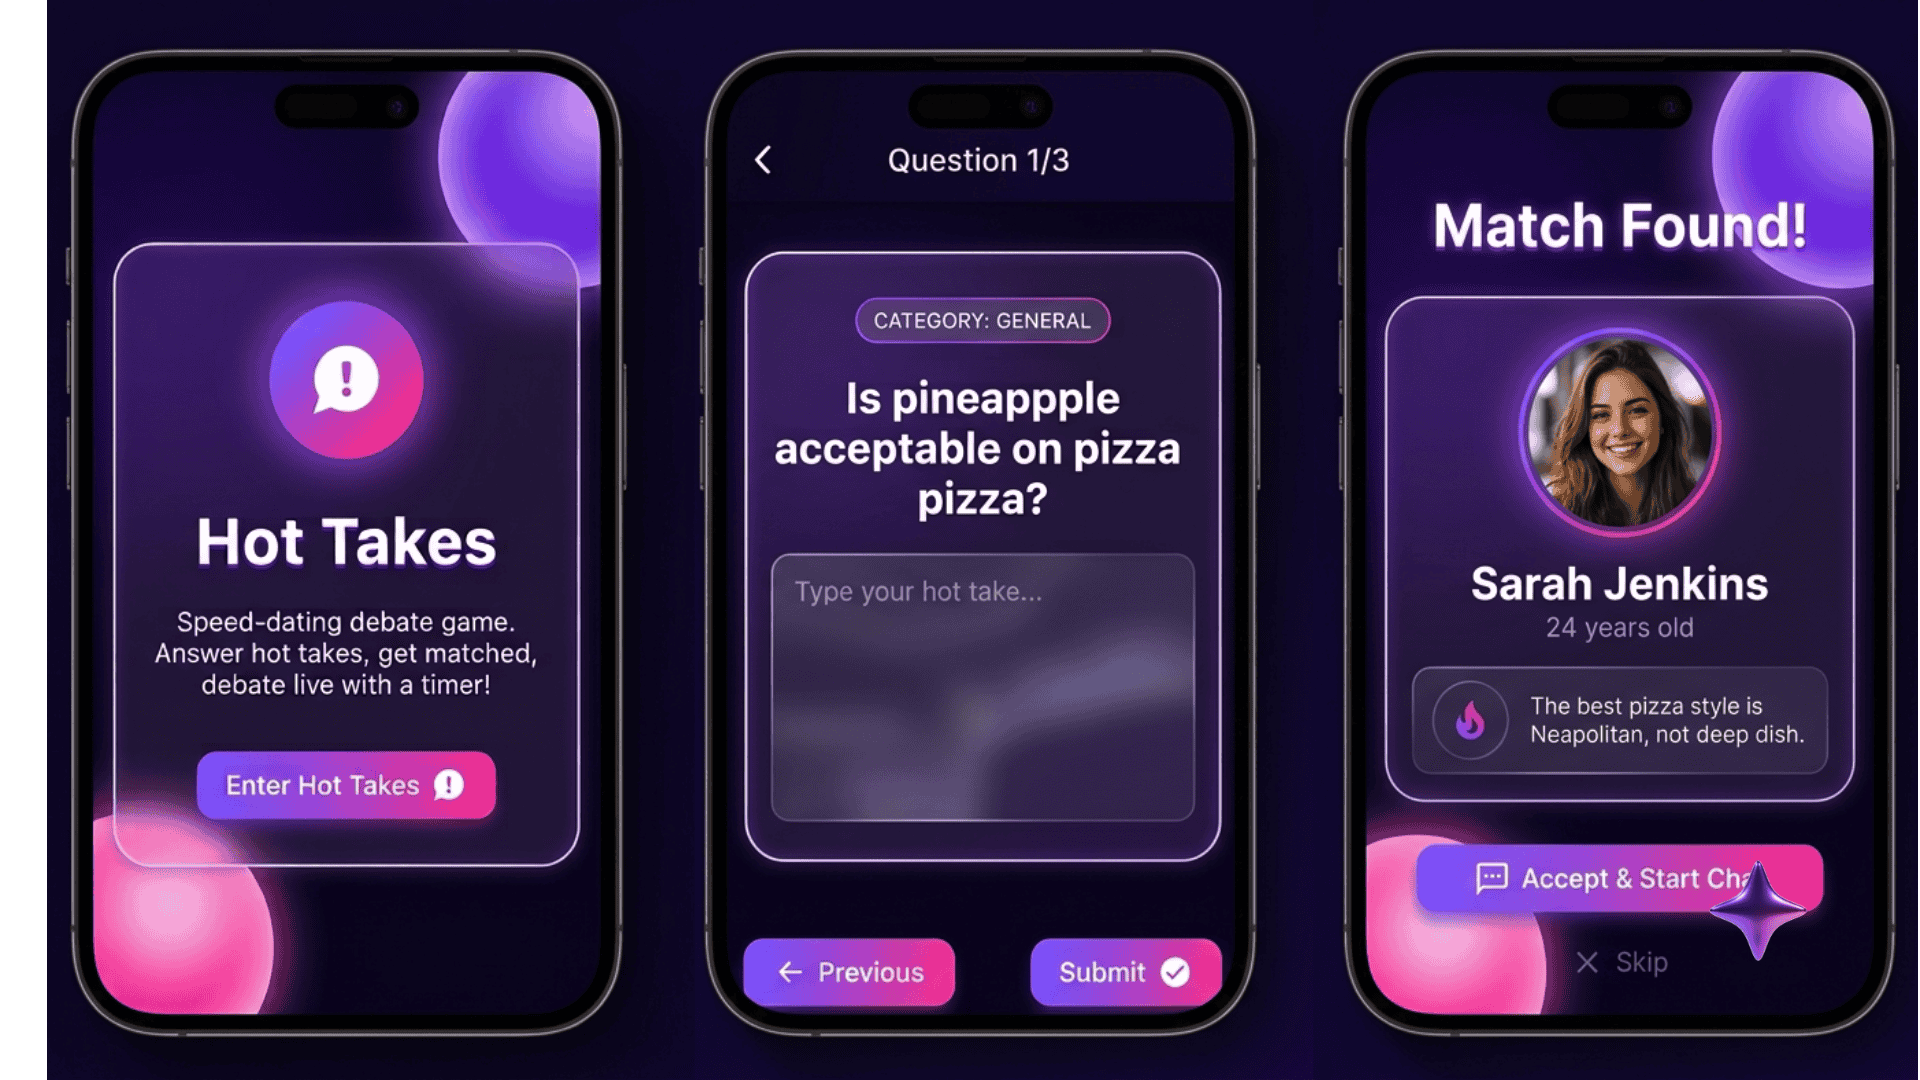
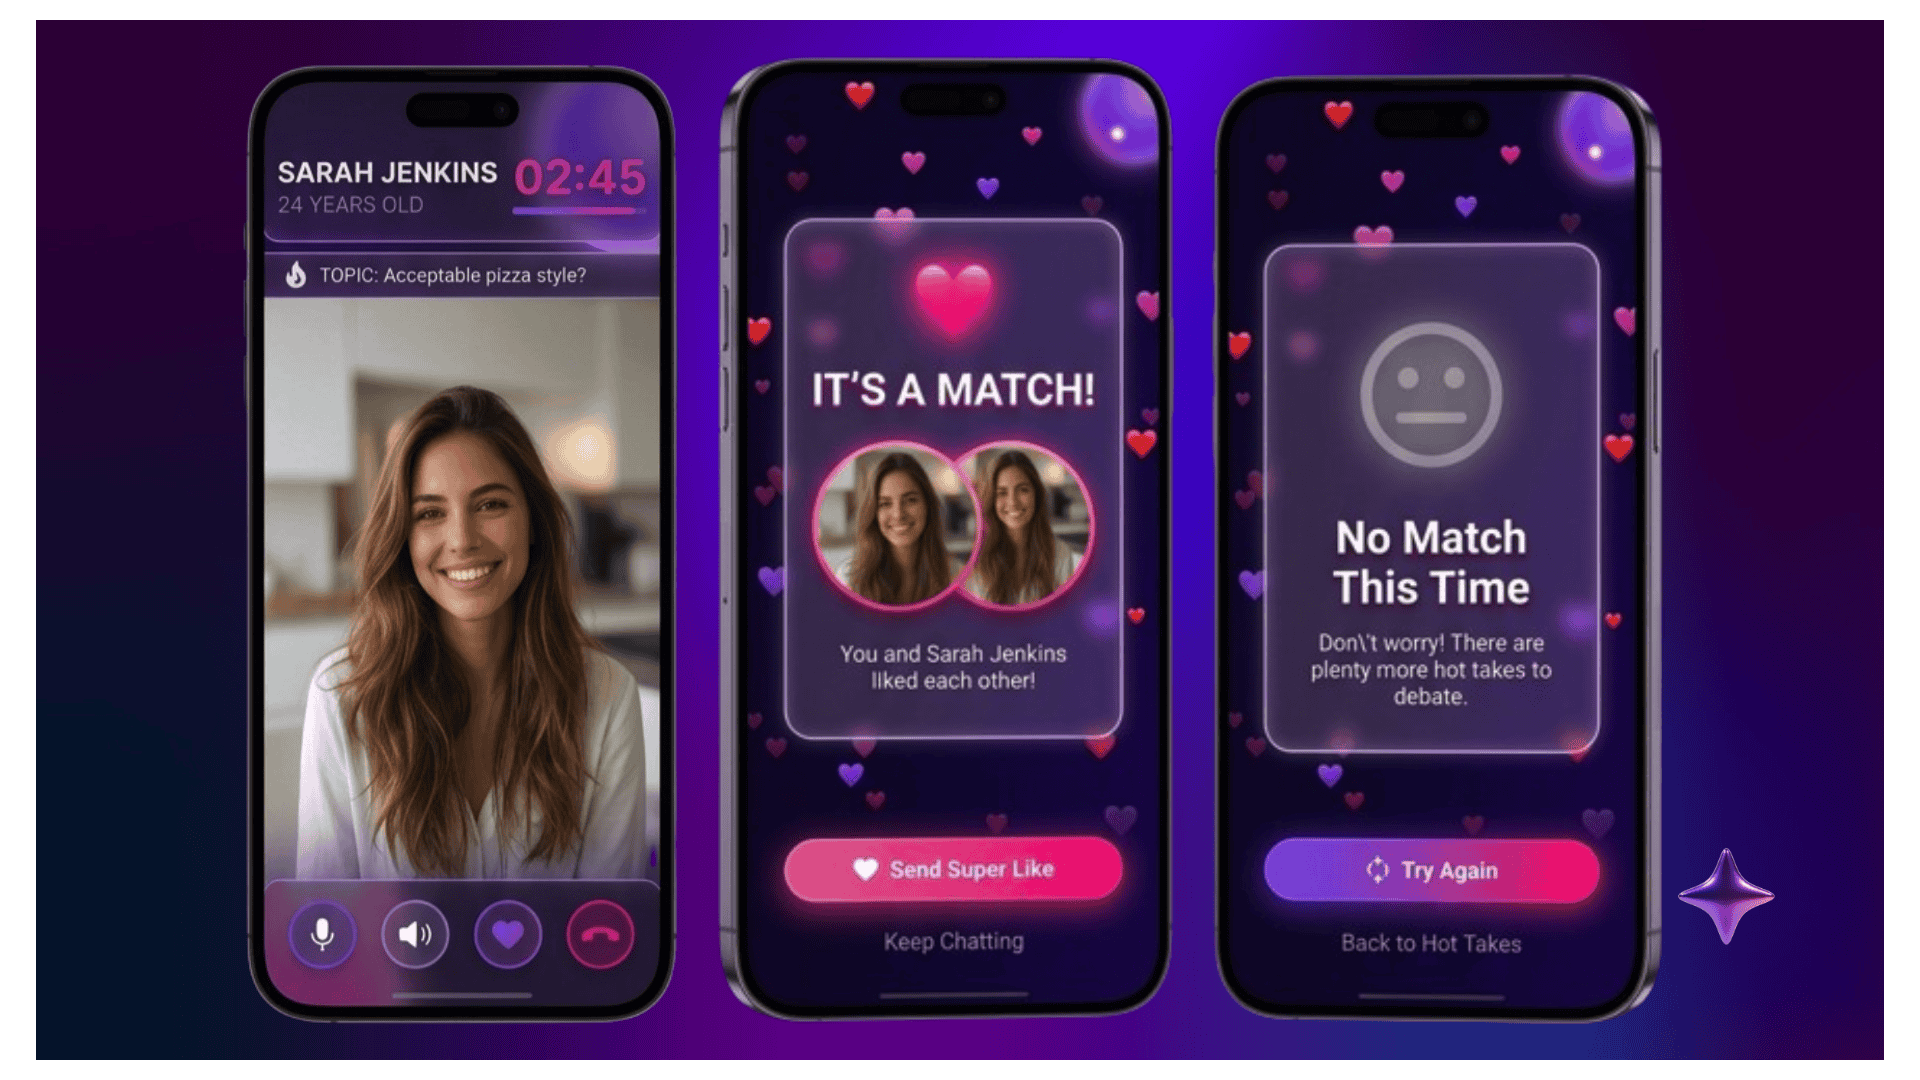
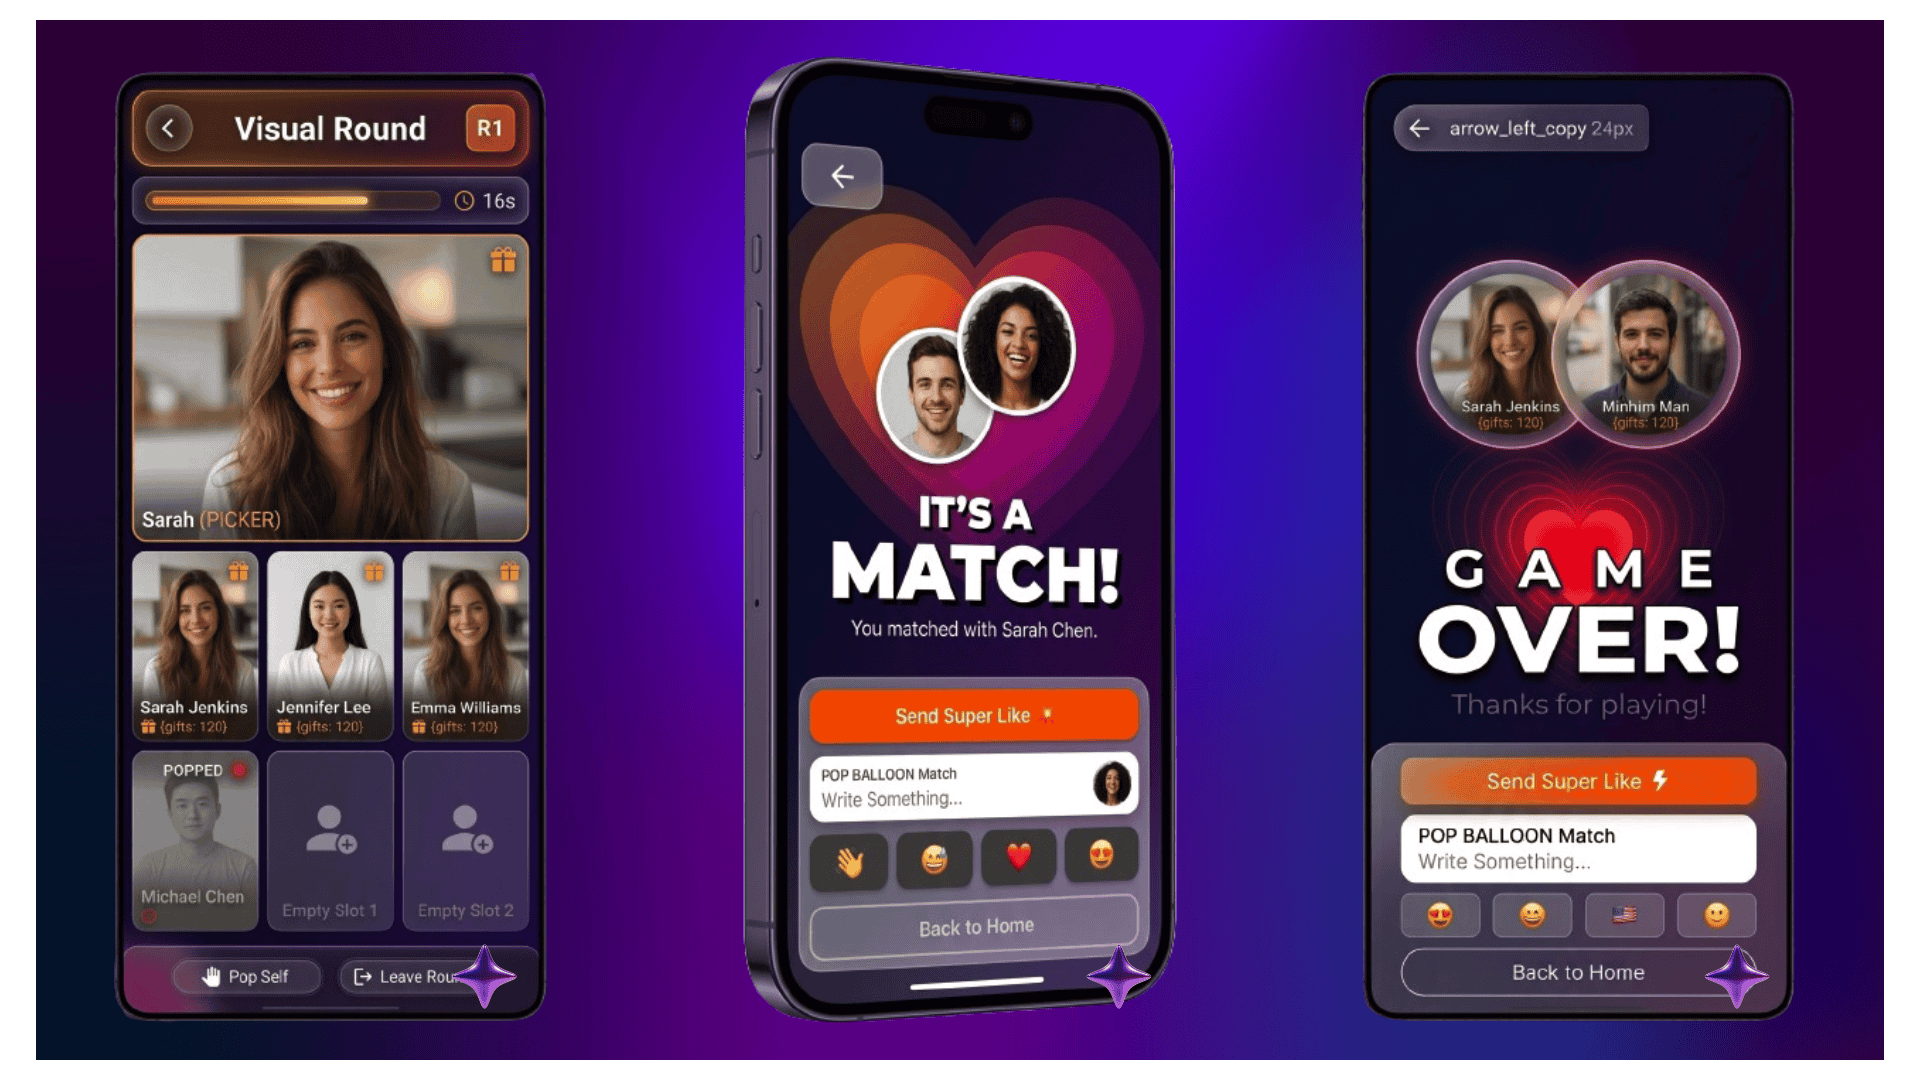
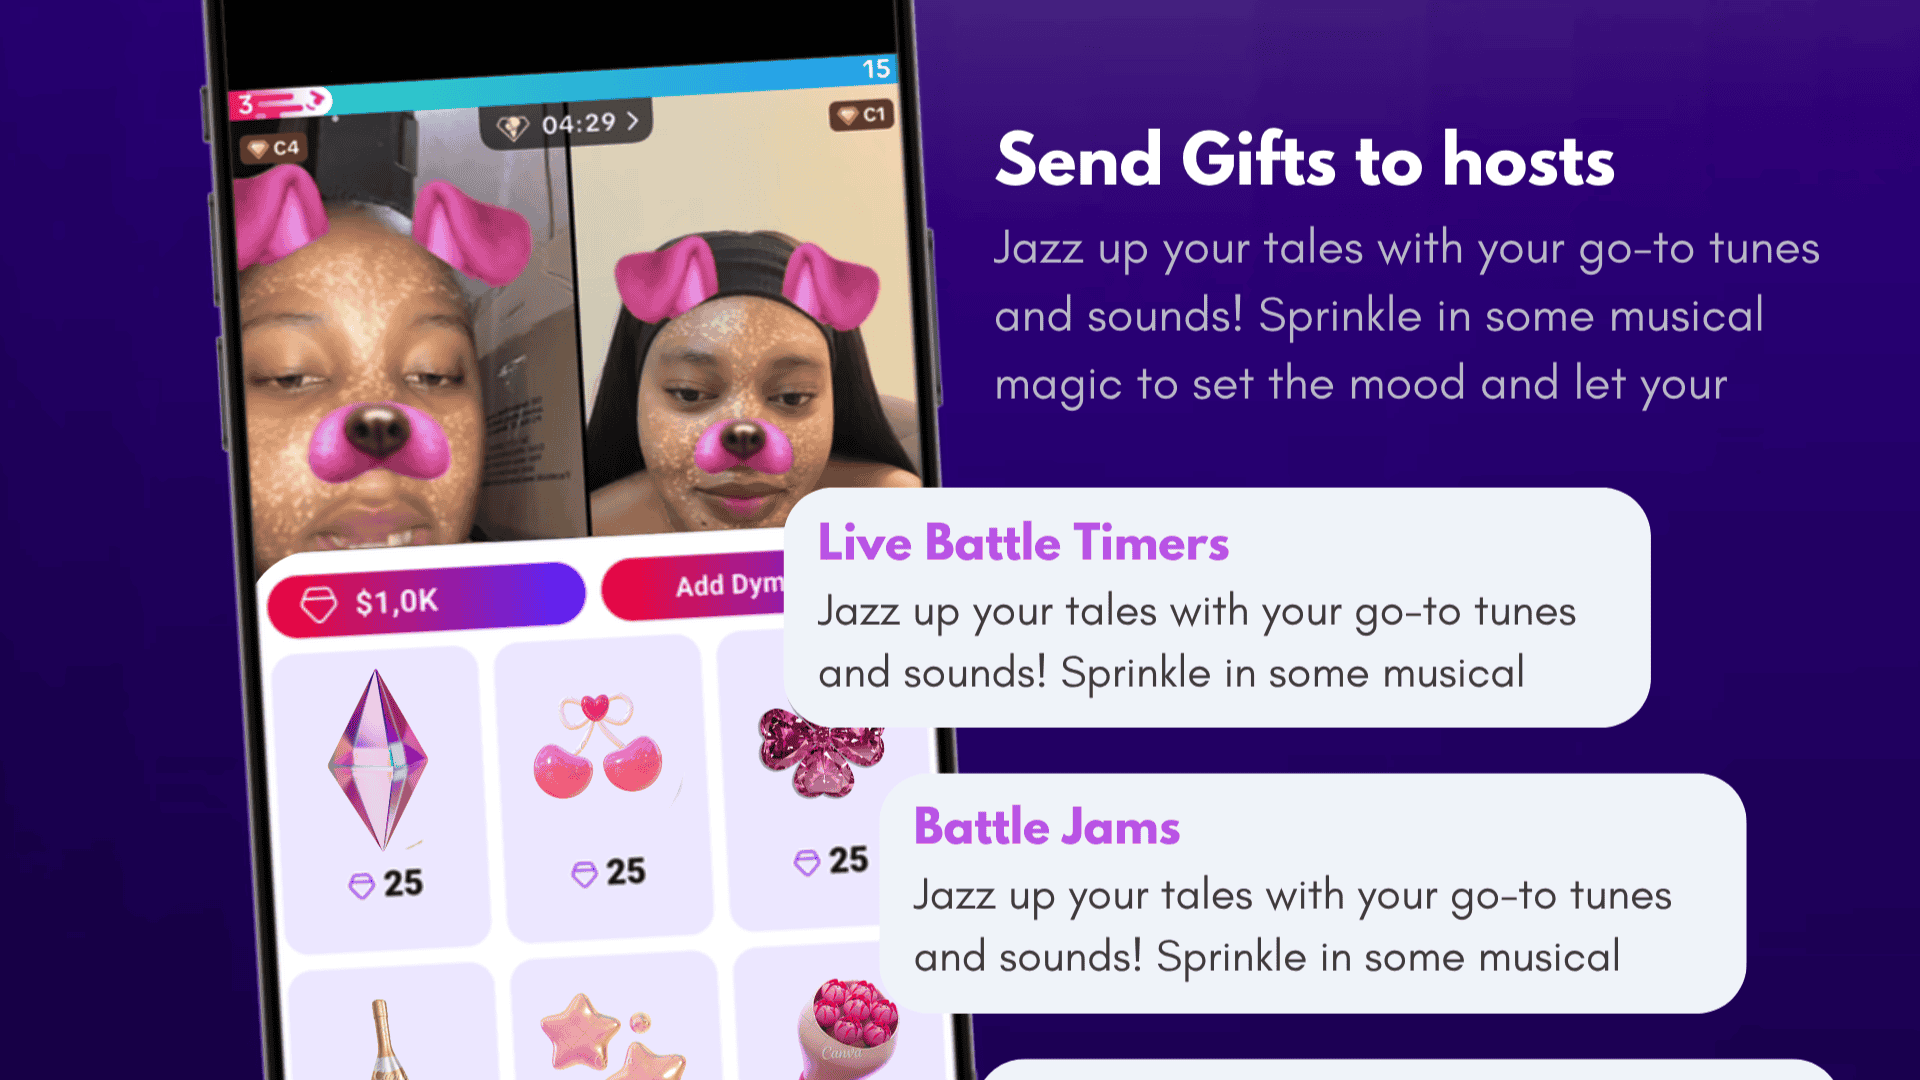
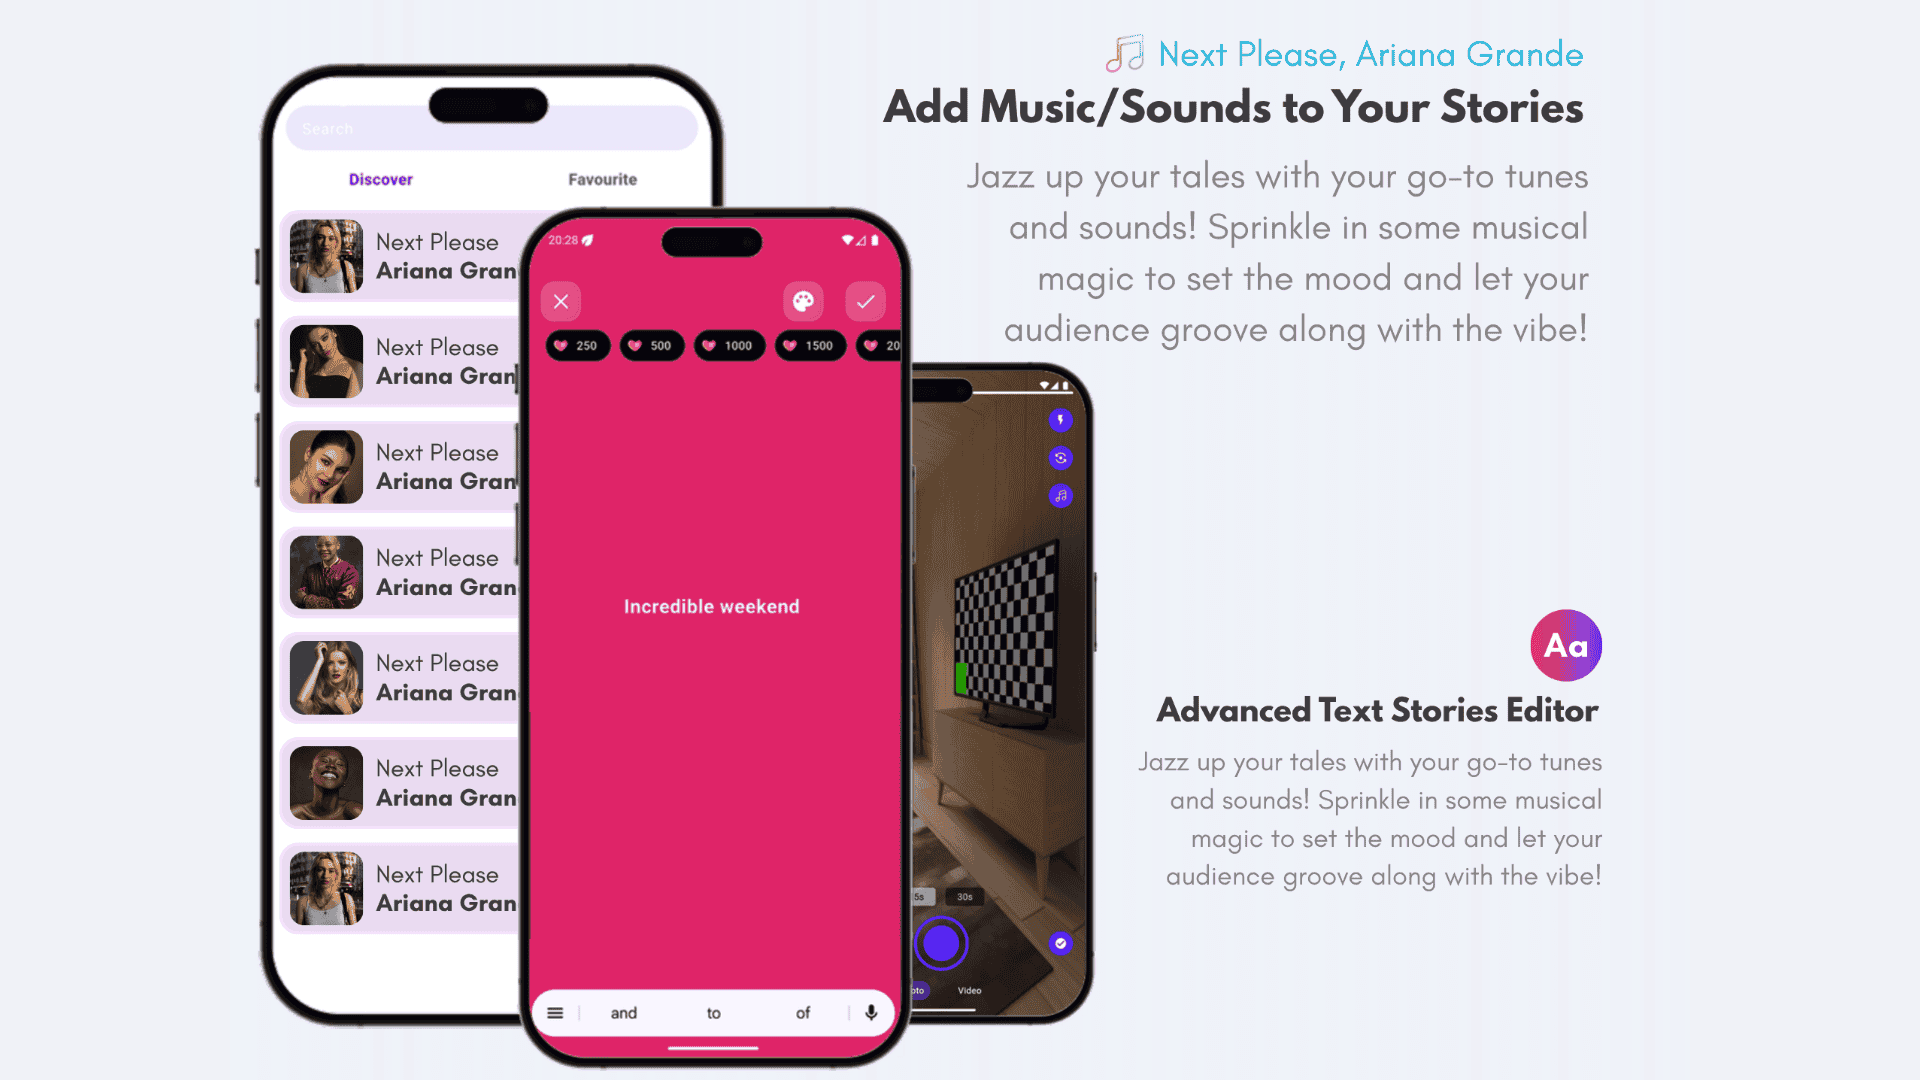
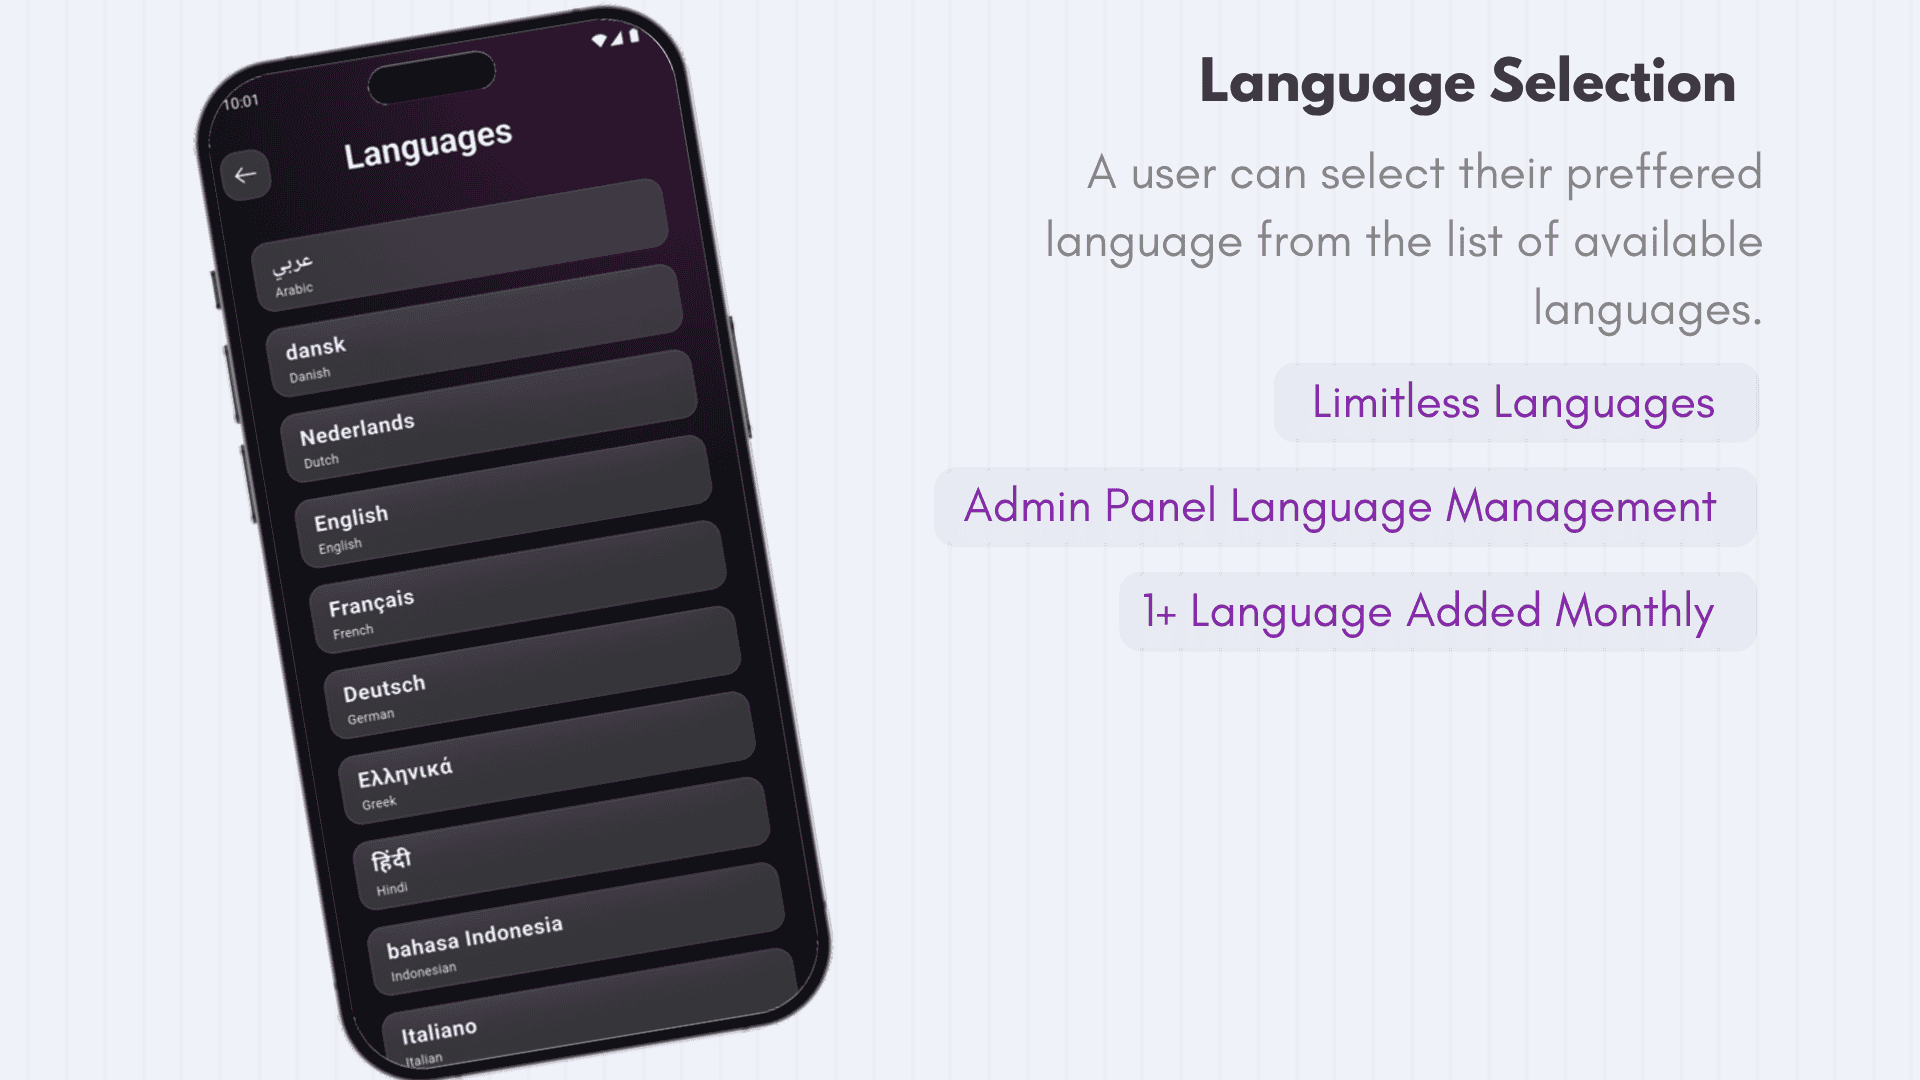
System Requirements
Server (Production)
| Component | Minimum | Recommended |
|---|---|---|
| Web Server | Apache 2.4 | Apache 2.4 / Nginx 1.24 |
| PHP | 8.1 | 8.2 or 8.3 |
| MySQL / MariaDB | MySQL 8.0 / MariaDB 10.4 | MariaDB 10.11 |
| RAM | 2 GB | 4 GB |
| Disk | 10 GB | 20 GB SSD |
| HTTPS | Let's Encrypt | Paid SSL |
Local Development
| Tool | Version |
|---|---|
| XAMPP / Laragon | PHP 8.3, MariaDB 10.11 |
| Flutter | 3.27+ (stable channel) |
| Dart SDK | ^3.6.1 |
| Composer | 2.7+ |
Required PHP Extensions
BCMath, Ctype, cURL, DOM, Fileinfo, GD, JSON, Mbstring, OpenSSL, PCRE, PDO, PDO_MySQL, Tokenizer, XML, Zip, Intl.
External Services
| Service | Purpose | Required? |
|---|---|---|
| Firebase | Push notifications, Phone Auth, Crashlytics | Yes |
| Pusher | Real-time chat & presence | Yes |
| RevenueCat | Subscription management | No |
| Google Maps / MapKit | Location & map view | Yes |
| Google Gemini | AI features | No |
| ZegoUIKit | Live video/audio streaming | Yes |
| Paystack / Flutterwave / Stripe | In-app payments | Yes (at least 1) |
Quick Start (5 Minutes)
Place files on server
Download the file from CodeCanyon and extract it on your PC. You will get 4 folders:
- documentation
- flutter-app
- laravel-admin
- update_xxxxx_xxxx
Open the laravel-admin folder - you will find a zip
file. Upload it to your server via FTP or cpanel file manager. It
must be in root of domain e.g in public_html. Then
extract it.
Configure environment
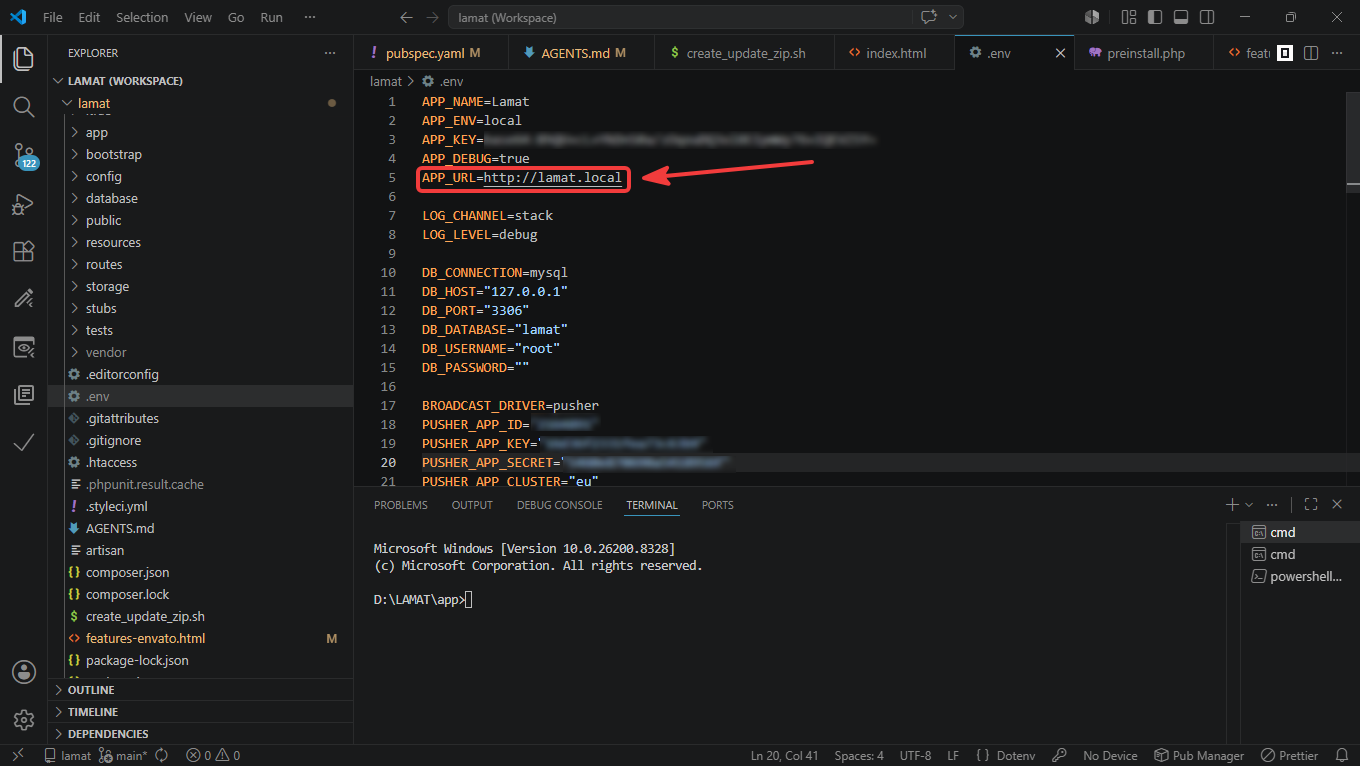
Open and Edit .env. Set your APP_URL which
is your backend domain for example
https://domain.com without the closing/end slash
/
Run the wizard
Visit https://your-domain.com/install in a browser. The
5-step wizard handles purchase verification, database import, and
admin setup.
Setup Flutter app
-
Go to the root folder of project, enter
flutter-appfolder. -
Extract here the zip in it so that you have
flutter-app/android, flutter-app/assets, flutter-app/ios
                etc
. -
Open the
flutter-appfolder in your desired code editor e.gVS CODE. - Run
flutter pub getin terminal.
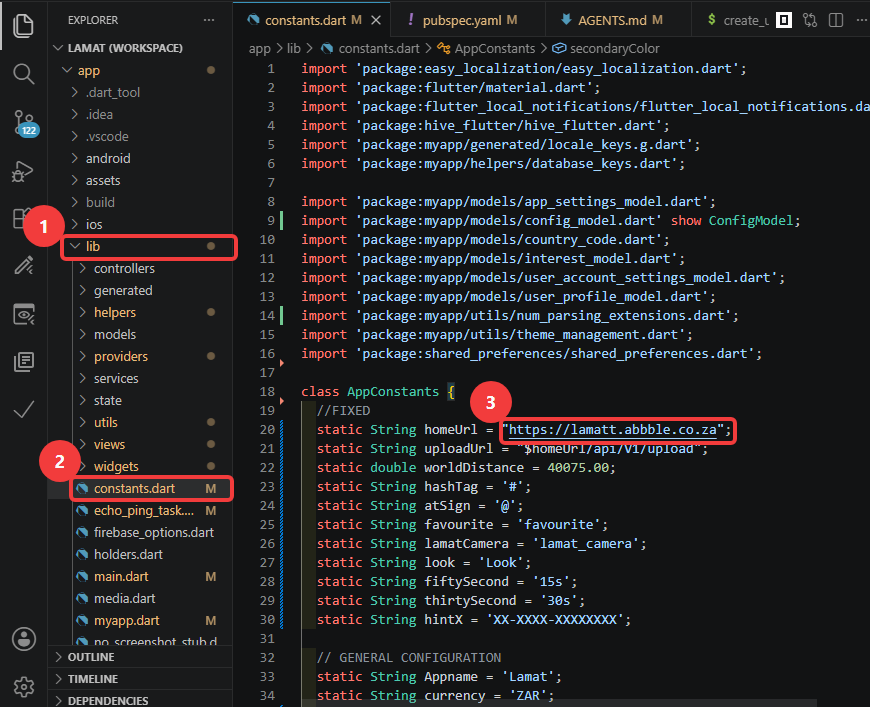
Update lib/constants.dart with your server URL.
Run Flutter app
Run flutter run with with emulator open.
Server Setup
Directory Structure
/var/www/html/               # Web root
/var/www/html/lamat/         # Laravel backend
/var/www/html/lamat/app/
/var/www/html/lamat/bootstrap/
/var/www/html/lamat/config/
/var/www/html/lamat/database/
/var/www/html/lamat/public/  # ← DocumentRoot must point here
/var/www/html/lamat/resources/views/
/var/www/html/lamat/routes/
/var/www/html/lamat/storage/
Apache Configuration
<VirtualHost *:443>
    ServerName yourdomain.com
    DocumentRoot /var/www/html/lamat/public

    <Directory /var/www/html/lamat/public>
        AllowOverride All
        Require all granted
    </Directory>

    SSLEngine on
    SSLCertificateFile /path/to/fullchain.pem
    SSLCertificateKeyFile /path/to/privkey.pem
</VirtualHost>
Nginx Configuration
server {
    listen 443 ssl;
    server_name yourdomain.com;
    root /var/www/html/lamat/public;

    add_header X-Frame-Options "SAMEORIGIN";
    add_header X-Content-Type-Options "nosniff";

    location / {
        try_files $uri $uri/ /index.php?$query_string;
    }

    location ~ \.php$ {
        fastcgi_pass unix:/var/run/php/php8.2-fpm.sock;
        fastcgi_param SCRIPT_FILENAME $realpath_root$fastcgi_script_name;
        include fastcgi_params;
    }

    location ~ /\.(?!well-known) { deny all; }

    ssl_certificate /path/to/fullchain.pem;
    ssl_certificate_key /path/to/privkey.pem;
}
Local Development Environment
Prerequisites
- PHP 8.1 or higher
- Composer (dependency manager)
- MySQL/MariaDB or SQLite
- Git (for version control)
Windows Setup (using XAMPP)
Install XAMPP
Download and install XAMPP from apachefriends.org. This includes Apache, PHP, and MySQL.
Install Composer
Download and install Composer from getcomposer.org. Make sure to select PHP from XAMPP during installation.
Clone the Project
cd C:\xampp\htdocs
git clone [your-repository-url] lamat
cd lamat
Install Dependencies
composer install
Configure Environment
copy .env.example .env
notepad .env
Update the following settings:
APP_URL=http://localhost/lamat
DB_CONNECTION=mysql
DB_HOST=127.0.0.1
DB_PORT=3306
DB_DATABASE=lamat
DB_USERNAME=root
DB_PASSWORD=
Generate Application Key
php artisan key:generate
Run Migrations
php artisan migrate
Start Development Server
php artisan serve
Access your local development environment at
http://localhost:8000
macOS Setup (using Homebrew)
Install Homebrew
/bin/bash -c "$(curl -fsSL https://raw.githubusercontent.com/Homebrew/install/HEAD/install.sh)"
Install PHP and MySQL
brew install php mysql
brew services start mysql
Install Composer
brew install composer
Clone and Setup Project
cd /Applications/XAMPP/xamppfiles/htdocs
git clone [your-repository-url] lamat
cd lamat
composer install
cp .env.example .env
php artisan key:generate
php artisan migrate
php artisan serve
Linux Setup (Ubuntu/Debian)
Install Dependencies
sudo apt update
sudo apt install php php-cli php-common php-mysql php-zip php-gd php-mbstring php-curl php-xml php-bcmath
sudo apt install mysql-server composer git
Configure MySQL
sudo mysql_secure_installation
sudo mysql -u root -p
CREATE DATABASE lamat CHARACTER SET utf8mb4 COLLATE utf8mb4_unicode_ci;
CREATE USER 'lamat_user'@'localhost' IDENTIFIED BY 'your_password';
GRANT ALL PRIVILEGES ON lamat.* TO 'lamat_user'@'localhost';
FLUSH PRIVILEGES;
EXIT;
Clone and Setup Project
cd /var/www/html
sudo git clone [your-repository-url] lamat
cd lamat
sudo chown -R $USER:$USER .
composer install
cp .env.example .env
nano .env
Update your database credentials in .env:
DB_CONNECTION=mysql
DB_HOST=127.0.0.1
DB_PORT=3306
DB_DATABASE=lamat
DB_USERNAME=lamat_user
DB_PASSWORD=your_password
Complete Setup
php artisan key:generate
php artisan migrate
php artisan serve
Development Tips
-
Use
php artisan servefor local development (runs on port 8000) -
Enable debug mode in
.env:APP_DEBUG=true -
Use
php artisan cache:clearto clear application cache -
Use
php artisan config:clearto clear configuration cache -
Use
php artisan migrate:fresh --seedto reset database with seeders -
Set up virtual hosts for cleaner local URLs (e.g.,
lamat.local)
Database
The backend uses a single MySQL/MariaDB database named
lamat.
Manual Import
# Create the database
mysql -u root -p -e "CREATE DATABASE lamat CHARACTER SET utf8mb4 COLLATE utf8mb4_unicode_ci"

# Import the schema
mysql -u root -p lamat < database/backup/database.sql
database.sql automatically from the license server during
Step 2. You only need a local backup if you don't set
LICENSE_SERVER_URL.
Laravel Configuration
# Navigate to the backend directory
cd lamat

# Generate app key
php artisan key:generate

# Edit .env with your settings
nano .env
Key .env Settings
| Key | Required | Description |
|---|---|---|
APP_URL |
Yes | Your backend's base URL (must match the domain users will access) |
DB_* |
Yes | Database connection settings |
PUSHER_* |
Yes | Pusher credentials for real-time features |
LICENSE_SERVER_URL |
Yes | URL to the license server's index.php |
FCM_SERVER_KEY |
Yes | Firebase Cloud Messaging server key |
MAIL_* |
Yes | SMTP settings for transactional emails |
APP_DEBUG |
Yes | Set to false in production |
Storage Permissions
chmod -R 775 storage bootstrap/cache
Installation Wizard
Access the wizard at
https://your-domain.com/install after uploading the
backend files. It runs in 5 steps and is locked after completion .
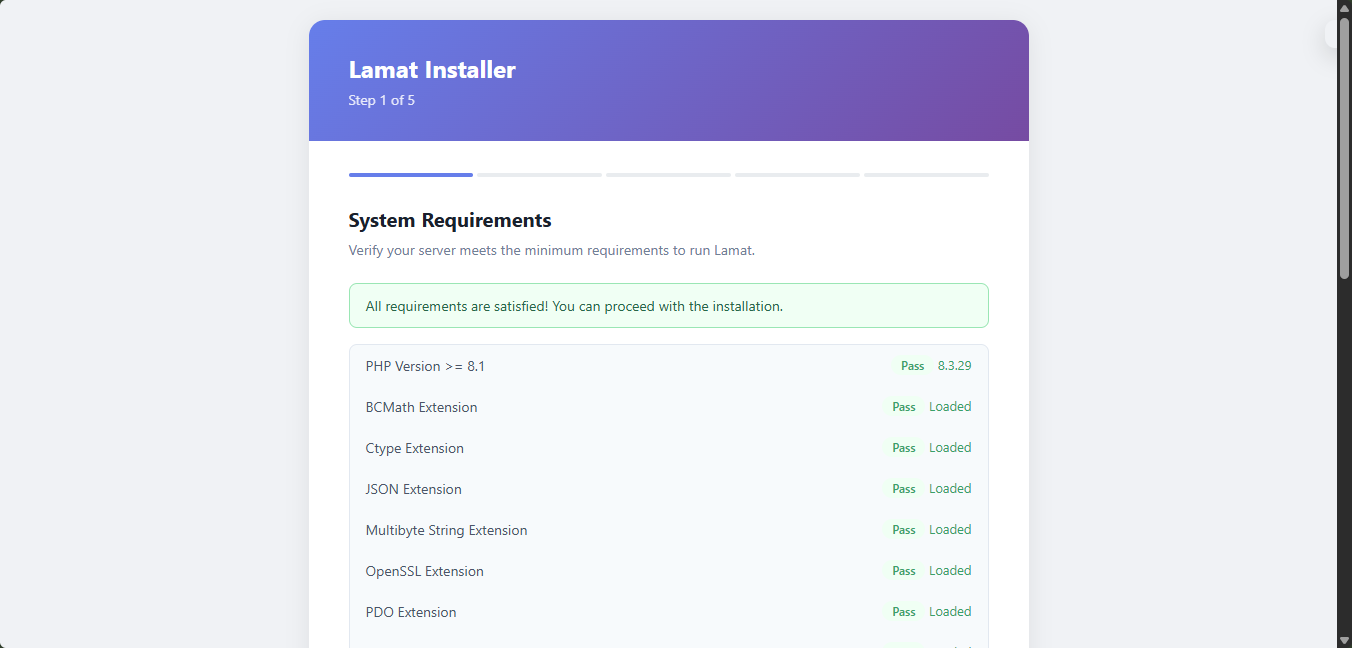
Step 1 — Requirements
The wizard checks PHP version, required extensions, file permissions
(storage/, bootstrap/cache/), and required
configuration values. All checks must pass.
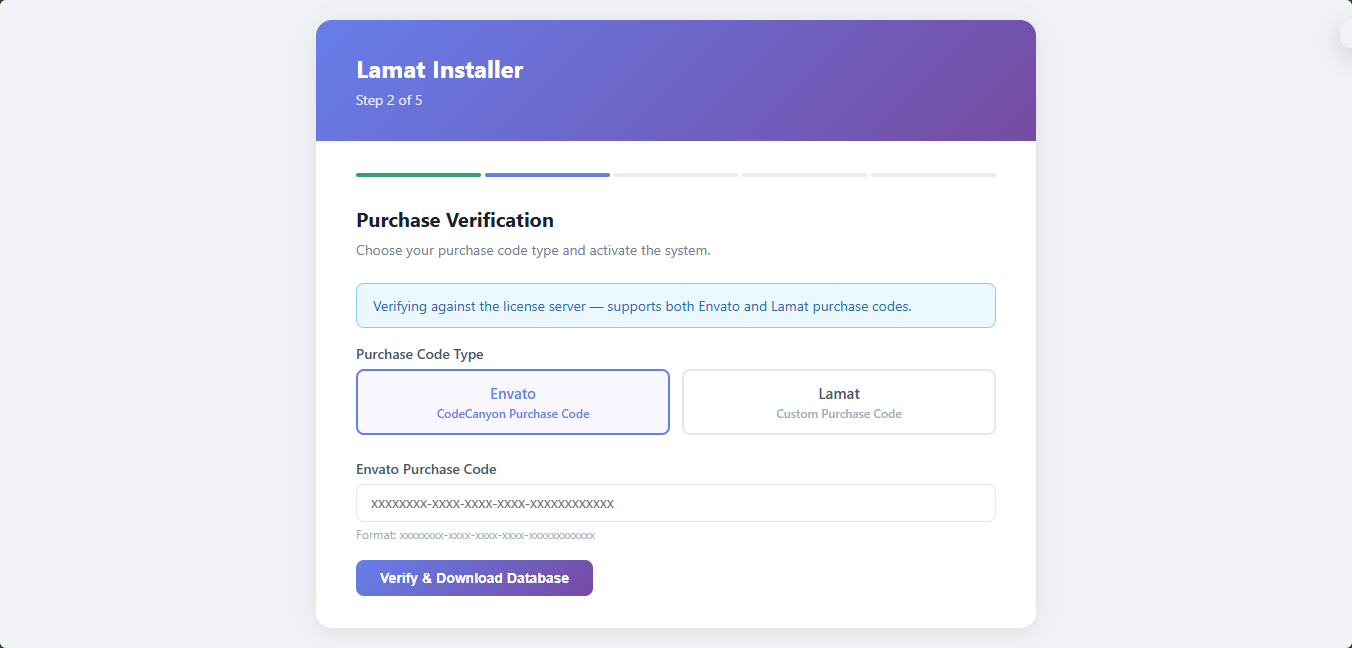
Step 2 — Purchase Verification
Enter your Envato purchase code
(xxxxxxxx-xxxx-xxxx-xxxx-xxxxxxxxxxxx).
If LICENSE_SERVER_URL is configured, verification is
handled by the license server automatically. Otherwise, you'll be
asked for an Envato Personal Token.
On success, a 30-minute download token is generated and the database schema is downloaded from the license server.
storage/app/purchase.json
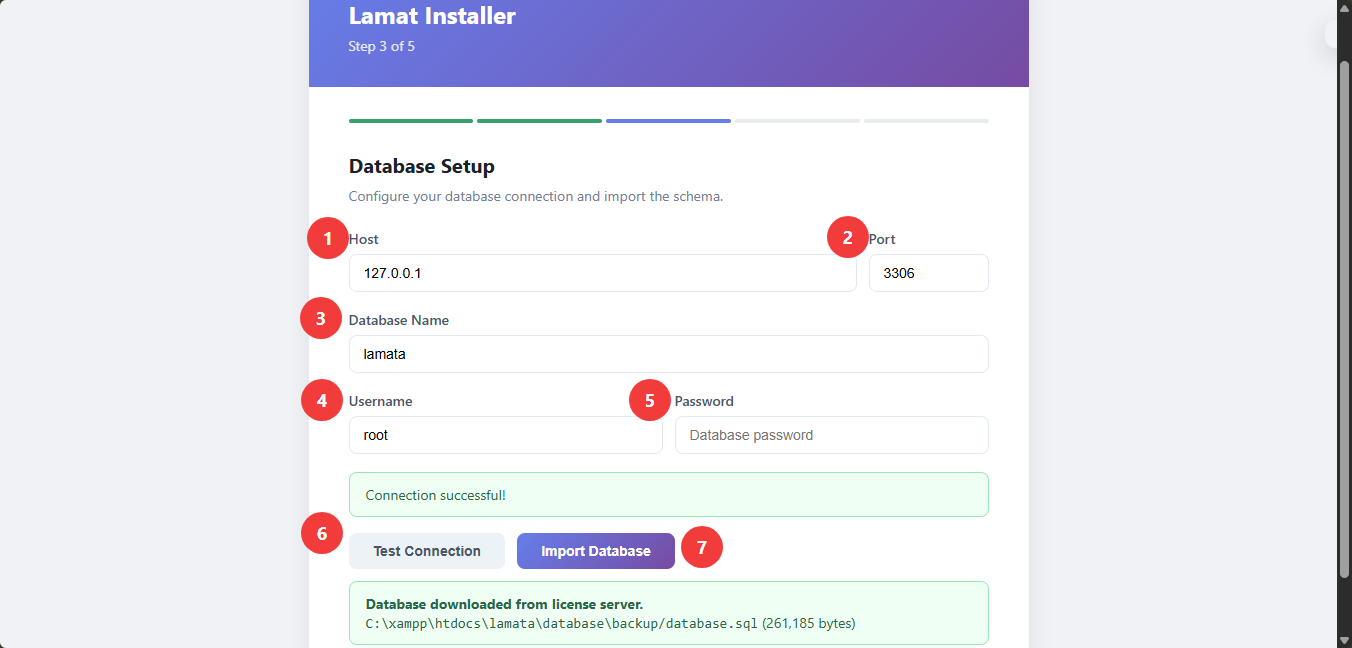
Step 3 — Database Setup
Enter your database credentials and click Test Connection.
If the schema was downloaded in Step 2, you'll see a green confirmation. If not, click Retry Download. If the token expired, click Refresh Token & Retry to get a new one.
Click Import Database to execute the schema.
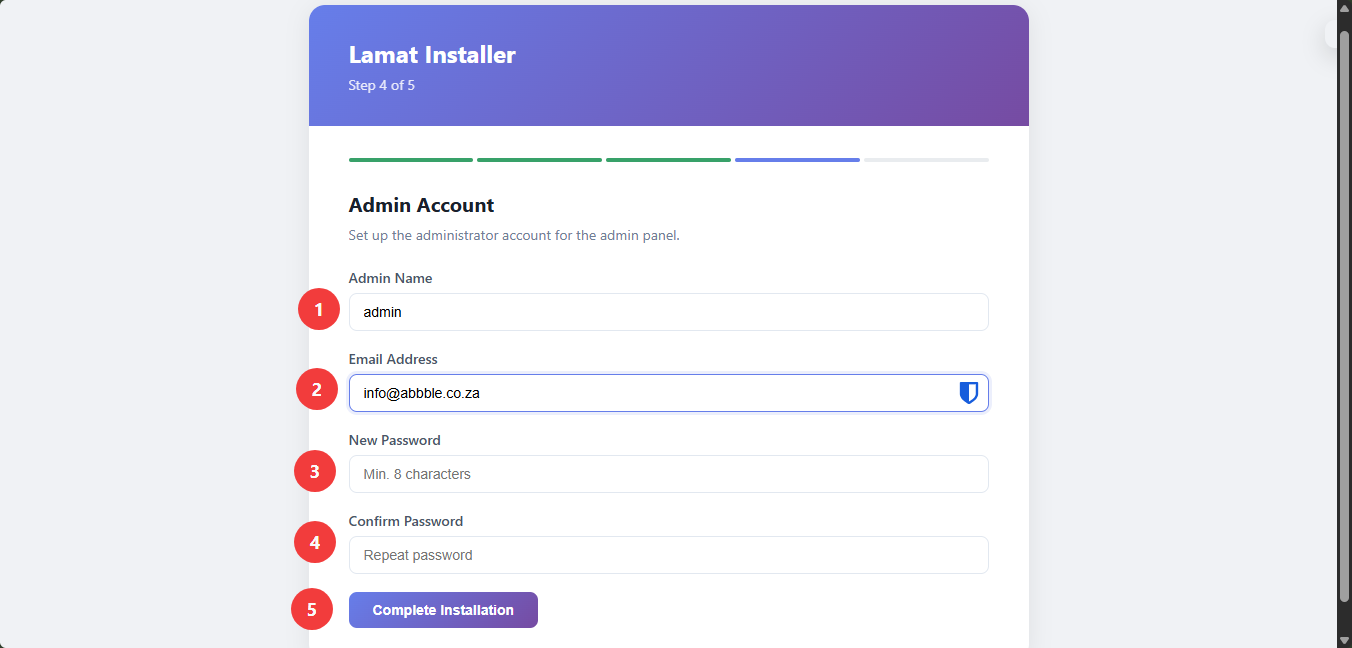
Step 4 — Admin Account
Create the super admin account:
- Name — display name for the admin panel
- Email — login email
- Password — minimum 8 characters (bcrypt hashed)
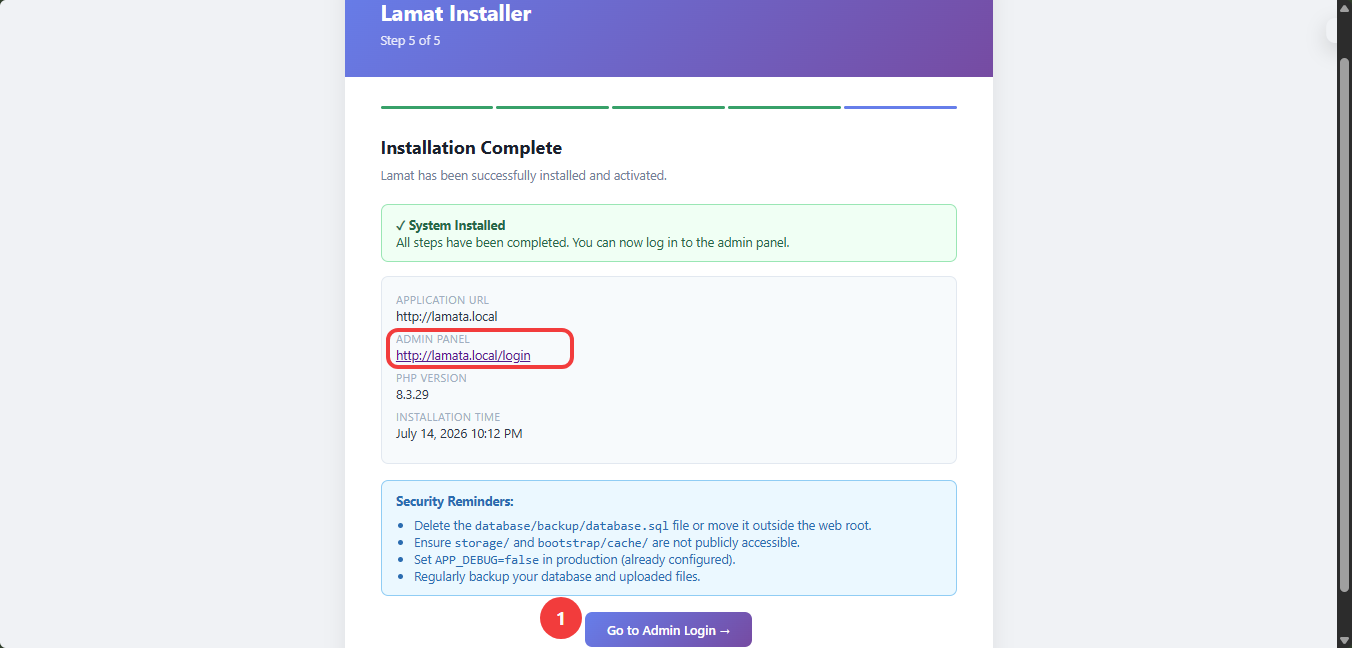
Step 5 — Complete
The wizard locks itself so it can't be re-run.
Post-install:
- Delete
database/backup/database.sql - Verify the Flutter app can reach the API
- Set
APP_DEBUG=falsein .env
Local Flutter Development
Prerequisites
- Flutter SDK 3.27+ (
flutter doctorshould pass) - Dart SDK (included with Flutter)
- IDE: VS Code, Android Studio, or IntelliJ IDEA
- For Android development: Android Studio with Android SDK
- For iOS development: Xcode (macOS only)
- For web development: Chrome browser
Windows Setup
Install Flutter SDK
Download Flutter SDK from
Flutter documentation. Extract to a location like C:\flutter.
Add Flutter to PATH
Add C:\flutter\bin to your system PATH environment
variable.
Install Android Studio
Download and install Android Studio from developer.android.com/studio. Install Android SDK and Android SDK Platform-Tools.
Install VS Code (Optional)
Download VS Code and install the Flutter and Dart extensions.
Run Flutter Doctor
flutter doctor
Follow the instructions to fix any issues. All items should show checkmarks for optimal development.
Clone the Flutter Project
cd D:\projects
git clone [your-repository-url] flutter-app
cd flutter-app
Install Dependencies
flutter pub get
Run the App
For development on different platforms:
# Web development
flutter run -d chrome

# Android development (ensure device/emulator connected)
flutter run -d android

# Check available devices
flutter devices
macOS Setup
Install Xcode (for iOS development)
brew install xcode
Or install from the Mac App Store. Open Xcode and accept the license agreement.
Install Android Studio (for Android development)
brew install --cask android-studio
Install VS Code
brew install --cask visual-studio-code
Install Flutter and Dart extensions in VS Code.
Setup and Run
flutter doctor
cd ~/projects/flutter-app
flutter pub get
flutter run -d macos        # macOS desktop
flutter run -d ios          # iOS simulator
flutter run -d chrome       # Web
Linux Setup
Install Flutter SDK
sudo apt update
sudo apt install git unzip xz-utils zip libglu1-mesa
cd /opt
wget https://storage.googleapis.com/flutter_infra_release/releases/stable/linux/flutter_linux_3.27.0-stable.tar.xz
tar xf flutter_linux_3.27.0-stable.tar.xz
export PATH="$PATH:/opt/flutter/bin"
Install Android Studio
sudo apt install android-studio
Install VS Code
sudo apt install code
Install Flutter and Dart extensions in VS Code.
Setup and Run
flutter doctor
cd ~/projects/flutter-app
flutter pub get
flutter run -d linux        # Linux desktop
flutter run -d chrome       # Web
flutter run -d android      # Android device/emulator
Development Tips
-
Use
flutter devicesto list available development targets -
Use
flutter run -d [device-id]to run on specific device -
Use
flutter hot-reloadfor quick UI updates (press 'r' in terminal) -
Use
flutter hot-restartfor full restart (press 'R' in terminal) -
Use
flutter cleanto clean build cache when facing issues - Use
flutter pub upgradeto update dependencies -
Enable Dart DevTools for debugging:
flutter pub global activate devtools - Use
flutter analyzeto check code for issues - Test on multiple screen sizes using device emulator
VS Code Extensions Recommended
- Flutter (official Flutter extension)
- Dart (official Dart extension)
- Flutter Widget Snippets (widget code snippets)
- Awesome Flutter Snippets (additional snippets)
- Bracket Pair Colorizer (code readability)
- Error Lens (inline error display)
Debugging Tools
- Flutter DevTools: Performance profiling, memory analysis, network inspection
- Android Studio Debugger: Full-featured debugging for Android
- VS Code Debugger: Lightweight debugging with breakpoints
- Flutter Inspector: Widget tree inspection and property modification
- iOS: Requires macOS and Xcode. Cannot develop iOS apps on Windows or Linux.
- Android: Requires Android SDK. Emulator setup can be resource-intensive.
- Web: Works on all platforms but has some platform limitations.
- Desktop: Linux, Windows, and macOS desktop apps are supported.
Flutter App Setup
Prerequisites
- Flutter SDK 3.27+ (
flutter doctorshould pass)
.
Flutter installation
- VS CODE, Android Studio or Xcode
- A Firebase project with Android + iOS apps registered in Firebase console
Step 1: Configure Constants
Edit lib/constants.dart:
| Line | Constant | Your Value |
|---|---|---|
| ~20 | homeUrl |
https://yourdomain.com |
| ~32 | isDemo |
false |
Step 2: Create a Firebase Project
To enable features like authentication, analytics, or remote config in your app, you'll need to create a Firebase project and link both your Android and iOS apps to it.
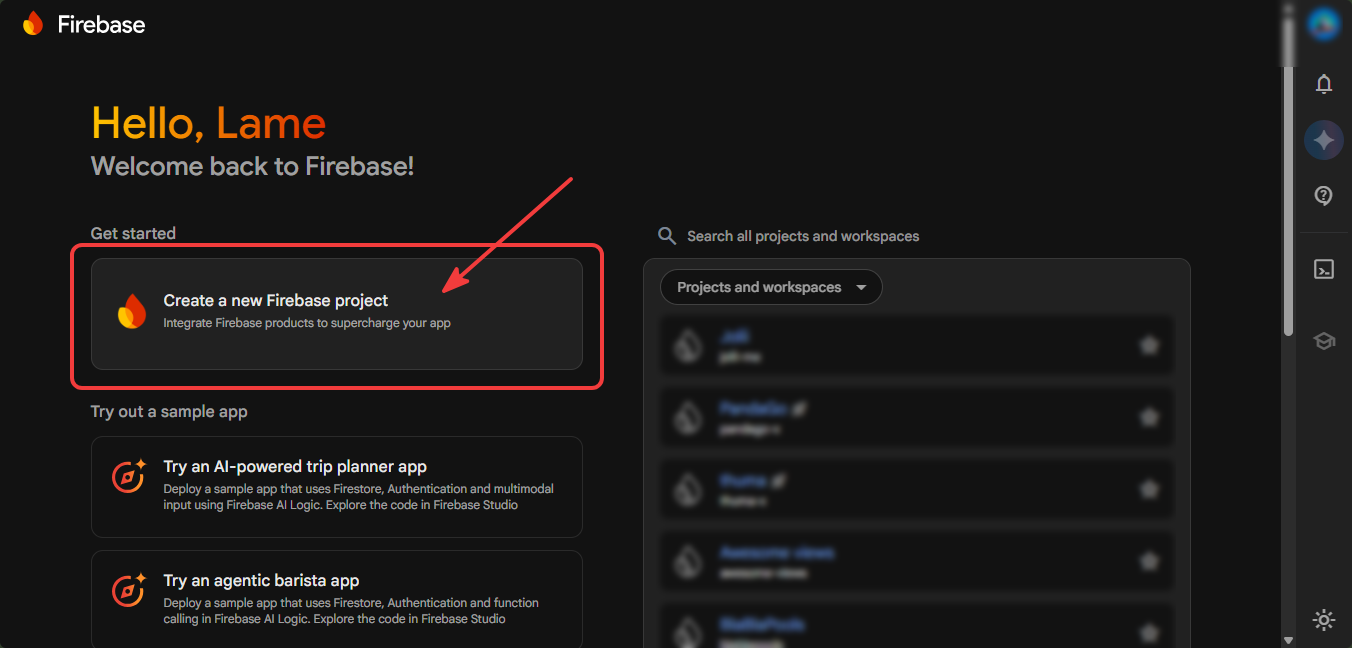
Steps to get started
-
Go to the Firebase Console
Visit https://console.firebase.google.com and sign in with your Google account. -
Create a new project
Click "Add project" and follow the steps. Make sure to enable Google Analytics.
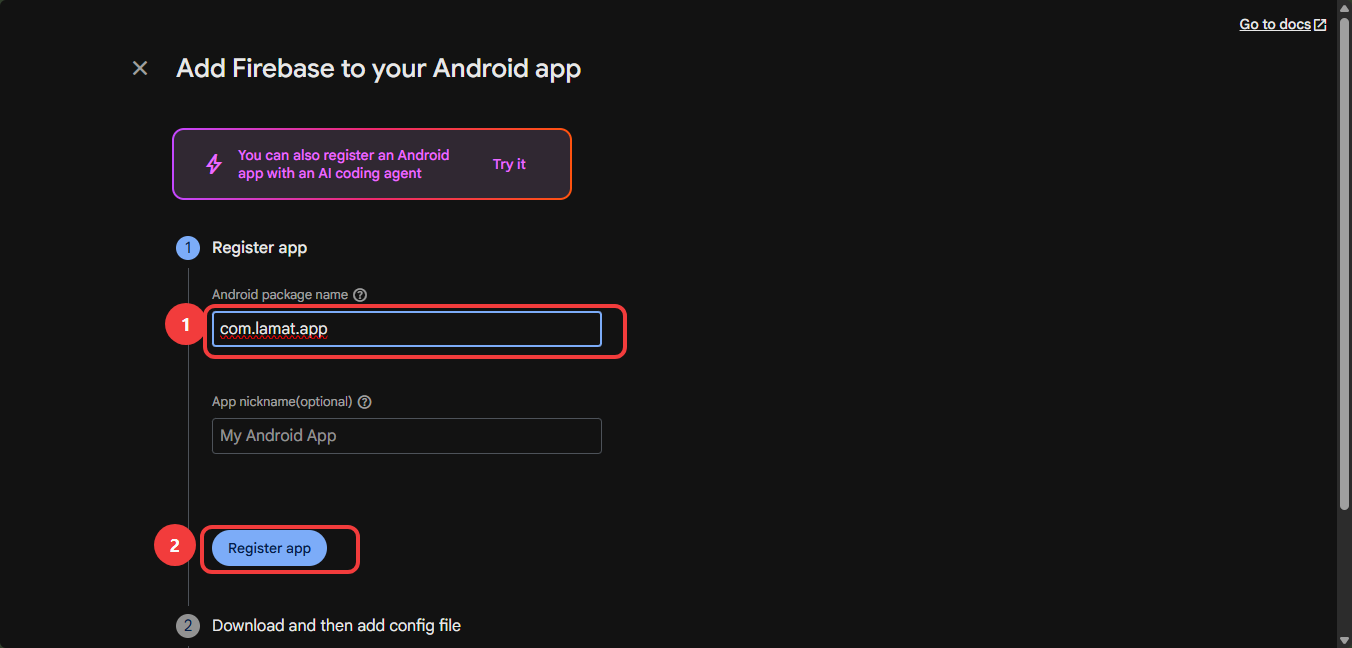
Add your Android app
- In your new Firebase project, click "Add app" and choose the Android icon.
-
Enter your app's package name (e.g.
com.example.myapp) — this must match your actual Android package. -
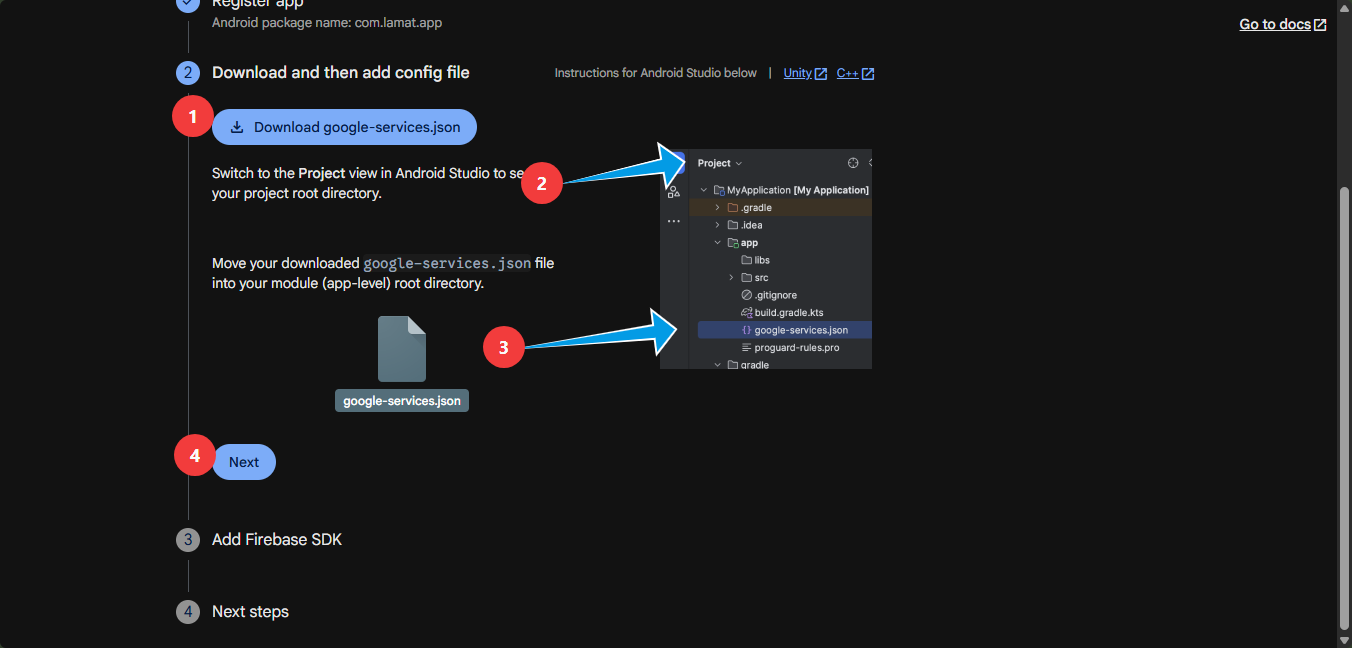
Download the
google-services.jsonfile and place it in:androidApp/google-services.json
This will replace the placeholder file already in that location.
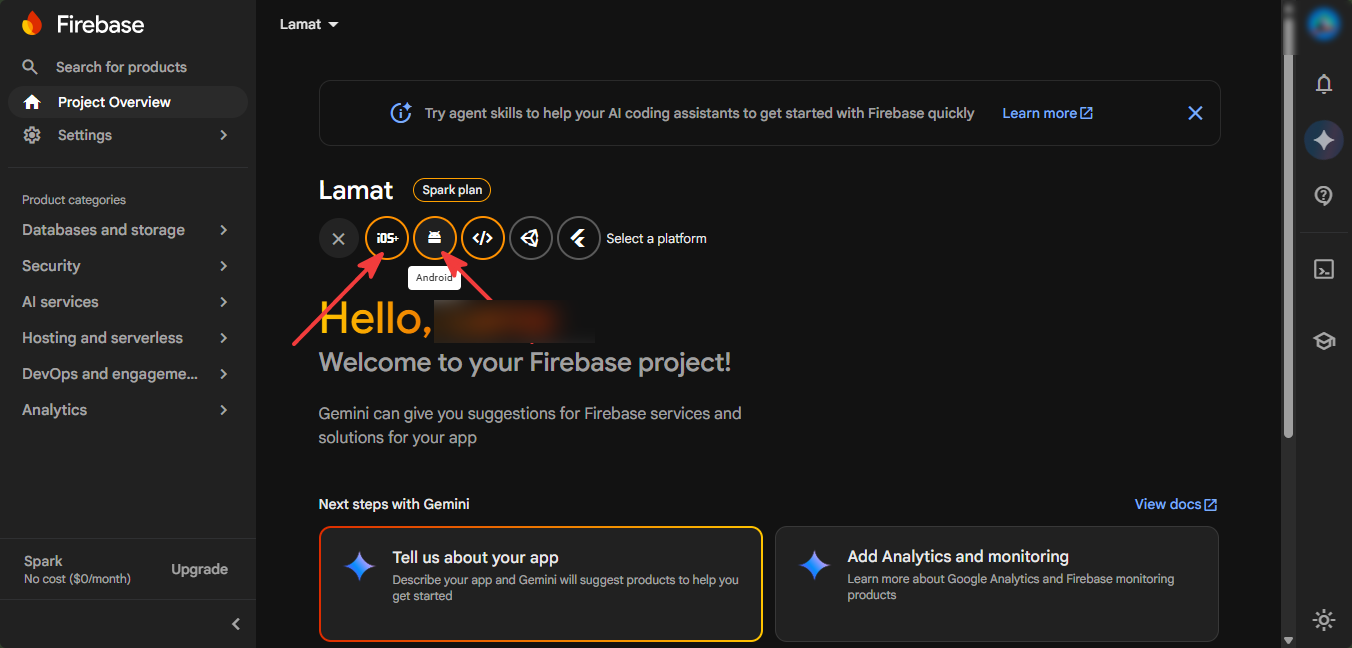
Add your iOS app
- Still in the Firebase Console, click "Add app" and choose the iOS icon.
-
Enter your iOS app's bundle ID (e.g.
com.example.myapp) — this must match exactly. -
Download the
GoogleService-Info.plistfile and place it in:iosApp/iosApp/Firebase/GoogleService-Info.plist
This will replace the placeholder file already included in the project.
Step 3: Connect Firebase to Flutter App
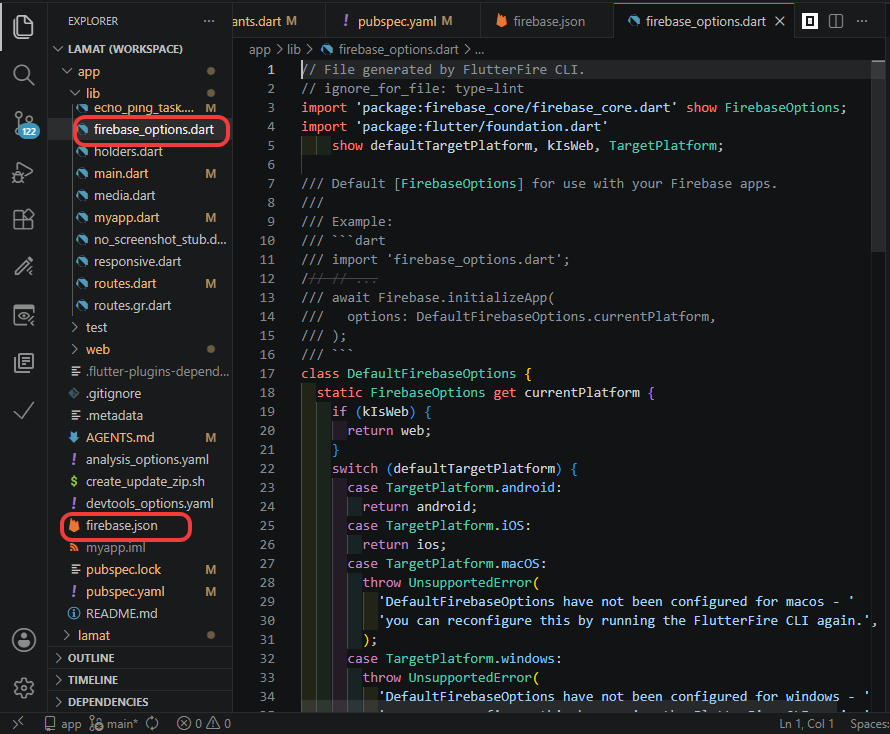
After creating your Firebase project and registering your apps, you
need to connect them to your Flutter project using the FlutterFire
CLI. This generates the firebase_options.dart file and
handles all native configuration files.
1. Install Firebase CLI & FlutterFire CLI
# Install Firebase CLI (if not already installed)
npm install -g firebase-tools

# Log in to Firebase
firebase login

# Install FlutterFire CLI
dart pub global activate flutterfire_cli
2. Run flutterfire configure
From your Flutter project root, run the following command. It
registers your apps, downloads the native config files, and generates
lib/firebase_options.dart.
flutterfire configure
This interactive command will:
- Prompt you to select a Firebase project from your console.
- Detect your platforms (Android, iOS, Web) from the project.
- Match or create Firebase apps for each platform based on your package/bundle IDs.
-
Download
google-services.jsontoandroid/app/. -
Download
GoogleService-Info.plisttoios/Runner/. -
Generate
lib/firebase_options.dartwith theDefaultFirebaseOptionsclass. -
Create or update a
firebase.jsonin your project root to track the configuration.
3. The firebase.json file
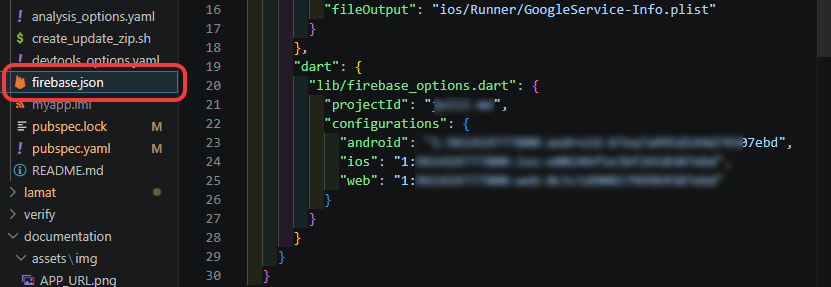
The firebase.json file is created in your project root
and tracks where each platform's native service files are placed. It
is used by flutterfire reconfigure to rewrite service
files in place when you add new Firebase products or platforms.
{
  "flutterfire": {
    "platforms": ["android", "ios", "web"],
    "android": {
      "out": "android/app/google-services.json"
    },
    "ios": {
      "out": "ios/Runner/GoogleService-Info.plist"
    }
  }
}
Commit this file to your repository. It ensures that subsequent
flutterfire reconfigure calls know where to place
platform config files without re-prompting.
4. The firebase_options.dart file
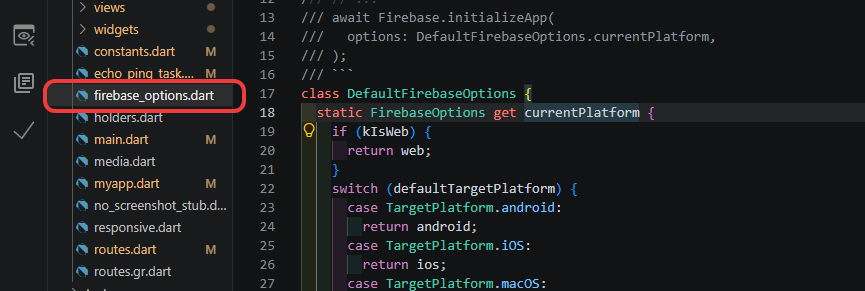
This auto-generated file in lib/ exports a
DefaultFirebaseOptions class with a static getter
currentPlatform that returns the correct
FirebaseOptions for the current build target:
// Generated by FlutterFire CLI.
// lib/firebase_options.dart

import 'package:firebase_core/firebase_core.dart'
    show FirebaseOptions;

class DefaultFirebaseOptions {
  static FirebaseOptions get currentPlatform {
    // Returns the correct options based on Platform.isXxx
  }

  static FirebaseOptions android = FirebaseOptions(
    apiKey: '...',
    appId: '...',
    messagingSenderId: '...',
    projectId: '...',
    storageBucket: '...',
  );

  static FirebaseOptions ios = FirebaseOptions(
    apiKey: '...',
    appId: '...',
    messagingSenderId: '...',
    projectId: '...',
    storageBucket: '...',
    iosBundleId: '...',
  );

  static FirebaseOptions web = FirebaseOptions(
    apiKey: '...',
    appId: '...',
    messagingSenderId: '...',
    projectId: '...',
    authDomain: '...',
    storageBucket: '...',
    measurementId: '...',
  );
}
The values are non-secret identifiers for your Firebase project. Do
not edit this file manually — run
flutterfire configure again if you need to update it
(e.g. after adding a new platform or switching projects).
5. (Optional) Reconfigure after adding products
If you enable new Firebase services (e.g. Crashlytics, Analytics, Realtime Database), run the reconfigure command to update all native config files without re-prompting:
flutterfire reconfigure
flutterfire configure or
flutterfire reconfigure to keep the native config files
and firebase_options.dart in sync.
Step 4: Dependencies
flutter pub get
Step 5: Generate Routes
The app uses auto_route. After modifying
lib/routes.dart:
flutter pub run build_runner build --delete-conflicting-outputs
lib/routes.gr.dart (~5k lines) and
lib/generated/locale_keys.g.dart. These are committed to
the repo; regenerate after route changes.
Step 6: Google Location / Geocoding / Maps
To use Google Maps, Places, and Geocoding APIs in your Flutter app, you need a Google Cloud project with the relevant APIs enabled and a restricted API key per platform. Below is the complete setup as of 2026.
1. Enable the required APIs
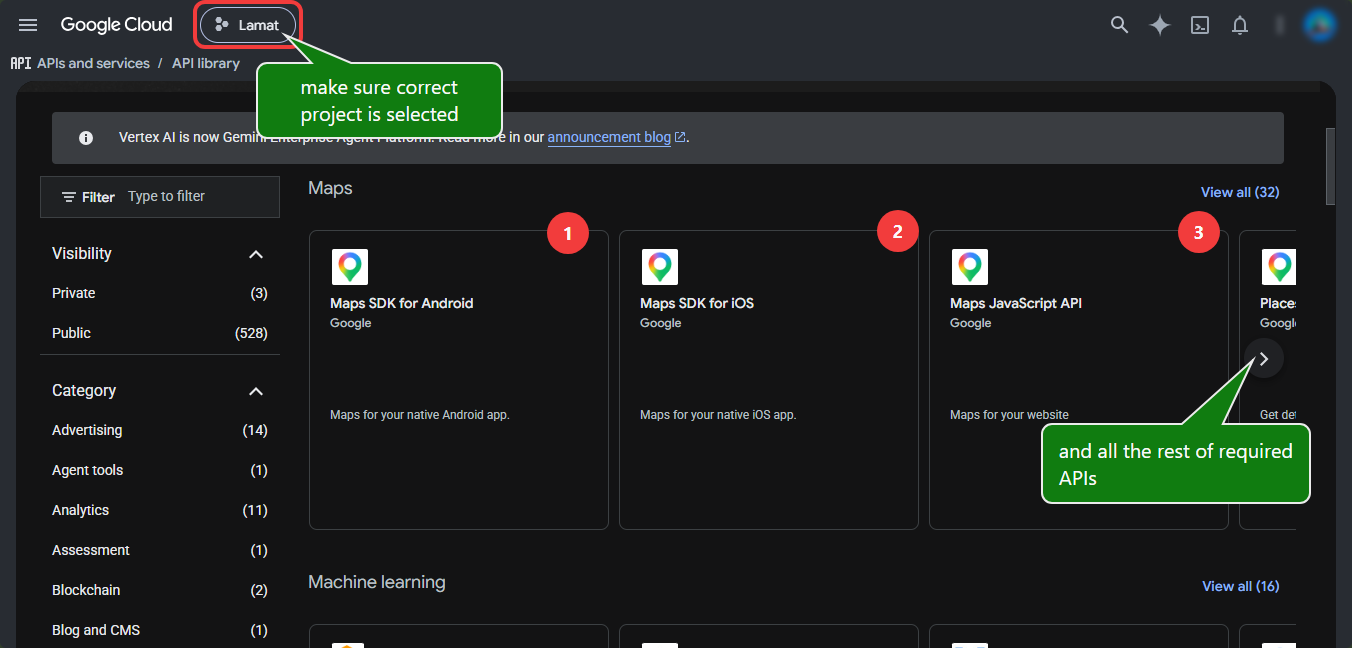
Go to the Google Cloud Console → APIs & Services → Library and enable the following APIs for your project:
- Maps SDK for Android — native maps on Android
- Maps SDK for iOS — native maps on iOS
- Maps JavaScript API — maps on Flutter Web
- Places API (New) — place search, autocomplete, and details
- Geocoding API — convert coordinates to addresses and vice versa
- Directions API — (optional) route calculations
2. Create & restrict API keys
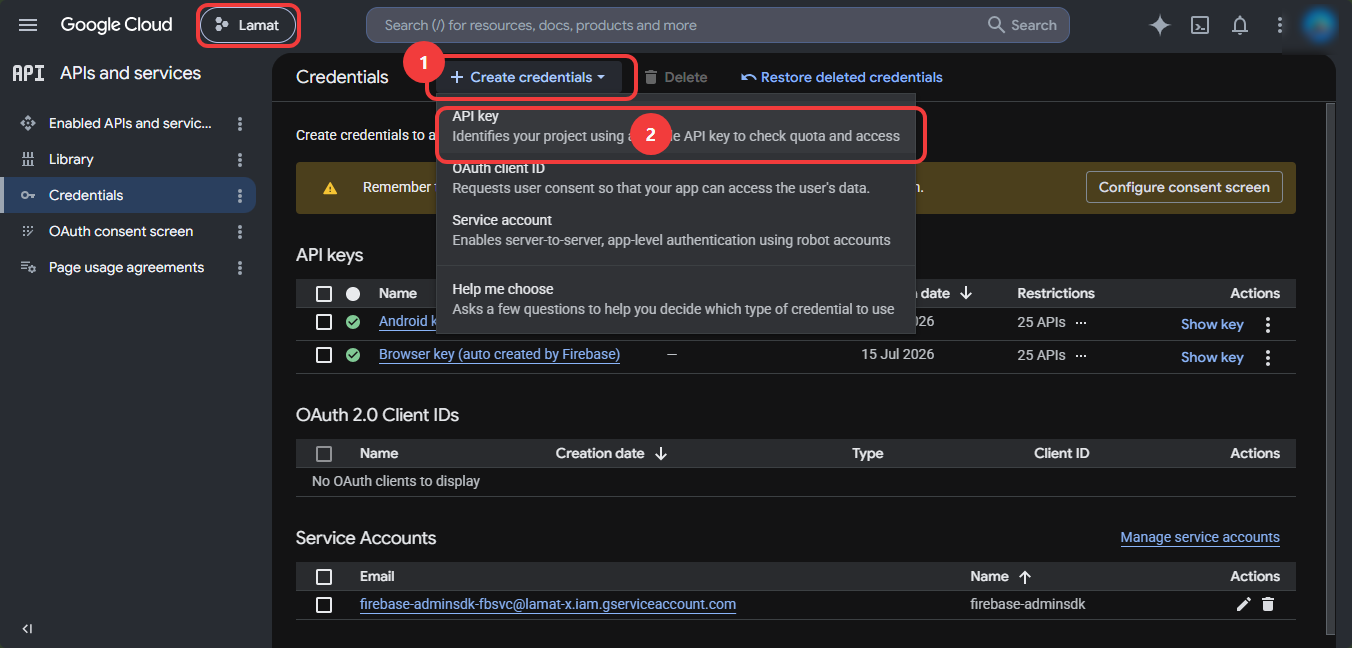
Create an API key in Credentials. For security, create separate keys for each platform and apply both application and API restrictions.
Android API key
-
Application restriction: Android apps → enter your
package name (e.g.
com.yourcompany.appname) and the SHA-1 certificate fingerprint. - API restriction: Restrict to Maps SDK for Android, Places API (New), and Geocoding API.
iOS API key
-
Application restriction: iOS apps → enter your
bundle ID (e.g.
com.yourcompany.appname). - API restriction: Restrict to Maps SDK for iOS, Places API (New), and Geocoding API.
Web API key
-
Application restriction: HTTP referrers → add your
domain(s), e.g.
https://yourdomain.com/*andhttp://localhost:*for development. - API restriction: Restrict to Maps JavaScript API, Places API (New), and Geocoding API.
3. Configure Android
Add the API key to
android/app/src/main/AndroidManifest.xml inside the
<application> tag:
<meta-data
    android:name="com.google.android.geo.API_KEY"
    android:value="YOUR_ANDROID_API_KEY" />
For production, use the Secrets Gradle Plugin to keep the key out of version control:
# 1. In root build.gradle (buildscript > dependencies):
classpath "com.google.android.libraries.mapsplatform.secrets-gradle-plugin:secrets-gradle-plugin:2.0.1"

# 2. In app build.gradle (plugins):
id 'com.google.android.libraries.mapsplatform.secrets-gradle-plugin'

# 3. In local.properties (do NOT commit):
MAPS_API_KEY=YOUR_ANDROID_API_KEY

# 4. Reference in AndroidManifest.xml:
# android:value="${MAPS_API_KEY}"
Ensure minSdkVersion is at least 21.
4. Configure iOS
Add the API key (replace YOUR_IOS_API_KEY) to
ios/Runner/AppDelegate.swift (or
AppDelegate.m):
import GoogleMaps

@main
class AppDelegate: FlutterAppDelegate {
  override func application(
    _ application: UIApplication,
    didFinishLaunchingWithOptions launchOptions: [UIApplication.LaunchOptionsKey: Any]?
  ) -> Bool {
    GMSServices.provideAPIKey("YOUR_IOS_API_KEY")
    GeneratedPluginRegistrant.register(with: self)
    return super.application(application, didFinishLaunchingWithOptions: launchOptions)
  }
}
5. Configure Web
Replace YOUR_WEB_API_KEY for the Maps JavaScript API loader in
web/index.html inside the <head> tag:
<script src="https://maps.googleapis.com/maps/api/js?key=YOUR_WEB_API_KEY"></script>
6. Flutter packages
| Package | Purpose |
|---|---|
google_maps_flutter |
Embed interactive maps in your app (Android, iOS, Web) |
geocoding |
Convert addresses ↔ coordinates (forward & reverse geocoding) |
geolocator |
Get the user's current location |
google_places_flutter or
places_flutter
|
Place autocomplete, search, and details UI |
http |
Direct REST calls to Geocoding / Places / Directions APIs |
Building the App
Web
# Development
flutter run -d chrome --web-port=8080

# Production
flutter build web --web-renderer canvaskit --release

# Deploy to server
cp -r build/web/* /var/www/html/lamat/public/
Android
flutter build apk --release
flutter build appbundle --release    # Play Store
iOS
flutter build ios --release
open ios/Runner.xcworkspace          # Archive in Xcode
User Sign Up Walkthrough
After running
Flutter run or Flutter build commands you
will open the app for testing.
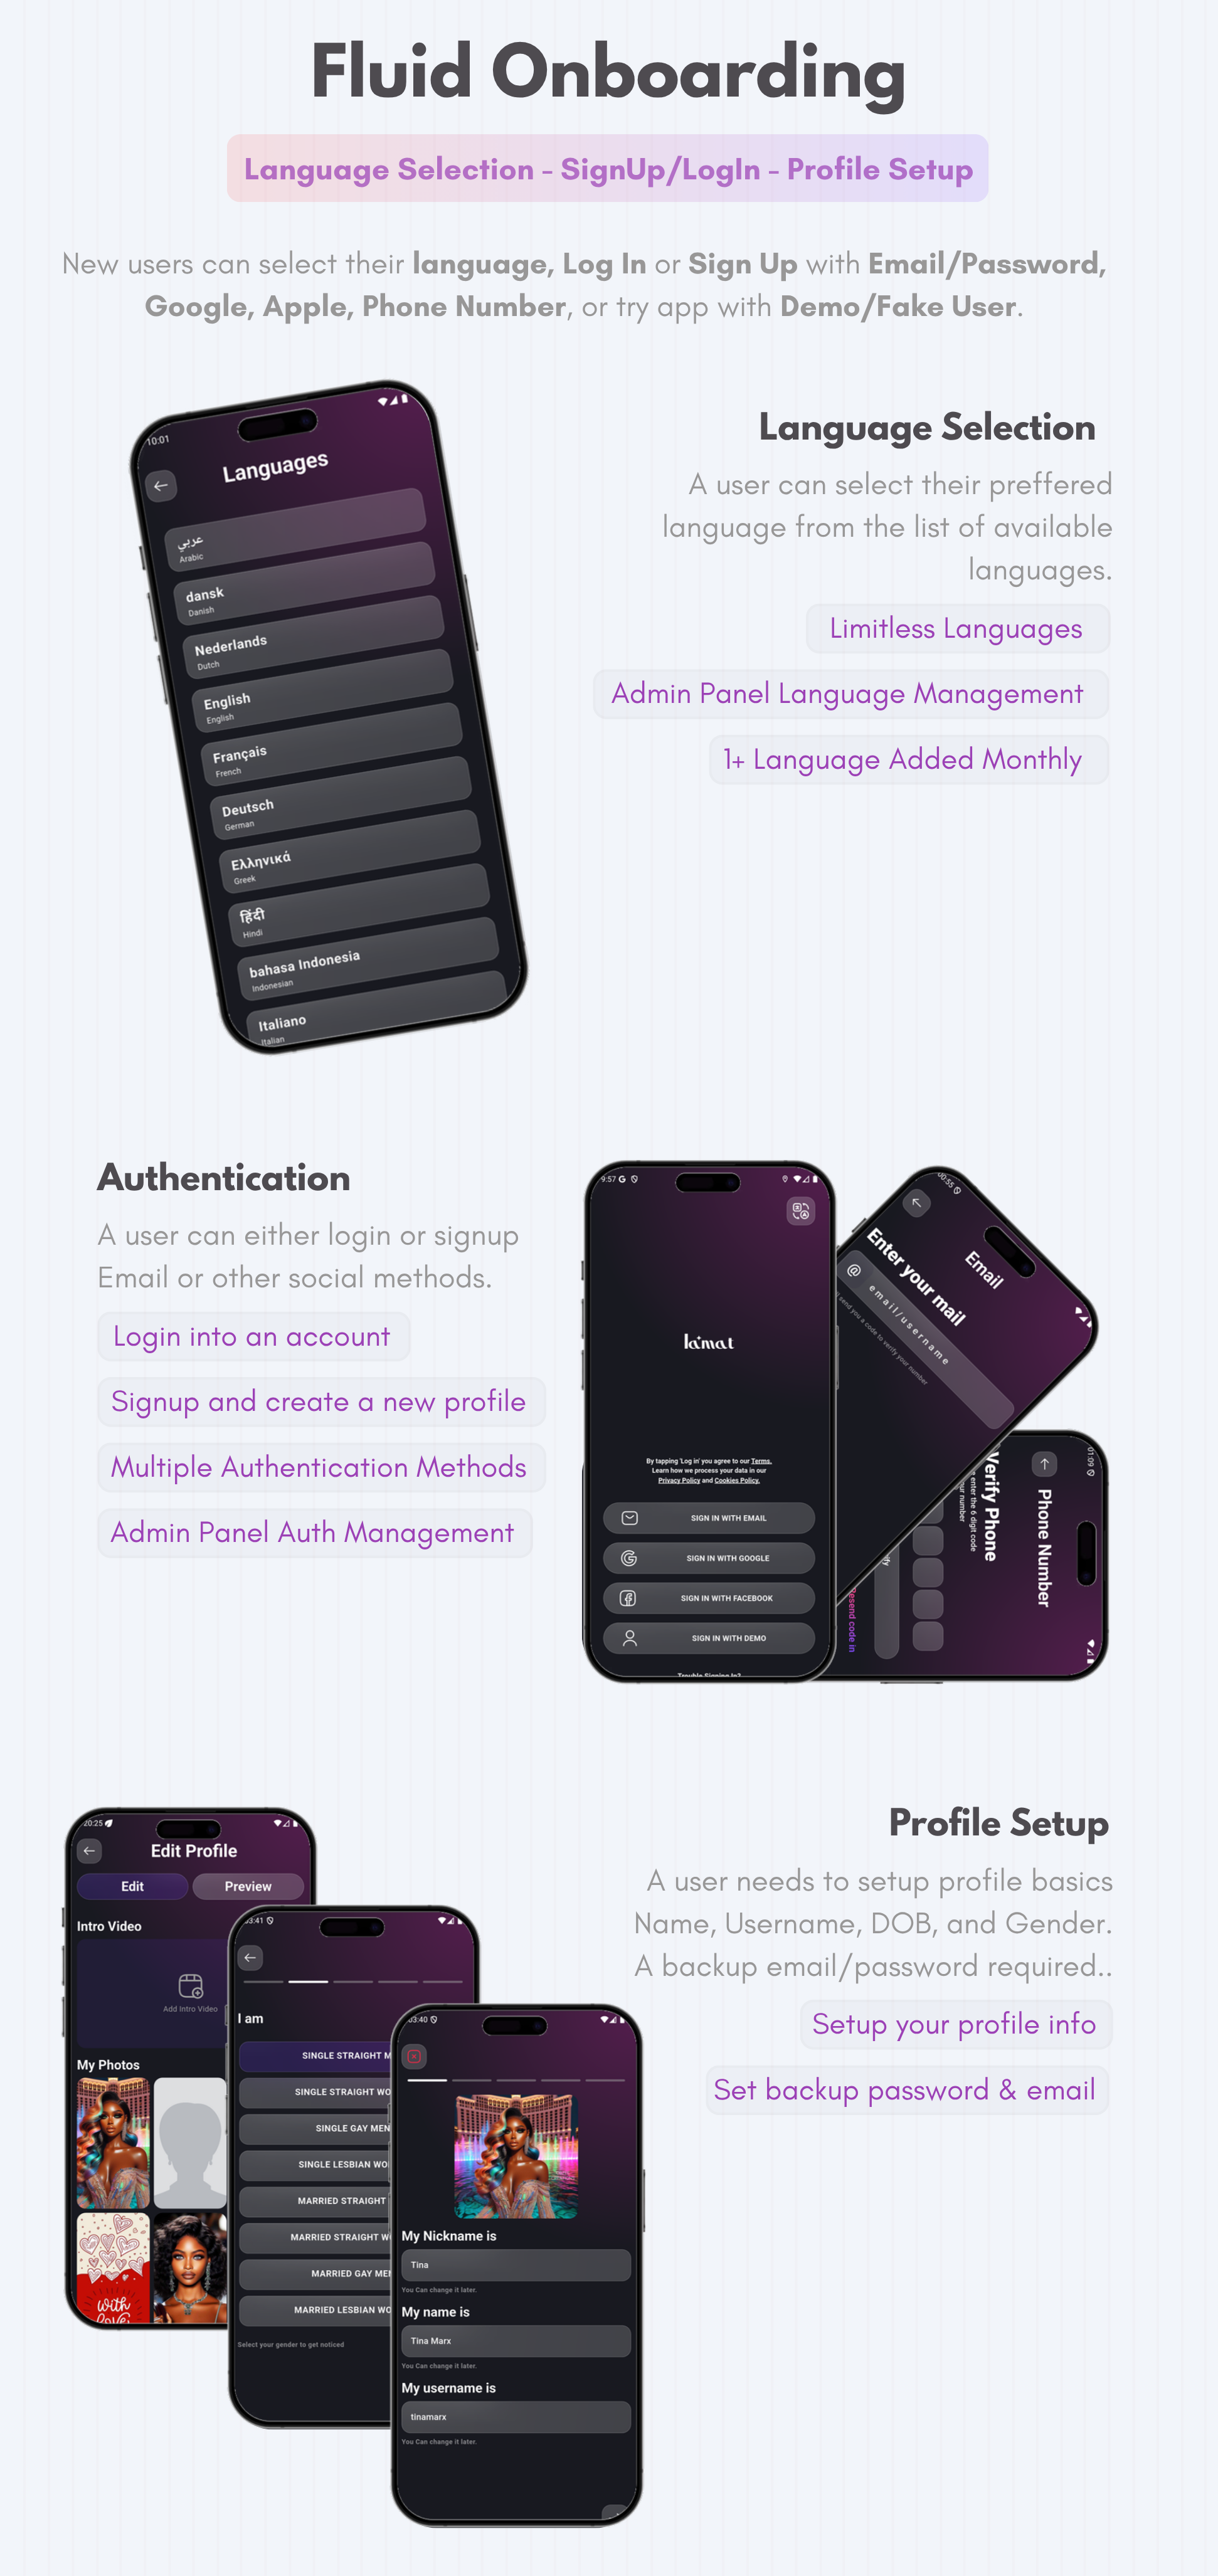
Step 1
The User will pick their app language. And continue
Step 2
The User will pick their preffered login/register method and verify with OTP
Step 3
New users will be sent to user on-boarding screen to set their basic details like Full names, Profile picture, email, username, gender, d.o.b, profiles filter, location and profile images.
Step 4
Finally user will be asked set a new password.
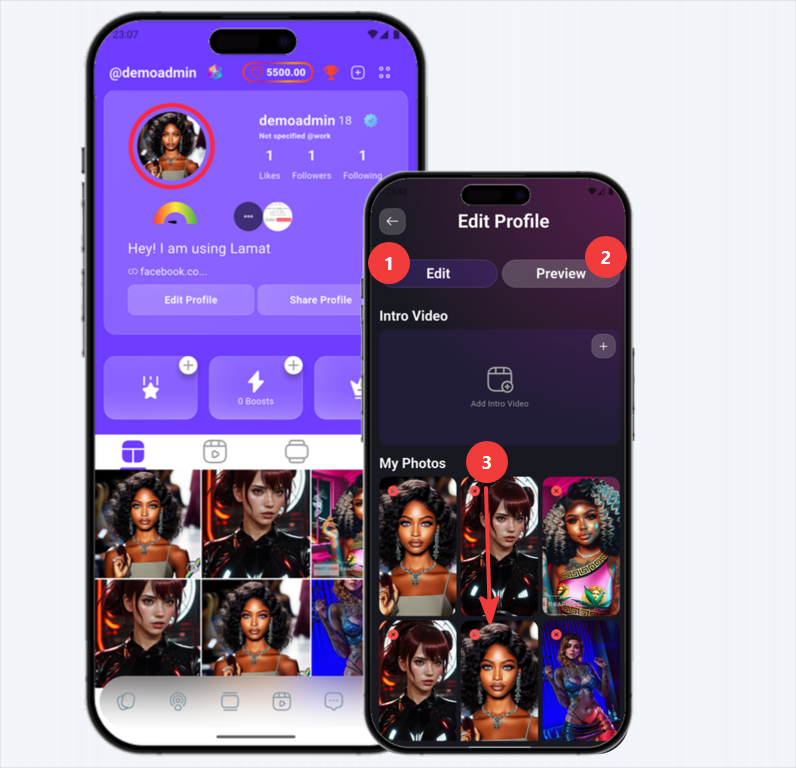
Step 5
After on-boarding the user will be sent to the home screen and an optional complete profile window will be shown for user to set other optional profile details.
- This tab is profile editing tab
- This tab is your profile preview how others see your profile
- Scroll down to see more profile details options
Matching Process Walkthrough
After user has finished profile setup they can then start swiping left/right on user cards. Swipe Right to like a user and Swipe Left to dislike and pass.
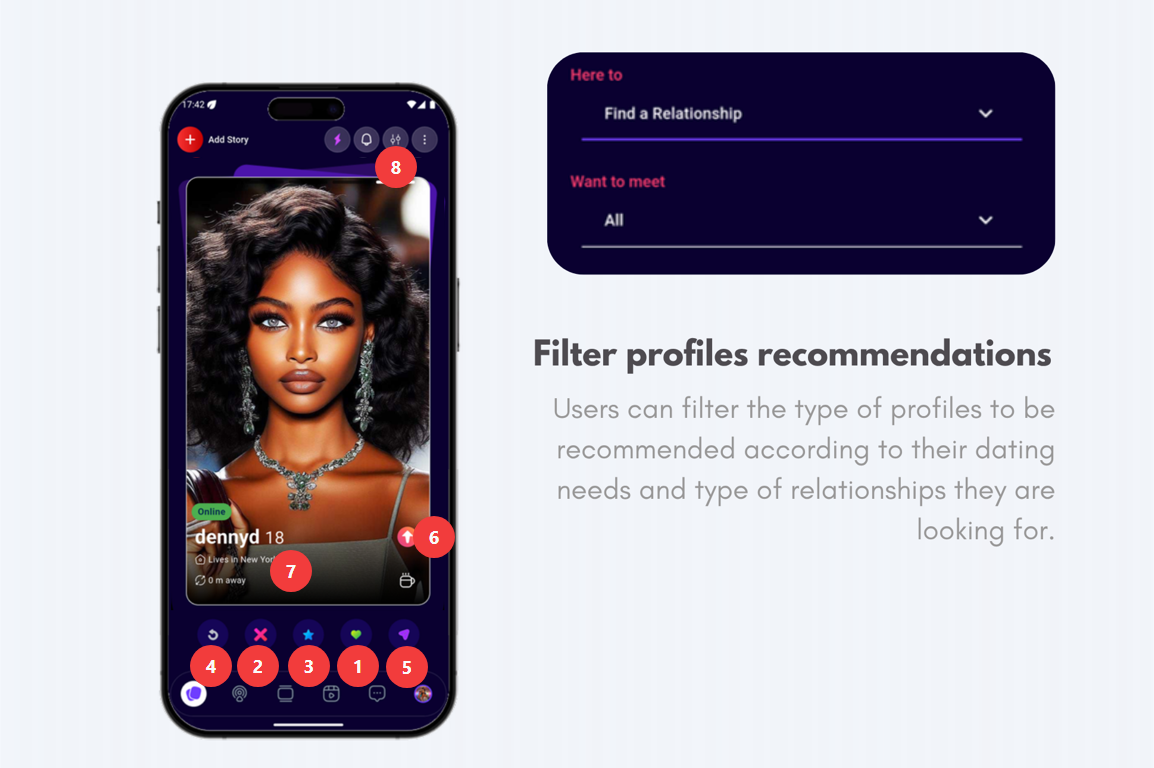
Like User/Swipe Right
This button is for liking the current profile. It's the same as a Swipe Right
Dislike User/Swipe Left
This button is for disliking and skipping the current profile. It's the same as a Swipe Left
Super Like User/Swipe Up
This button is for super liking and the current profile. It's the same as a Swipe Up
Rewind User
This button is for rewinding to previous profile. It requires a pro/premium membership.
Request Chat with User
This button is for sending and request chat before swipe. It requires the setting to be turned on in admin panel.
Open Detailed User Profile
This button will open the users detailed profile page.
User Profile Details
Here user will see profile details like name, city, age, and distance away.
User Profile Filters
This button will open the filters screen for the user to adjust their matching preferences.
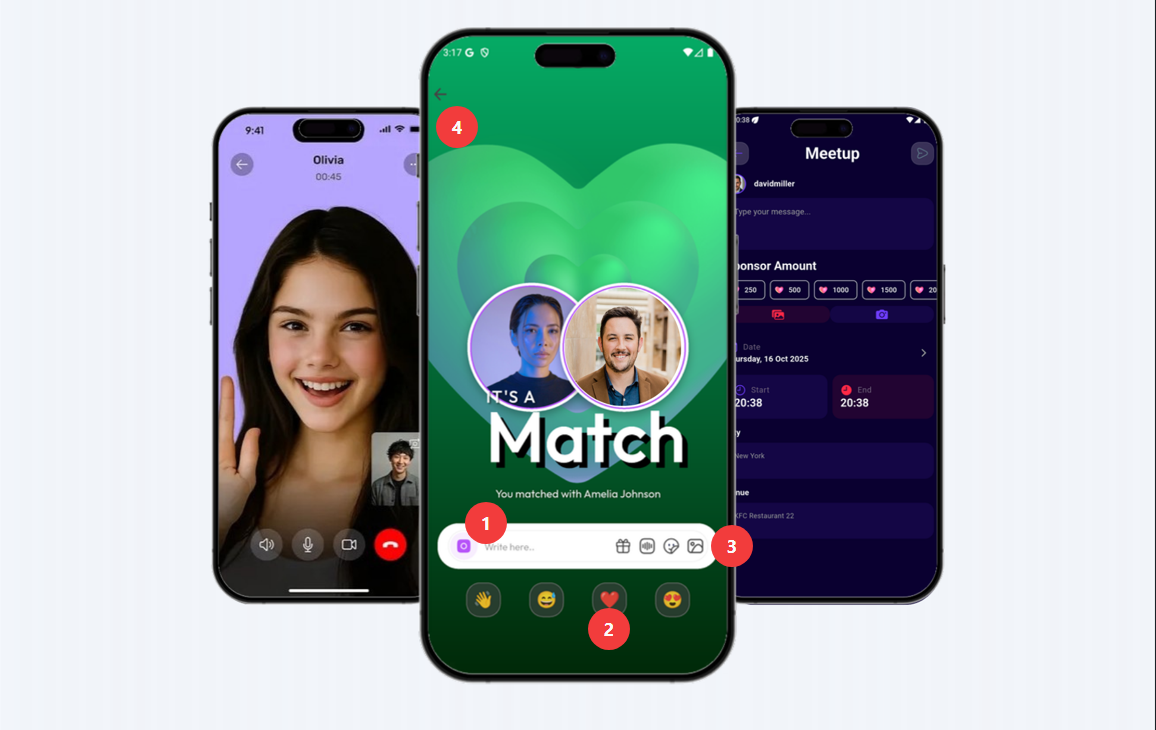
Text Message
The user can then start a chat with text message
Emoji Message
Or they can send an emoji message picking from list.
Media Message
Or the user can send an image, sticker, gift, audio message.
Media Message
This button will open the filters screen for the user to adjust their matching preferences.
Customization Guide
This customization guide explains how to update the app name, bundle identifier (package name / application ID), colors, logo, icon, and splash screen.
- App name — display name
- Bundle identifier — package name / application ID
- App icon — launcher icon on all platforms
-
Logo — in-app logo images in
assets/logos/ - Splash screen — launch screen
- Colors — admin panel > Mobile App Colors
App Icon (all platforms)
1. Add the package
flutter pub add -d flutter_launcher_icons
2. Generate a config file (auto)
dart run flutter_launcher_icons:generate
This creates a flutter_launcher_icons.yaml in your
project root.
3. Edit the config
flutter_launcher_icons:
  android: "launcher_icon"
  ios: true
  image_path: "assets/logos/icon.png"
  min_sdk_android: 21
  remove_alpha_ios: true
  web:
    generate: true
    image_path: "assets/logos/icon.png"
    background_color: "#FFFFFF"
    theme_color: "#0175C2"
  windows:
    generate: true
    image_path: "assets/logos/icon.png"
    icon_size: 48
  macos:
    generate: true
    image_path: "assets/logos/icon.png"
Use a high-resolution source image (at least 1024×1024 px, square,
PNG) saved as assets/logos/icon.png. For Android adaptive
icons, add:
  android_adaptive_icon_foreground: "assets/logos/icon.png"
  android_adaptive_icon_background: "#FFFFFF"
4. Generate icons
flutter pub get
dart run flutter_launcher_icons
This generates all required sizes into
android/app/src/main/res/mipmap-*/,
ios/Runner/Assets.xcassets/AppIcon.appiconset/,
web/icons/, and the respective Windows/macOS asset
catalogs.
Logo
The in-app logo is separate from the launcher
app icon. Replace the files in
flutter-app/assets/logos/ with your own branding, keeping
the same file names and sizes:
App and site logos in Admin Panel (General Settings)
You can change the app and site logos from the admin panel — no code changes needed. Go to Settings > General Settings and upload your logos.
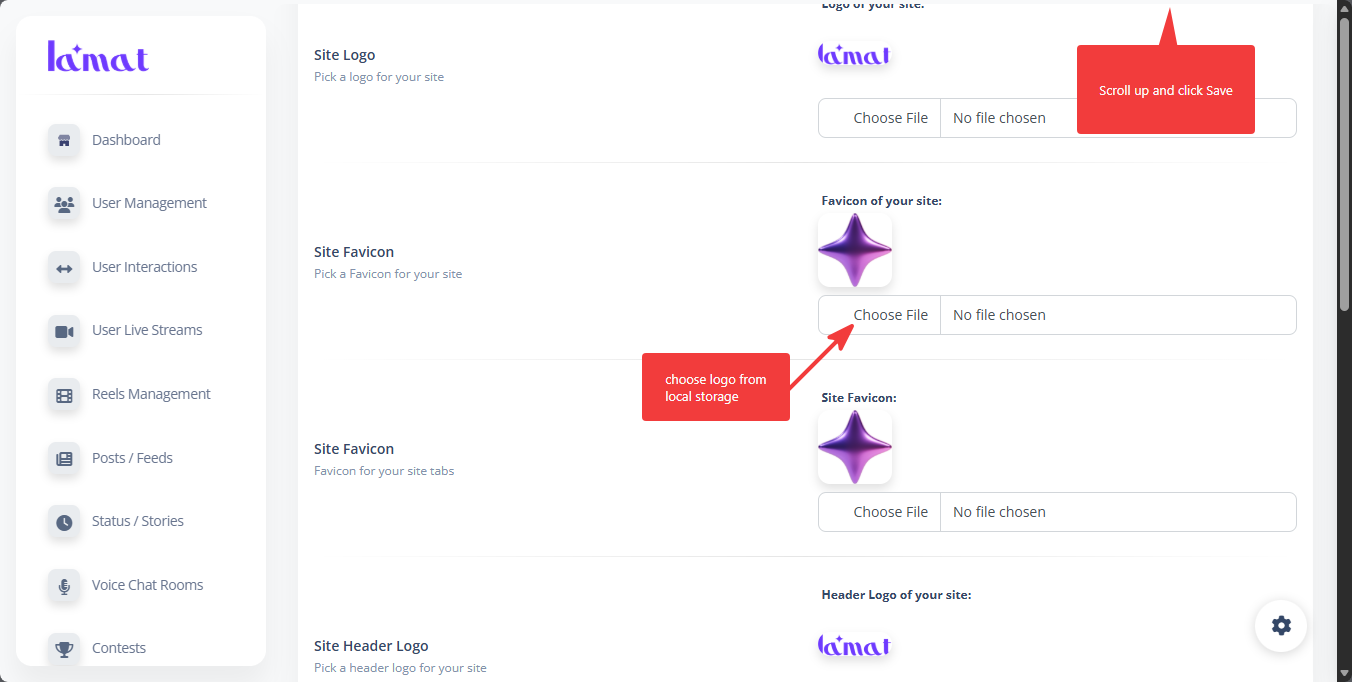
App Logo (in-app logo images)
| File | Used for |
|---|---|
assets/logos/logo-wh-tr.png |
Main in-app logo (appLogo in lib/constants.dart)
|
assets/logos/logo.png |
Color logo variant / headers |
assets/logos/logo-anim.gif |
Animated splash logo (splashAnim) |
assets/logos/icon.png |
Icon source for launcher icon and splash image (see
pubspec.yaml > flutter_native_splash)
|
assets/logos/background.png |
Splash / onboarding background (splashBg) |
assets/logos/background-dark.png |
Dark-mode splash / onboarding background |
assets/logos/profile_pic.png |
Default profile picture placeholder |
After replacing the files, rebuild the app:
flutter clean
flutter pub get
flutter run
Splash Screen
This project configures the splash screen in
pubspec.yaml under flutter_native_splash:
flutter_native_splash:
  android: true
  ios: true
  web: true
  background_image: "assets/logos/background.png"
  image: "assets/logos/icon.png"

  android_12:
    color: "#FFFFFF"
    image: assets/logos/icon.png
    image_dark: assets/logos/icon.png
To use a different background color or branding image instead of the background image, use:
flutter_native_splash:
  color: "#FFFFFF"
  image: assets/logos/icon.png
  branding: assets/logos/logo.png
  color_dark: "#121212"
  image_dark: assets/logos/icon.png
  branding_dark: assets/logos/logo-wh-tr.png

  android: true
  ios: true
  web: true

  fullscreen: true
Generate splash assets
dart run flutter_native_splash:create
(Optional) Keep splash during initialization
import 'package:flutter_native_splash/flutter_native_splash.dart';

void main() {
  WidgetsBinding widgetsBinding = WidgetsFlutterBinding.ensureInitialized();
  FlutterNativeSplash.preserve(widgetsBinding: widgetsBinding);
  runApp(const MyApp());
}

// Later, when initialization is complete:
FlutterNativeSplash.remove();
Rebuild
flutter clean
flutter run
Web Favicon & App Icons
If you use flutter_launcher_icons with
web.generate: true, favicons and manifest icons are
generated automatically. To manually replace them:
web/
  favicon.png     → 32×32 px
  icons/
    Icon-192.png  → 192×192 px
    Icon-512.png  → 512×512 px
Update web/manifest.json with the correct icon paths and
theme color.
App Name / Label
Use the rename_app package to update the display name
across all platforms at once:
flutter pub add -d rename_app
dart run rename_app:main all="Your App Name"
Or set per-platform names and define defaults in
pubspec.yaml:
config_name:
  name: "My App"

# Then run with no arguments:
dart run rename_app:main
Per-platform overrides:
dart run rename_app:main android="Android Name" ios="iOS Name" others="Other Name"
Package Name (Bundle Identifier / Application ID)
Change the Android applicationId and iOS
PRODUCT_BUNDLE_IDENTIFIER with a single command using
change_package_name:
flutter pub add -d change_package_name
dart run change_package_name:main com.yourcompany.appname
This updates AndroidManifest.xml,
build.gradle, MainActivity directory
structure, and iOS project.pbxproj /
Info.plist.
Platform-specific:
# Android only
dart run change_package_name:main com.yourcompany.appname --android

# iOS only
dart run change_package_name:main com.yourcompany.appname --ios
App Version & Build Number
The canonical source is pubspec.yaml under the
version field using the format
version_name+version_code:
version: 1.0.0+1
#         ^     ^
#         |     build number (Android versionCode / iOS CFBundleVersion)
#         version name (Android versionName / iOS CFBundleShortVersionString)
Increment the build number for each release. You can also override during build:
flutter build apk --build-name=1.0.0 --build-number=2
flutter build ipa --build-name=1.0.0 --build-number=2
For Android, the version is written to
android/app/build.gradle. For iOS, it is written to
ios/Runner/Info.plist and
ios/Runner.xcodeproj/project.pbxproj during the build.
Customization Guide — App Colors
This section of the customization guide explains how to update the app colors. No code changes are needed — colors are managed from the admin panel and applied by the Flutter app on startup.
Open your admin panel at
https://yourdomain.com/admin, and login if not already
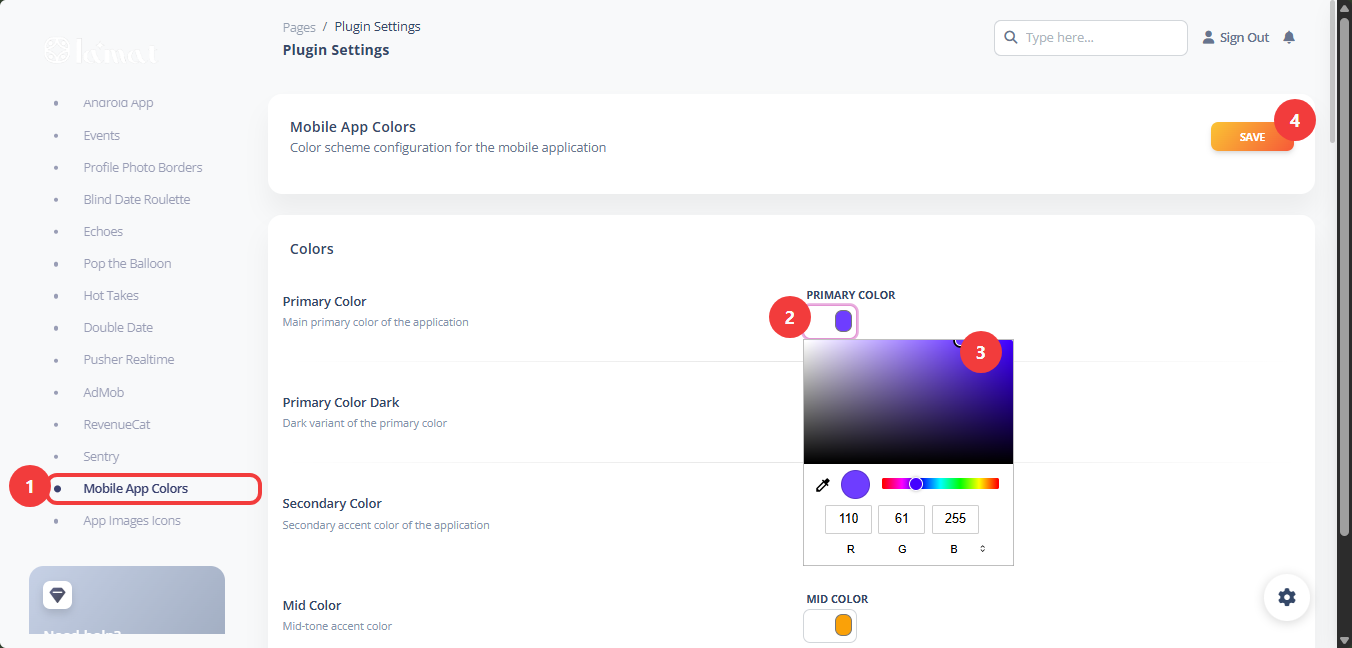
Step 1
On left side panel scroll down to Settings and Expand Settings Tab
and select
Mobile App Colors
Step 2
Click on color widget and a color picker will open.
Step 3
Move color picker dot and adjust to desired color. Or set by hex code. Do this for all colors you want to change.
Step 4
Finally click SAVE button to save all your changes.
Basic Admin Panel Usage
Dashboard and Stats
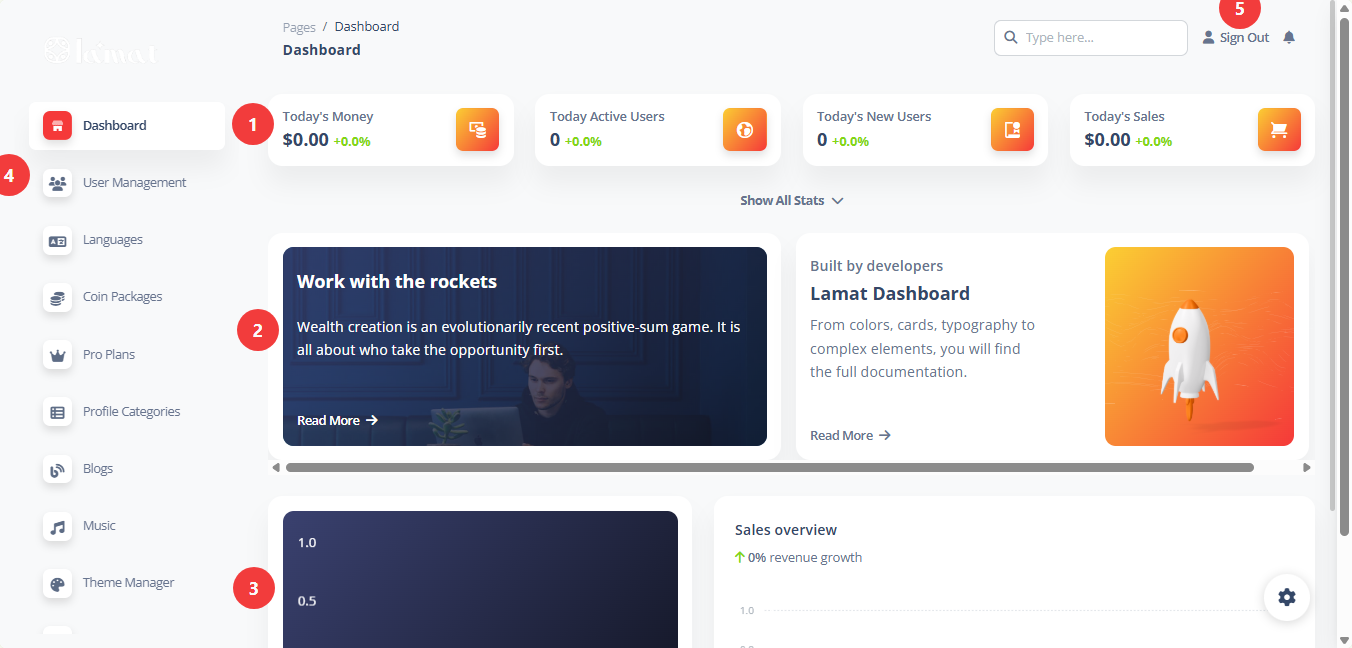
Daily Stats
Stats here update instantly on page reload
Blogs
Read blogs and news about announcements.
Graphs
Sales and transactions graphs.
Side Bar Navigator
Here you can scroll to show more tabs.
Navigating Admin
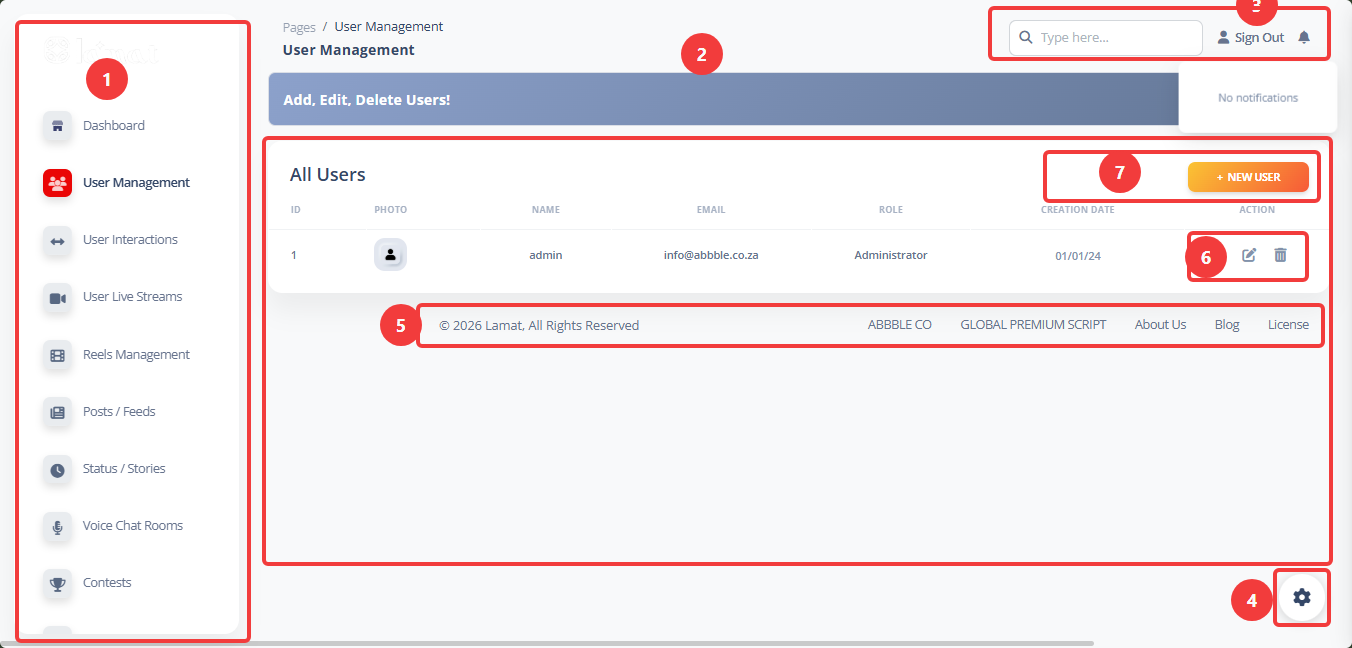
Navigation Panel
Use this panel to scroll up/down to jump to desired page.
Content Panel
Here is the page content and lists.
Top Navigation Bar
Use the mini widget to search, sign out or view notifications.
Admin Themer
This button open the Admin Themer panel to change colors and style of the admin panel.
Content Management
App Translations

Languages
Find Languages on sidebar navigation panel
Language picker
Pick the language you want to edit.
Language String Key
Only change keys if you know what you're doing
Language String
Write the String for the language key.
Save
Save your changes after making adjustments.
Add New Translation
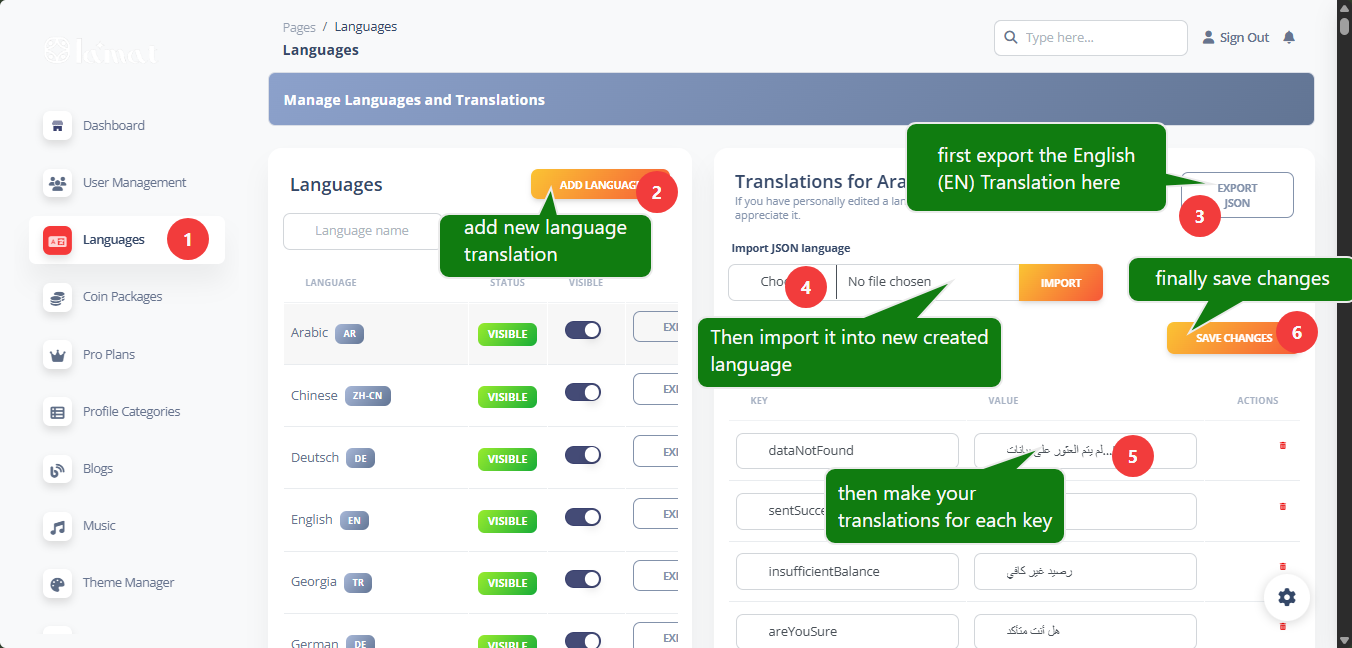
Languages
Find Languages on sidebar navigation panel
Add Language Button
Click this button if you want to add a new language.
Export Language
First Export the English language file
Import Language
Then in the new language you just add import the default English language file.
Language String
Translate the English string to the desired language. Do this for all the strings in the file.
Save
Finally save your new language file translations.
Admob Setup
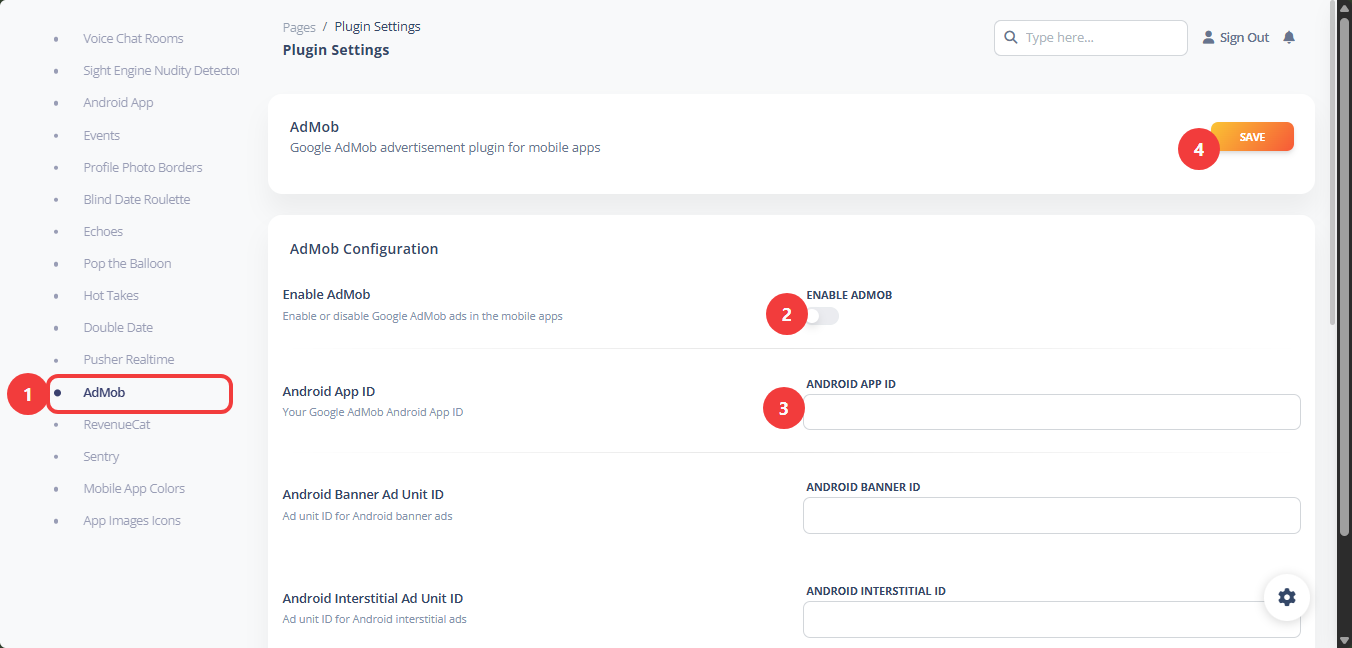
Admob Setup
Scroll down on the sidebar navigation panel, expand Settings menu and keep scrolling down until you see Admob and click on it.
Status Switch
Turn admob on or off.
Admob keys
Add your admob ads keys here.
Save
Save changes before leaving page.
Revenue Cart Configuration
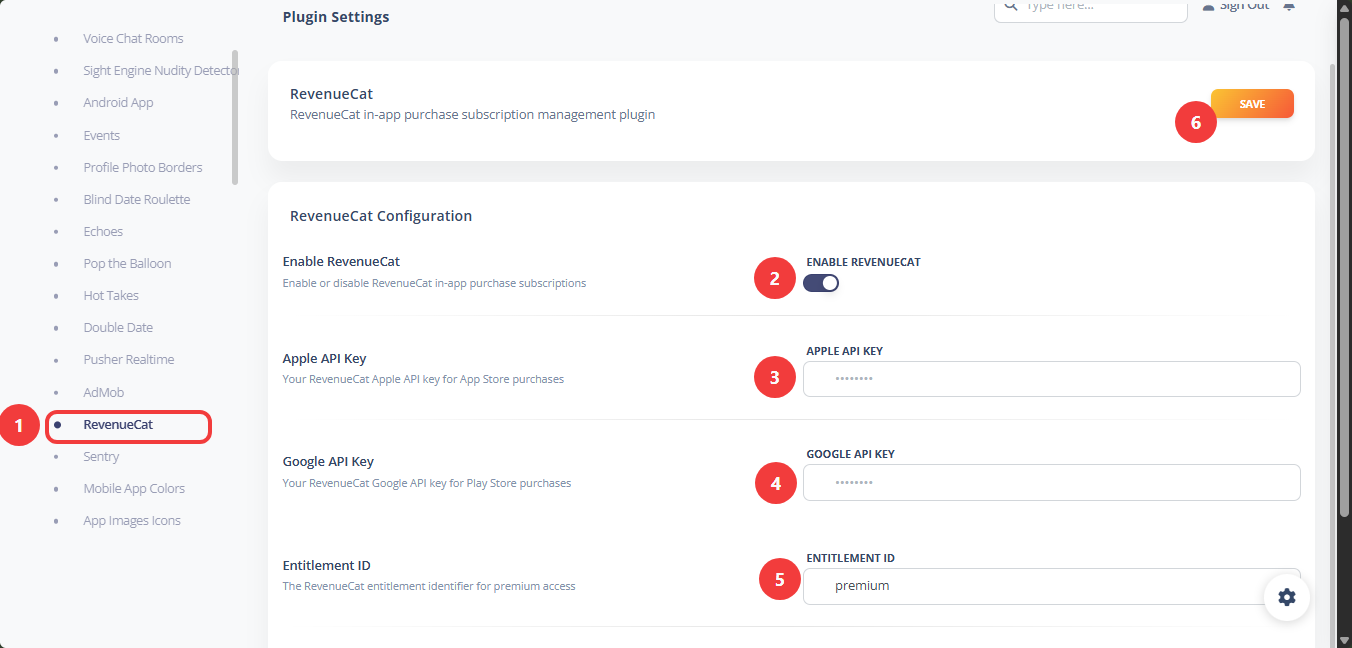
Sidebar panel
Scroll to Revenue cart under Settings in the sidebar panel.
Switch Button
Turn RevenueCat on/off
Api Keys & ids
Here paste your revenucat keys and the entitlement id.
Save
Save your changes before leaving page.
Users Management
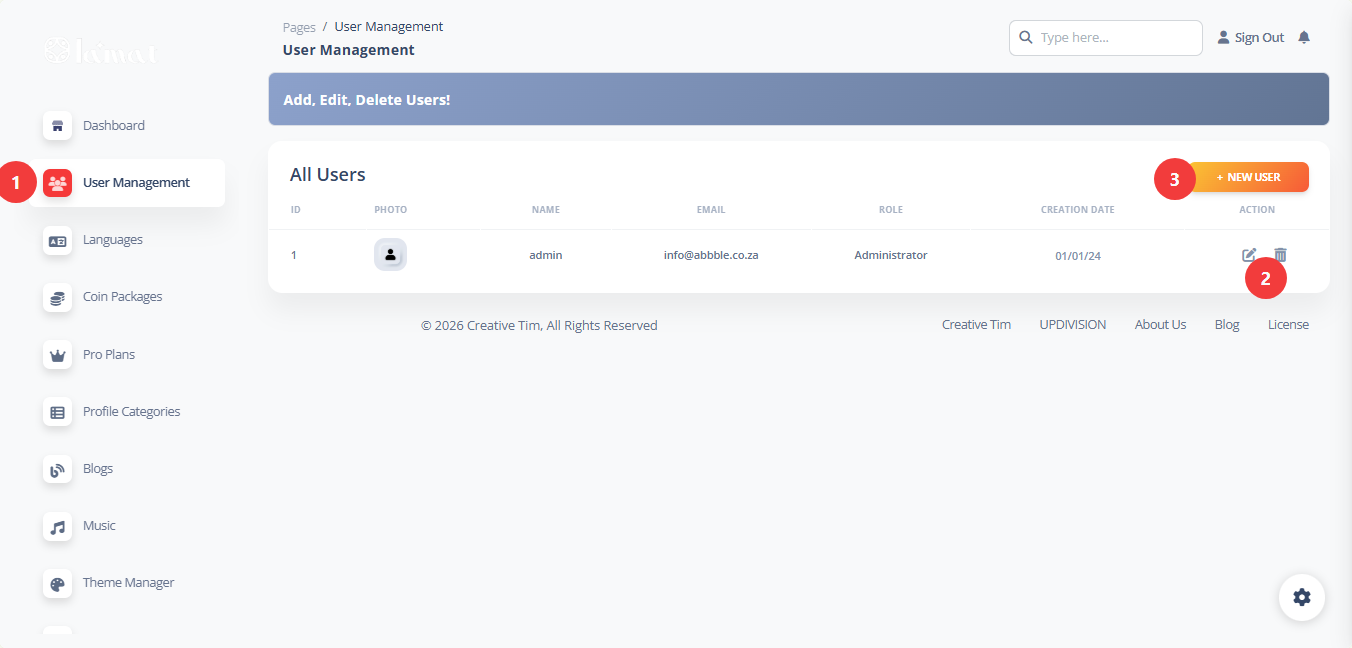
Sidebar Panel
Scroll sidebar panel to find Users Management
Actions
Perfom actions on a user like edit or delete.
New User Button
This button will show the new user creation panel.
Medias Management
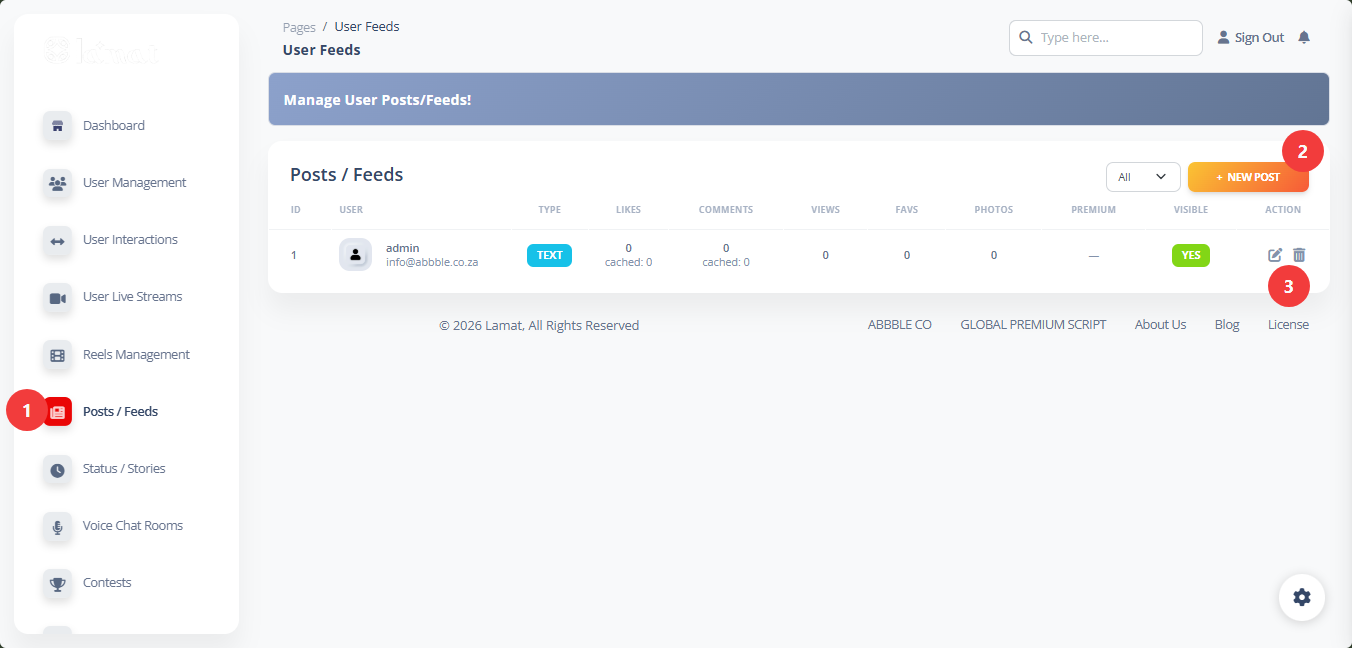
Sidebar Panel
Find the desired media you want to manage in the sidebar panel.
Actions
Perfom actions on an item like view, edit or delete.
New Item Button
This button will show the new item creation panel.
Theme Manager (Landing Pages)
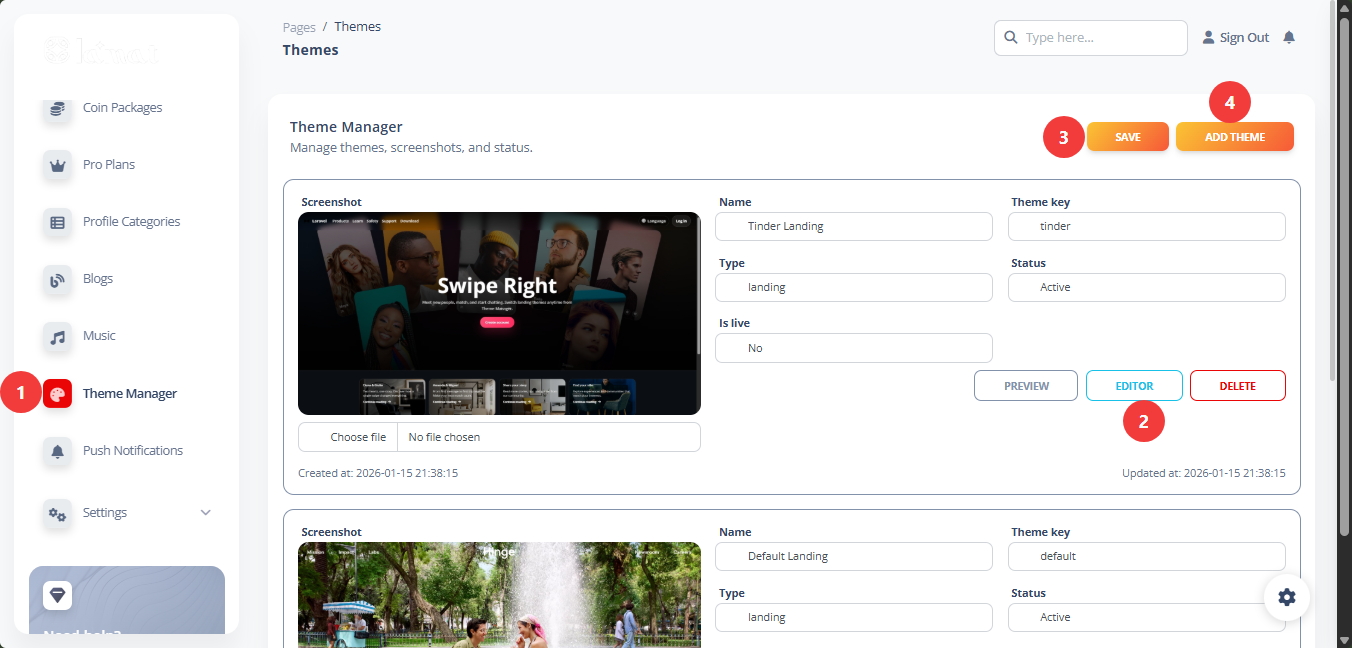
Sidebar Panel
Scroll to find the Theme Manager in the sidebar panel.
Actions
Perfom actions on a theme like preview, editor or delete.
Save
Save the changes before leaving the page.
New Theme Button
This button will show the new theme creation panel.
Push Notifications
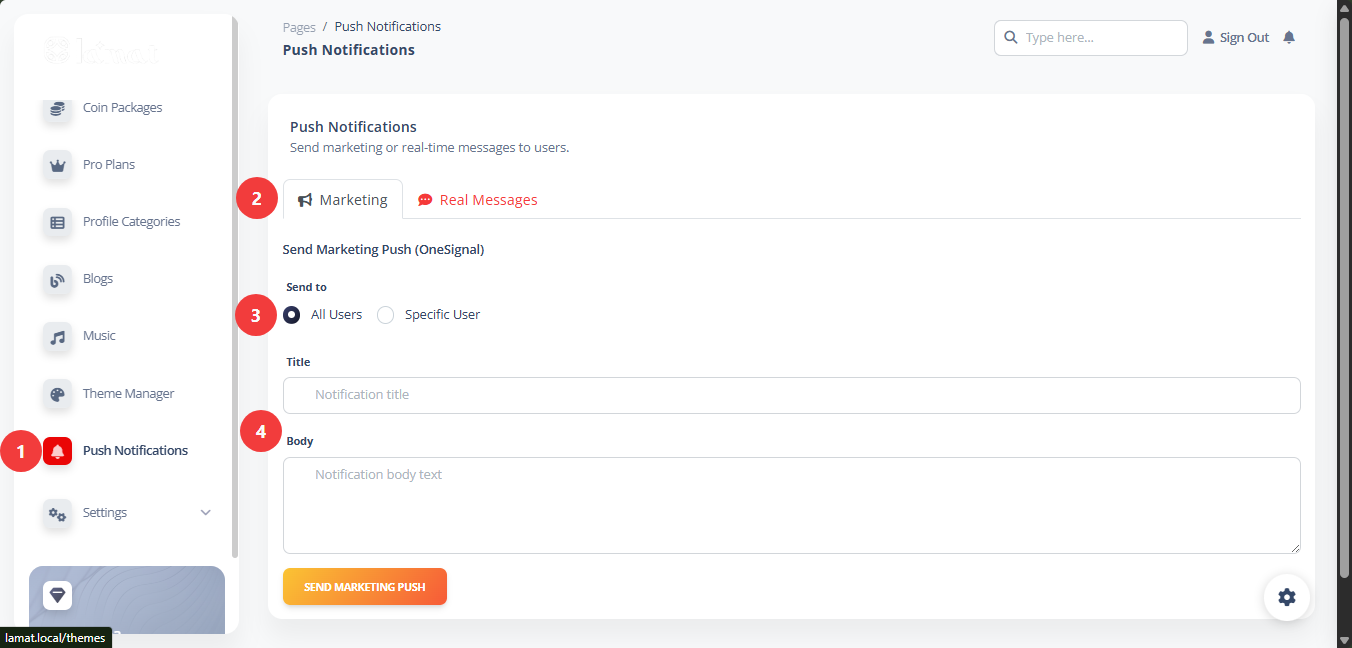
Sidebar Panel
Scroll to find the Push Notifications in the sidebar panel.
Type Picker
Choose either Marketing or Real Messages
Broadcast Type
Choose to either broadcast the push notification to all users or a specific user.
Content
Fill in the title and the body of the push notification. The body does not support html. It support image links though. So you can paste an ad image here. Then press the SEND Button.
Configuration Reference
Laravel .env
| Key | Default | Description |
|---|---|---|
APP_URL |
https://example.com |
Backend base URL — used by CORS, Sanctum, and deep links |
APP_DEBUG |
false |
Must be false in production |
DB_CONNECTION |
mysql |
Database driver |
DB_HOST |
127.0.0.1 |
Database host |
DB_PORT |
3306 |
Database port |
DB_DATABASE |
lamat |
Database name |
DB_USERNAME |
root |
Database user |
DB_PASSWORD |
Database password | |
BROADCAST_DRIVER |
pusher |
Broadcasting driver |
PUSHER_APP_ID |
Pusher app ID | |
PUSHER_APP_KEY |
Pusher app key | |
PUSHER_APP_SECRET |
Pusher app secret | |
PUSHER_APP_CLUSTER |
eu |
Pusher cluster |
MAIL_MAILER |
smtp |
Mail driver |
MAIL_HOST |
SMTP host | |
MAIL_PORT |
587 |
SMTP port |
MAIL_FROM_ADDRESS |
noreply@example.com |
Sender email |
FCM_SERVER_KEY |
Firebase Cloud Messaging server key | |
LICENSE_SERVER_URL |
License server URL for purchase verification | |
ONESIGNAL_APP_ID |
OneSignal app ID (optional) | |
ONESIGNAL_REST_API_KEY |
OneSignal REST API key (optional) | |
REMOTE_DB_URL |
Override DB download URL (leave empty to derive from
LICENSE_SERVER_URL)
|
Flutter constants.dart
| Key | Description |
|---|---|
homeUrl |
Backend API base URL — must match APP_URL |
isDemo |
Set to false for production |
locationApiKey |
Google Maps / MapKit API key |
geminiApiKey |
Google Gemini AI API key (optional) |
isAdmobAvailable |
Enable AdMob ads |
isSubscriptionAvail |
Enable RevenueCat subscriptions |
Third Party Integrations
Every external service Lamat connects to, what it needs, and where it's configured.
Sources: pubspec.yaml • lib/models/config_model.dart
Firebase Configured
Core Firebase services including Cloud Messaging (FCM push), phone authentication, and AI services.
→ Firebase ConsoleFiles Needed
| File | Platform | Notes |
|---|---|---|
google-services.json |
Android | From Firebase Console → Project settings → General |
GoogleService-Info.plist |
iOS | From Firebase Console → Project settings → General |
firebase_options.dart |
All | Generated via flutterfire configure |
FCM Config (Backend)
| Field | Config Key |
|---|---|
| Server Key | onesignal → fcm_server_key |
| Project ID | onesignal → fcm_project_id |
RevenueCat Configured
In-app purchases and subscription management across iOS and Android.
→ RevenueCat DashboardConfig section: plugins.revenue_cart
| Field | Key | Required |
|---|---|---|
| Apple API Key | apple_api_key | Yes |
| Google API Key | google_api_key | Yes |
| Entitlement ID | entitlement_id | Yes |
| App ID | app_id | Yes |
OneSignal Configured
Push notification service for promotional campaigns and targeted notifications.
→ OneSignal DashboardConfig section: plugins.onesignal
| Field | Key | Required |
|---|---|---|
| App ID | app_id | Yes |
Also Needs (Backend)
| Field | Config Key |
|---|---|
| FCM Server Key | onesignal → fcm_server_key |
| FCM Project ID | onesignal → fcm_project_id |
Pusher Configured
Real-time WebSocket events (diamond earnings, live interactions, etc.).
→ Pusher DashboardConfig section: plugins.pusher
| Field | Key | Required |
|---|---|---|
| App Key | app_key | Yes |
| Cluster | cluster | Yes |
| Encrypted | encrypted | Optional |
| Auth Endpoint | auth_endpoint | Optional |
Google Sign-In Configured
OAuth social login via Google accounts.
→ Google Cloud CredentialsConfig section: plugins.google
| Field | Key | Required |
|---|---|---|
| Enabled | enabled | Yes |
| Key (Client ID) | key | Yes |
| Secret | secret | Yes |
Facebook Sign-In Configured
OAuth social login via Facebook accounts.
→ Facebook DevelopersConfig section: plugins.facebook
| Field | Key | Required |
|---|---|---|
| Enabled | enabled | Yes |
| App ID | id | Yes |
| Secret | secret | Yes |
Apple Sign-In Configured
Sign in with Apple for iOS users.
→ Apple Developer Portal| Step | Details |
|---|---|
| Xcode Capability | Target → Signing & Capabilities → "+" → "Sign in with Apple" |
| Service ID | Create in Apple Developer → Identifiers → Services IDs |
| Domain/Return URL | Configure in Apple Developer for the Service ID |
Sentry Configured
Error tracking and performance monitoring for Flutter and backend PHP.
→ Sentry ProjectsConfig section: plugins.sentry
| Field | Key | Required |
|---|---|---|
| Enabled | enabled | Yes |
| DSN | dsn | Yes |
Google AdMob Configured
Monetization via banner, interstitial, rewarded, and native ads.
→ AdMob ConsoleConfig section: plugins.admob
| Field | Key | Required |
|---|---|---|
| Enabled | enabled | Yes |
| Android App ID | android_app_id | Yes |
| Android Banner ID | android_banner_id | Yes |
| Android Interstitial ID | android_interstitial_id | Optional |
| Android Rewarded ID | android_rewarded_id | Optional |
| Android Native ID | android_native_id | Optional |
| iOS App ID | ios_app_id | Yes |
| iOS Banner ID | ios_banner_id | Yes |
Zego UIKit Configured
Real-time audio/video calls, live streaming, live audio rooms. Powers BlindDate, VoiceParty, LiveStream, LiveMingle.
→ ZegoConsoleConfig section: plugins.live
| Field | Key | Required |
|---|---|---|
| Enabled | enabled | Yes |
| Pub Token | pub_token | Yes |
| Account ID | account_id | Yes |
Google Maps Configured
Location services, map display, geocoding, place picking.
→ Google Maps CredentialsConfig section: plugins.settings
| Field | Key | Required |
|---|---|---|
| Geolocation API Key | geolocation_api_key | Yes |
Native Files
| File | Platform |
|---|---|
| AndroidManifest.xml (meta-data) | Android |
| AppDelegate.swift (GMSServices) | iOS |
Giphy Configured
GIF search and sharing in chat.
→ Giphy DevelopersConfig section: plugins.giphy
| Field | Key | Required |
|---|---|---|
| Enabled | enabled | Yes |
| API Key | apiKey | Yes |
Deep Links Configured
Universal links (iOS) and app links (Android) for deep navigation.
| Platform | Requirement |
|---|---|
| Android |
assetlinks.json served at
/.well-known/assetlinks.json
|
| iOS |
apple-app-site-association served at
/.well-known/apple-app-site-association
|
Instagram API Key Needed
Instagram Basic Display API for social login / content sharing.
→ Instagram Basic Display APIConfig section: plugins.instagram
| Field | Key | Required |
|---|---|---|
| Enabled | enabled | Yes |
| Key | key | Yes |
| Secret | secret | Yes |
Twitter API Key Needed
Twitter API v2 for OAuth 2.0 login / content sharing.
→ Twitter Developer PortalConfig section: plugins.twitter
| Field | Key | Required |
|---|---|---|
| Enabled | enabled | Yes |
| Key | key | Yes |
| Secret | secret | Yes |
App Architecture
Flutter
| Layer | Directory | Description |
|---|---|---|
| Entry | lib/main.dart |
Initializes Firebase, Hive, WorkManager, EasyLocalization, SessionManager |
| App | lib/myapp.dart |
MyApp — Riverpod + auto_route + theming |
| Routes | lib/routes.dart |
AppRouter with ~40 route definitions |
| State | lib/state/ |
Riverpod providers |
| API | lib/providers/api_service.dart |
Dio singleton with Sanctum token interceptor |
| Auth | lib/providers/token_service.dart |
FlutterSecureStorage for Sanctum tokens |
| Models | lib/models/ |
Data models |
| Views | lib/views/ |
UI screens by feature |
| Widgets | lib/widgets/ |
Reusable components |
| Services | lib/services/ |
Pusher, DeepLink, Notifications |
State Management
-
ConsumerStatefulWidget— screens with mutable state -
StateNotifierProvider— complex state (auth, wallet, deep links) StateProvider— simple primitive state-
ProviderContainer— shared globally for background services
Route Groups
- Splash → Splash, SplashAnimation
- Auth → Login, PhoneLogin, VerifyOTP, EmailLogin, Password
- Main → BottomNavBar (tabs)
- Swipe → Swipe, Match, Explore, FilterOptions, Map
- Social → Feed, Teels (videos), Stories
- Chat → Messages, ChatScreen
- Profile → EditProfile, AccountSettings, OtherProfile, Gallery
- Wallet → Wallet, Withdrawal, Transactions
Backend
| Component | Path | Description |
|---|---|---|
| API Controllers | app/Http/Controllers/Api/ |
REST endpoints for auth, profiles, wallet, uploads |
| API Routes | routes/api.php |
Sanctum-protected routes under api/V1/* |
| Web Routes | routes/web.php |
Install wizard, deep links, payment checkouts |
| Models | app/Models/ |
Eloquent models |
| Middleware | app/Http/Middleware/ |
Sanctum auth, CORS, CheckInstalled |
API Endpoint Pattern
# All mobile API routes are under api/V1/
GET    /api/V1/config              # App configuration
POST   /api/V1/auth/login          # Email login
POST   /api/V1/auth/phone-login    # Phone auth
POST   /api/V1/auth/register       # Registration
GET    /api/V1/user/profile        # Current user profile
POST   /api/V1/user/update         # Update profile
GET    /api/V1/swipe/feed          # Swipe cards
POST   /api/V1/swipe/action        # Like / dislike / superlike
GET    /api/V1/matches             # Match list
GET    /api/V1/messages            # Chat messages
POST   /api/V1/messages/send       # Send message
GET    /api/V1/wallet/balance      # Wallet
POST   /api/V1/upload/image        # Image upload
Troubleshooting
| Problem | Solution |
|---|---|
/install returns 500 |
Check storage/logs/laravel.log. Ensure
storage/ and bootstrap/cache/ are
writable. Verify all PHP extensions are installed.
|
| Purchase verification fails |
Confirm LICENSE_SERVER_URL is correct in
.env. The server must be reachable and have a valid
SSL certificate.
|
| Database import fails |
Check that the database exists and connection credentials are
correct. The SQL file must not be empty
(database/backup/database.sql).
|
| Download token expired | Click Refresh Token & Retry Download on Step 3 of the wizard. |
| Flutter shows "Purchase not verified" |
storage/app/purchase.json is missing or invalid.
Re-run the wizard.
|
| Pusher connection fails |
Verify PUSHER_* keys. The
/broadcasting/auth endpoint must be accessible from
the app.
|
| Sanctum 401 errors |
Tokens expire after 24 hours. Re-login. Ensure
APP_URL matches the actual domain (used in CORS /
Sanctum config).
|
| Push notifications not working |
Verify FCM_SERVER_KEY. Check notification permissions
on the device.
|
| Images not uploading |
Check PHP upload limits (upload_max_filesize,
post_max_size). Verify
storage/ permissions.
|
| Web shows blank screen |
Build with --web-renderer canvaskit. Check the
browser console for errors.
|
Target of URI doesn't exist |
Run
flutter pub run build_runner build
                --delete-conflicting-outputs
|
SQLSTATE[HY000] [2002] |
MySQL not running — start the MySQL service. |
400 | BAD_REQUEST or 419 on API calls
|
CSRF token mismatch. Ensure APP_URL matches the exact
domain in the browser. For Flutter, set
SESSION_DRIVER=cookie and verify Sanctum config in
config/sanctum.php includes your app's domain in
stateful array.
|
| CORS errors (Flutter Web) |
Add your Flutter web origin to config/cors.php
allowed_origins. For development, you can use
allowed_origins = ['*'] but restrict in production.
Also ensure supports_credentials = true.
|
| Flutter app can't reach local backend (emulator) |
Android emulator: use 10.0.2.2 in
homeUrl instead of localhost. iOS
simulator: use localhost. Real device: use your LAN
IP (192.168.x.x). Both devices must be on the same
network.
|
| Mixed content blocked (HTTPS + HTTP) |
If your Flutter web is served over HTTPS, the backend must also
use HTTPS. Set APP_URL=https://yourdomain.com and
ensure your server has a valid SSL certificate. For development,
use http://localhost for both.
|
No application encryption key |
Run php artisan key:generate to generate
APP_KEY in .env. This is required for
session encryption, CSRF protection, and Sanctum tokens.
|
Class "..." not found or blank Laravel page |
Dependencies not installed. Run
composer install --no-dev from the backend root. If
memory is insufficient, use
COMPOSER_MEMORY_LIMIT=-1 composer install.
|
| Install wizard stuck at Step 1 — requirements check |
Missing PHP extensions. Ensure all required extensions are
installed (BCMath, Ctype, cURL, DOM, Fileinfo, GD, JSON, Mbstring,
OpenSSL, PCRE, PDO, PDO_MySQL, Tokenizer, XML, Zip, Intl). On
Ubuntu:
sudo apt install php8.2-bcmath php8.2-curl php8.2-dom php8.2-gd
                php8.2-mbstring php8.2-mysql php8.2-xml php8.2-zip
                php8.2-intl
.
|
| Database import times out |
Increase PHP max_execution_time and
max_input_time in php.ini. Import via
command line instead:
mysql -u root -p lamat < database/backup/database.sql.
|
Storage path not found or images return 404 |
Run php artisan storage:link to create the symbolic
link from public/storage to
storage/app/public. Verify storage/
directory has write permissions.
|
| .env changes not taking effect |
Laravel caches config in production. Run
php artisan config:clear after every
.env
change. For persistent caching in production, run
php artisan config:cache after verifying all values.
|
ModRewrite / 404 on all routes except / |
Apache: ensure mod_rewrite is enabled and
AllowOverride All is set in the VirtualHost for the
Laravel public/ directory. Nginx: verify the
try_files directive is present in your server block.
|
| PHP upload fails for large files |
Increase upload_max_filesize = 20M,
post_max_size = 20M, and
memory_limit = 128M in php.ini. Restart
the web server after changes.
|
| Email not sending (SMTP) |
Verify MAIL_* settings in .env. Test
with php artisan tinker:
Mail::raw('test', fn($m) => $m->to('you@example.com'));. Check your SMTP provider's firewall rules and port availability
(587/TLS or 465/SSL).
|
| Sanctum CSRF cookie not set (Flutter) |
Flutter must call /sanctum/csrf-cookie before POST
requests. Verify APP_URL in Flutter's
lib/constants.dart matches the backend origin exactly
(protocol + host + port). Check that
SESSION_DOMAIN is not set (or matches the backend
domain) in .env.
|
| Deep links not opening the app |
Verify /.well-known/assetlinks.json (Android) and
/.well-known/apple-app-site-association (iOS) are
accessible via browser. Confirm the SHA-256 fingerprint in
assetlinks.json matches your signing certificate. For iOS, ensure
the app's Associated Domains entitlement includes
applinks:yourdomain.com.
|
| Firebase phone auth fails on Android |
Add your app's SHA-256 (and SHA-1) certificate fingerprint to
Firebase Console → Project Settings → General → Your Android app.
Both debug and release keystore fingerprints must be added. Verify
google-services.json is the latest version from
Firebase.
|
| Pusher WebSocket not connecting (production) |
Ensure the Pusher cluster matches your app's cluster in the Pusher
dashboard. Use wss:// (secure WebSocket) — override
in config/websockets.php if using a custom Pusher
server. Verify port 443 is not blocked by a firewall.
|
| Flutter build fails with NDK version error |
Set ndkVersion in
android/app/build.gradle to match your installed NDK.
Run flutter doctor -v to see the detected NDK
version. Install a specific NDK via Android Studio SDK Manager if
needed.
|
| OneSignal push not delivered to iOS |
OneSignal uses FCM to relay to APNs for iOS. Ensure
FCM_SERVER_KEY and FCM_PROJECT_ID are
set in the backend .env. Also verify the OneSignal
app has the correct APNs key (.p8) uploaded in OneSignal dashboard
Settings.
|
| Install wizard re-appears after install |
The file storage/app/installed.lock was not created.
Check storage/ permissions — the web server must be
able to write files. Manually create the lock file:
touch storage/app/installed.lock
or re-run the wizard to completion.
|
| RevenueCat webhook returns 500 |
Check storage/logs/laravel.log for the error. Ensure
QUEUE_CONNECTION is set to database or
redis (not sync) for production webhook
processing. Verify the webhook secret in .env matches
RevenueCat dashboard.
|
Composer install fails with memory error |
Run
COMPOSER_MEMORY_LIMIT=-1 composer install --no-dev
to disable the memory limit. Alternatively, increase the memory
limit in php.ini (memory_limit = 512M).
|
Flutter flutter pub get fails / package not found
|
Ensure you're in the correct directory (flutter-app/
folder). Run flutter clean then
flutter pub get. If using a VPN or proxy, try
disabling it. Set PUB_HOSTED_URL environment variable
if in a region with restricted access to pub.dev.
|
Backend returns 500 after .env changes |
Run php artisan config:clear and
php artisan cache:clear. If that doesn't help, check
storage/logs/laravel.log for the specific error.
Common causes: missing APP_KEY, invalid database
credentials, or a syntax error in .env (e.g. value
containing spaces without quotes).
|
Call to undefined function bcrypt() |
PHP BCMath extension is missing. Install it:
sudo apt install php8.2-bcmath (or equivalent for
your PHP version and OS). This is a Laravel core requirement used
by hashing and encryption.
|
stream_socket_enable_crypto(): SSL operation failed
|
OpenSSL extension is missing or CA certificates are outdated.
Install OpenSSL PHP extension and update CA bundle:
sudo apt install php8.2-openssl ca-certificates. On
Windows, ensure openssl is enabled in
php.ini and curl.cainfo points to a
valid cacert.pem.
|
file_get_contents(): SSL: Connection reset by peer
|
Outbound HTTPS connections are failing. Check your server's
firewall rules — ensure port 443 is allowed outbound. If behind a
proxy, set HTTP_PROXY and HTTPS_PROXY
environment variables or configure Guzzle's proxy in
config/http-client.php.
|
Security Notes
APP_DEBUG=false— never expose debug output-
HTTPS everywhere — the app enforces SSL, no
MyHttpOverrides -
APP_URLcontrols CORS — only your domain is allowed - Sanctum tokens expire after 24 hours, stored in encrypted FlutterSecureStorage
-
Purchase data is encrypted at
storage/app/purchase.json -
Delete
database/backup/database.sqlafter installation - Use strong, unique passwords for the admin account and database
-
Keep your
.envfile outside the web root (it's in the parent directory)
FAQS
How do I change the app name from "Lamat" to my own brand?
Run dart run rename_app:main all="Your App Name" from
the Flutter project root. This updates all platform display names.
For the backend, update app_name in General Settings
plugin from the admin panel.
How do I change the package name (bundle ID)?
Run
dart run change_package_name:main com.yourcompany.app.
This updates Android's AndroidManifest.xml /
build.gradle, iOS project files, Firebase registration,
and all folder structures. After changing, re-run
flutterfire configure to download fresh
google-services.json and
GoogleService-Info.plist.
Where do I set the backend API URL?
Edit lib/constants.dart and change the
homeUrl constant to your backend domain (e.g.
https://yourdomain.com). Also ensure
isDemo is set to false.
How do I find my SHA-1 fingerprint for Firebase?
Run
cd android && gradlew signingReport (Linux/macOS) or
cd android && gradlew.bat signingReport (Windows). Look
for the SHA1 value under the
debug variant. For production releases, use the SHA-1
from your keystore. Add this fingerprint in Firebase Console under
Project Settings → General → Your Android app.
Push notifications are not showing on Android. What's wrong?
Check these in order: (1) Ensure
google-services.json is placed in
android/app/ and matches your Firebase project. (2)
Verify FCM_SERVER_KEY and
FCM_PROJECT_ID are set in the backend's
.env. (3) On Android 13+, request
POST_NOTIFICATIONS permission at runtime (the app
handles this automatically). (4) Ensure notification channels are
registered — the app uses channel ID basic_channel. (5)
Check that the device has Google Play Services and is not in Doze
mode.
Why does the map not load on Android?
The most common cause is a missing or incorrect Google Maps API key
in AndroidManifest.xml. Ensure you've added:
<meta-data android:name="com.google.android.geo.API_KEY"
              android:value="YOUR_KEY"/>
inside the <application> tag. Also verify the
Maps SDK for Android is enabled in your Google
Cloud Console and the API key is restricted to your Android app
(package name + SHA-1).
How do I enable or disable specific features?
Log into the admin panel at /admin, navigate to
Settings → Plugins, and select the feature you want
to toggle. Each plugin (Swiping, Chat, Stories, Live, Hot Takes,
Echoes, etc.) has an enable/disable switch. After changing, the
Flutter app fetches the latest config on next launch.
How do I configure Pusher for real-time chat and features?
In the backend .env, set PUSHER_APP_ID,
PUSHER_APP_KEY, PUSHER_APP_SECRET, and
PUSHER_APP_CLUSTER from your Pusher dashboard. In the
Flutter app, Pusher is initialized in
lib/services/pusher_service.dart and read from the
API's /config endpoint — no manual Flutter-side
configuration is needed.
How do I set up ZegoCloud for voice/video calls and live streaming?
Register at ZegoConsole,
create an application, and note your appID and
appSign. In the admin panel, go to
Settings → Plugins → Live and enter your Zego
credentials. The Flutter app uses the Zego prebuilt UI Kits — no
additional code changes required.
RevenueCat is not processing purchases. What should I check?
Verify: (1) RevenueCat plugin is enabled in admin panel under
Plugins. (2) apple_api_key,
google_api_key, entitlement_id, and
app_id are set correctly. (3) Your products are
configured in both RevenueCat dashboard and the respective app
stores (App Store Connect / Google Play Console). (4) The webhook
URL https://yourdomain.com/webhook/revenuecat is
configured in RevenueCat dashboard. (5)
QUEUE_CONNECTION in .env is set to
database or redis (not sync)
for production.
How do I switch from synchronous to async queue processing?
The default QUEUE_CONNECTION=sync is fine for
development but will block HTTP responses. For production, change it
to QUEUE_CONNECTION=database in .env, then
run php artisan queue:table && php artisan migrate to
create the jobs table. Finally, run
php artisan queue:work (supervisor recommended). The
HandleRevenueCatWebhook job and other queueable tasks
will then process asynchronously.
How do I configure payment gateways?
In the admin panel, go to Settings → Plugins and configure each gateway individually. For Stripe: enter the publishable key and secret key. For PayPal: client ID and secret. For Paystack, Razorpay, Mercado Pago, Mollie, Flutterwave: enter the respective API keys and webhook URLs. Exchange rates can be set per gateway. Each gateway has a sandbox mode toggle for testing.
Flutter build fails with "minSdkVersion" or "compileSdk" errors.
This app targets minSdk 24, compileSdk 36,
targetSdk 36. If a plugin requires a higher version,
update android/app/build.gradle:
minSdk 24, compileSdk 36,
targetSdk 36. Run
flutter clean && flutter pub get after changes. For NDK
issues, ensure ndkVersion "27.0.12077973" is set or
install the required NDK via SDK Manager.
How does the color theming work?
The app uses two theming layers. Admin Panel: Settings → Mobile App Colors plugin lets you set 37+ colors (primary, secondary, gradients, backgrounds, text, buttons, etc.) that are fetched by the Flutter app on startup. Admin Panel UI: Settings → Configurator lets you customize the admin sidebar color, navbar style, and dark mode. Theme changes take effect immediately on both platforms.
Why is the installation wizard stuck at Step 1?
The wizard checks PHP 8.1+, required extensions (BCMath, Ctype,
cURL, DOM, Fileinfo, GD, JSON, Mbstring, OpenSSL, PCRE, PDO,
PDO_MySQL, Tokenizer, XML, Zip, Intl), and directory permissions
(storage/ and bootstrap/cache/ must be
writable). Run php -m to verify extensions are
installed. Ensure the .env file exists and
LICENSE_SERVER_URL points to a valid license server
endpoint.
How do I generate the firebase_options.dart file again?
From the Flutter project root, run
flutterfire configure. This re-prompts you to select a
Firebase project and regenerates
lib/firebase_options.dart along with fresh
google-services.json and
GoogleService-Info.plist. For a non-interactive update,
use flutterfire reconfigure (uses existing
firebase.json config).
The app shows "Connection failed" or "Server error".
Check: (1) homeUrl in
lib/constants.dart points to the correct backend URL
with no trailing slash. (2) The backend is accessible from the
device/emulator — use 10.0.2.2 for Android emulator,
localhost for iOS simulator, or your network IP for
real devices. (3) CORS is configured correctly in
config/cors.php to allow requests from your Flutter Web
origin. (4) Run php artisan serve to verify the backend
starts without errors.
How do I add a new language to the app?
Backend: Admin panel → Settings → Languages → Add
Language. Enter the language name, native name, abbreviation (e.g.
fr), and upload a JSON translation file.
Flutter: The app uses
easy_localization
with 22 pre-built locales. Translation files are in
assets/translations/. To add a new locale, create a
lang.json file and register it in
main.dart under EasyLocalization's
supportedLocales list. The backend serves translations
via the /config API endpoint.
How does the freemium model work — what limits can I configure?
All limits are configured in the admin panel under Settings → Plugins → Swiping. You can set separate daily caps for free and pro users on: likes, superlikes, dislikes, rewinds, and monthly boosts. Other plugins (Chat, Live, Stories, etc.) have their own per-feature limits and credit costs. The app enforces these server-side via the API.
Why are profile photos not uploading or showing?
Check: (1) PHP's upload_max_filesize and
post_max_size are set to at least 20MB in
php.ini. (2) The storage/ directory is
writable (chmod -R 775 storage). (3) The
GD or Imagick extension is installed for
image processing. (4) If using cloud storage (Firebase Storage or
S3), ensure credentials are configured. The app defaults to local
storage at storage/app/public/.
How do I reset the installation wizard to re-run it?
Delete storage/app/installed.lock and
.env files, then visit
https://yourdomain.com/install again. WARNING: This
will not drop the existing database — you must manually drop and
recreate it if you want a fresh install. For security, the wizard is
locked after completion and cannot be re-run without deleting these
files.
What are the required external services and do they cost money?
Required (paid): Pusher (real-time chat), ZegoCloud (calls/streaming), SMTP (emails), at least one payment gateway (Stripe, PayPal, etc.). Required (free): Firebase (FCM, Auth), Google Maps/Geolocation (free tier available). Optional: RevenueCat ($), OneSignal (free tier), Sentry (free tier), Sight Engine ($), AdMob, Giphy (free). Refer to the "External Services" table in the System Requirements section for full details.
Can I run the app without all external services during development?
Yes. The app has graceful fallbacks for most services. For basic
testing: skip Pusher (chat won't be real-time but API polling
works), skip ZegoCloud (calls/streaming won't work), use a dummy
SMTP. You must configure Firebase (for auth and FCM) and Google Maps
(for location features). Set isDemo = true in
lib/constants.dart to bypass some checks during
development.
How do I update the app to a new version?
The update process varies by version. Generally: (1) Back up your
database and .env file. (2) Download the latest release
from CodeCanyon. (3) Replace the backend files (keeping your
.env and storage/ directory). (4) Run
composer install --no-dev and
php artisan migrate. (5) For the Flutter app, extract
the new flutter-app zip and copy over your
lib/constants.dart, .env values, and
Firebase configs. (6) Run flutter pub get and rebuild.
Each release includes an update_xxxxx_xxxx folder with
version-specific instructions.
How does the fake users generator work?
Enable it in Admin → Settings → Plugins → Fake Users Generator. Configure the generation rate (users per API call), country reference for ethnicity, force online mode, and auto-answer profile questions. The engine generates realistic profiles with photos and bio data. You can also enable Fake Users Interactions to have them auto-visit, like, and message real users — useful for populating an empty app during launch.
Why is the web build blank or showing a white screen?
(1) Use
flutter build web --web-renderer canvaskit --release
(canvaskit is required for this app). (2) Ensure the Firebase web
app is registered in Firebase Console and
firebase_options.dart has web options. (3) Check
browser console for CORS errors — add your web domain to
config/cors.php's allowed origins. (4) Deploy the
build/web/ folder to your server's
public/ directory or a subdomain.
Lamat Dating App v5.0.0+50 · Documentation v1.0